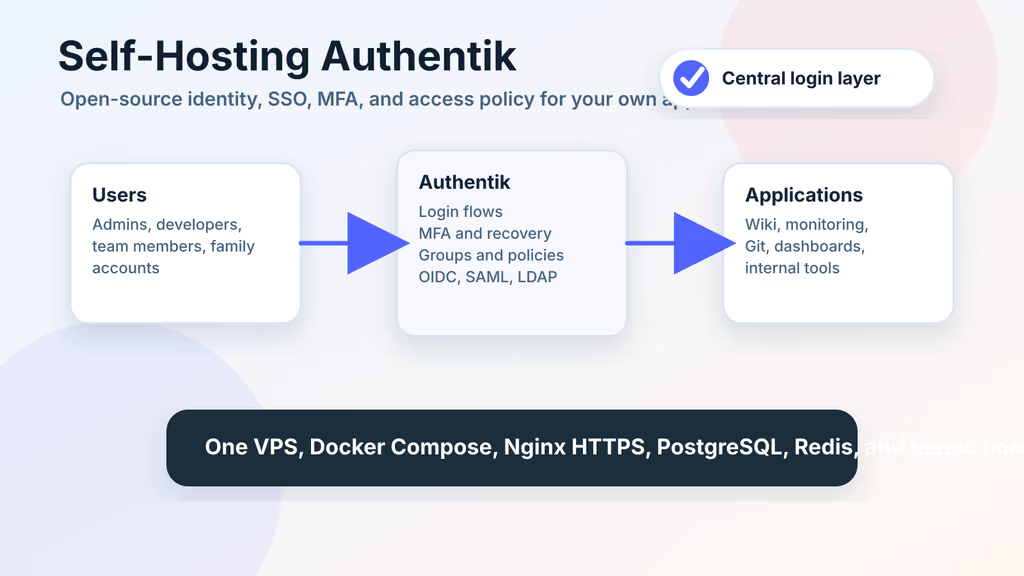
Caption: Authentik on my VPS — one sign-in layer for the apps I already self-host.
Introduction
I wanted one identity box for the wikis, monitors, and admin UIs on my network — not a new local user in every container. Authentik is the IdP I put on Ubuntu 24.04: OIDC, OAuth2, SAML, LDAP, forward auth, MFA, groups.
If Authentik is down, those apps may be unreachable. I treat it like DNS: backup, MFA on admin, a recovery path that does not require Authentik to be healthy.
On a fresh box this install is famous for /if/flow/initial-setup/ returning 404 while PostgreSQL and migrations are still running. I waited, watched docker compose logs --since=5m server worker, then the setup flow appeared. The other wall is CSRF on login when Nginx does not pass Host / X-Forwarded-Proto / X-Forwarded-For, or the proxy is not in AUTHENTIK_LISTEN__TRUSTED_PROXY_CIDRS. I bound HTTP to 127.0.0.1:9000, put Nginx in front, and only then created the admin.
Why I picked Authentik
- One IdP for apps that speak OIDC, SAML, LDAP, or need a proxy login.
- Flows I can change without writing a custom auth service.
- Accounts and audit events stay on my disk.
- Official Compose: server, worker, PostgreSQL, Redis.
- Groups and policies for who can open which app.
- Outposts when something old cannot speak OIDC.
- Docs I actually keep open during upgrades.
If I only run one app, this is too much machinery. I already had a pile.
Prerequisites
Hardware:
- 2 CPU / 2 GB RAM for a small team or homelab
- 4 GB RAM if the same VPS also runs proxies and apps
- 20 GB free plus DB, media, logs, backups
- SSD for Postgres and Redis
- Off-host backup target
Software and accounts:
- Ubuntu 24.04 LTS with sudo
- Domain such as
auth.example.com - DNS
AorAAAA - Docker + Compose
- Nginx + Certbot
- SMTP for recovery and enrollment
- Password manager for
PG_PASS, secret key, bootstrap password, recovery codes
Security notes:
- Critical infra: outage equals lockout of other tools.
- HTTPS only public; container ports on localhost.
- MFA on admin before other users.
- One tested backup off this host.
- Official Compose may mount the Docker socket for outposts — that is a lot of power. I decide that on purpose.
sudo apt update
sudo apt upgrade -y
sudo apt install -y ca-certificates curl gnupg git ufw nginx certbot python3-certbot-nginx wget openssl

sudo ufw allow OpenSSH
sudo ufw allow 80/tcp
sudo ufw allow 443/tcp
sudo ufw enable
sudo ufw status
Installation Guide
Official Compose under /opt/authentik. Public URL https://auth.example.com.
1. Install Docker Engine
curl -fsSL https://get.docker.com | sudo sh
sudo usermod -aG docker "$USER"
newgrp docker

docker --version
docker compose version
Log out/in if the docker group is not active.
2. Create the Authentik Project Directory
sudo mkdir -p /opt/authentik/backups
sudo chown -R "$USER":"$USER" /opt/authentik
chmod 700 /opt/authentik/backups
cd /opt/authentik
Named volumes come from Compose. backups is staging before files leave the host.
3. Download the Official Compose File
cd /opt/authentik
wget https://docs.goauthentik.io/compose.yml
That file pins whatever Authentik version the docs served that day. On upgrades I download the Compose file the release notes point at, then pull images.
4. Generate Secrets and the Environment File
cd /opt/authentik
touch .env
chmod 600 .env

echo "PG_PASS=$(openssl rand -base64 36 | tr -d '\n')" >> .env
echo "AUTHENTIK_SECRET_KEY=$(openssl rand -base64 60 | tr -d '\n')" >> .env
echo "AUTHENTIK_ERROR_REPORTING__ENABLED=false" >> .env
echo "COMPOSE_PORT_HTTP=127.0.0.1:9000" >> .env
echo "COMPOSE_PORT_HTTPS=127.0.0.1:9443" >> .env
Localhost bind so only Nginx talks to Authentik. Secrets go in the password manager before I depend on this box.
5. Add Email Configuration
Optional on first boot; I want it before recovery matters.
read -rsp "SMTP password: " AUTHENTIK_SMTP_PASSWORD_VALUE
echo

cat >> .env <<EOF
AUTHENTIK_EMAIL__HOST=smtp.example.com
AUTHENTIK_EMAIL__PORT=587
AUTHENTIK_EMAIL__USERNAME=auth@example.com
AUTHENTIK_EMAIL__PASSWORD=${AUTHENTIK_SMTP_PASSWORD_VALUE}
AUTHENTIK_EMAIL__USE_TLS=true
AUTHENTIK_EMAIL__FROM=auth@example.com
EOF

nano .env
Real SMTP values before up. Port 465 implicit TLS: AUTHENTIK_EMAIL__USE_SSL=true instead of USE_TLS — not both.
6. Start Authentik
cd /opt/authentik
docker compose pull
docker compose up -d
docker compose ps
docker compose logs --since=2m server worker
Server on 9000 HTTP / 9443 HTTPS locally. Worker runs background jobs.
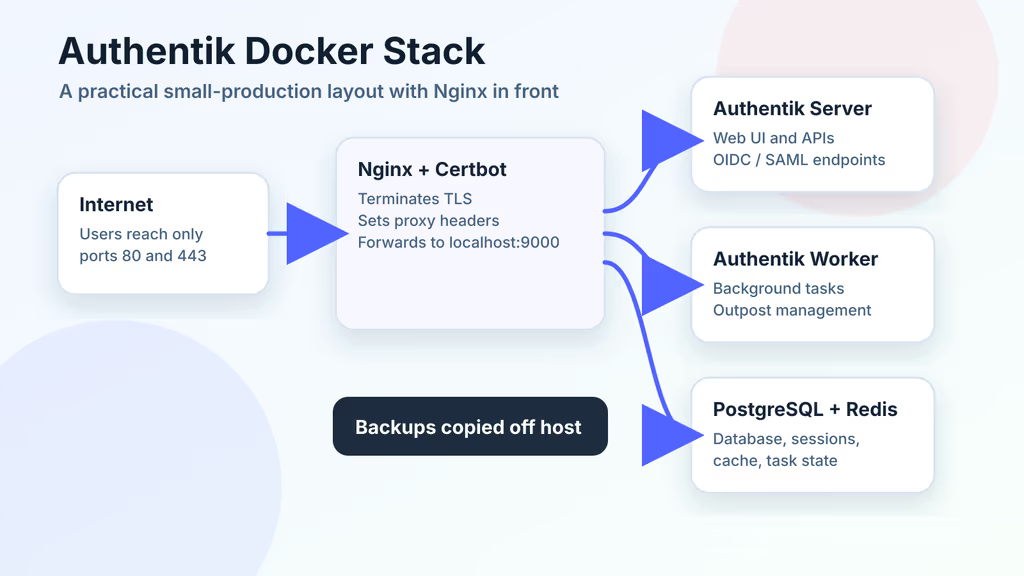
Caption: Nginx on 443; server, worker, Postgres, Redis stay in Compose.
7. Configure Nginx and HTTPS
/etc/nginx/sites-available/auth.example.com:
server {
    listen 80;
    listen [::]:80;
    server_name auth.example.com;

    client_max_body_size 100M;

    location / {
        proxy_http_version 1.1;
        proxy_set_header Host $host;
        proxy_set_header X-Real-IP $remote_addr;
        proxy_set_header X-Forwarded-For $proxy_add_x_forwarded_for;
        proxy_set_header X-Forwarded-Proto $scheme;
        proxy_set_header Upgrade $http_upgrade;
        proxy_set_header Connection "upgrade";
        proxy_pass http://127.0.0.1:9000;
    }
}
sudo ln -s /etc/nginx/sites-available/auth.example.com /etc/nginx/sites-enabled/
sudo nginx -t
sudo systemctl reload nginx
sudo certbot --nginx -d auth.example.com
If I see a login or setup page, TLS is working.
8. Complete the Initial Setup
https://auth.example.com/if/flow/initial-setup/
First admin, recovery codes saved, MFA on immediately. System > Tenants: external URL = https://auth.example.com.
Configuration
Verify Runtime Configuration
cd /opt/authentik
docker compose run --rm worker ak dump_config
I run this after .env edits. Apply with:
docker compose up -d
Trusted Proxy and Real Client IPs
Default trusted CIDRs include localhost. Nginx on the same host connects from 127.0.0.1, so forwarded headers should work. If Nginx moves to another host, I set AUTHENTIK_LISTEN__TRUSTED_PROXY_CIDRS to that network only.
Docker Socket Review
Official Compose may mount /var/run/docker.sock on the worker for outposts. Convenient, powerful. If I am not deploying outposts automatically, I remove the mount or put a Docker Socket Proxy in front, as Authentik documents.
Backups
Postgres is the brain. I also copy .env, Compose, and media:
cd /opt/authentik
mkdir -p backups
BACKUP_DATE="$(date +%F-%H%M%S)"

docker compose exec -T postgresql pg_dumpall -U authentik > "backups/authentik-postgres-${BACKUP_DATE}.sql"
cp compose.yml ".env" backups/
docker run --rm \
  -v authentik_media:/media:ro \
  -v "$PWD/backups:/backup" \
  alpine tar czf "/backup/authentik-media-${BACKUP_DATE}.tar.gz" -C /media .

tar czf "backups/authentik-config-${BACKUP_DATE}.tar.gz" compose.yml .env
rsync -av --progress /opt/authentik/backups/ backup-user@backup.example.com:/srv/backups/authentik/
Restore on another host once. Until then it is a guess.
Usage
First Login Checklist
- Admin logs in at
https://auth.example.com. - MFA on that user.
- Second emergency admin, recovery stored elsewhere.
- Test SMTP (recovery or invite).
- Tenant branding, domain, default flows.
- Groups:
admins,developers,read-only-users. - One non-admin test user before the rest of the team.
Create an OIDC Provider for an Application
Application first, then OAuth2/OpenID provider.
Example for docs at https://docs.example.com:
- Application name:
Docs - Slug:
docs - Launch URL:
https://docs.example.com - Redirect URI:
https://docs.example.com/oauth/callback - Subject mode: whatever that app's docs say
- Signing key: default unless I have a reason not to
Client ID, secret, issuer, authorize, token, userinfo into the app. Issuer is usually:
https://auth.example.com/application/o/docs/
Redirect URI and claims follow the application's OIDC docs, not my guess.
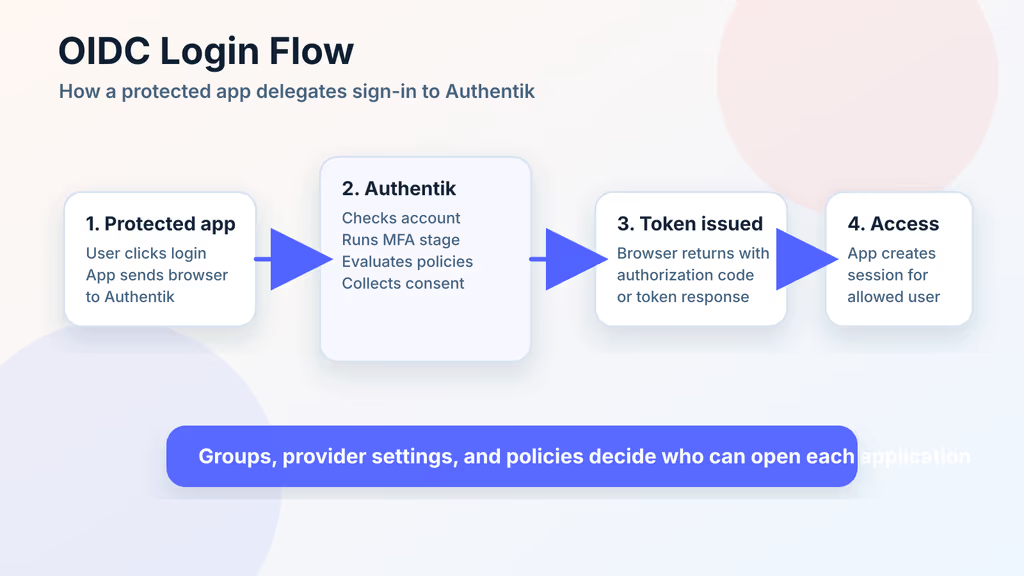
Caption: App redirects here, Authentik checks policy and MFA, token goes back.
Protect a Legacy Web App
Proxy outpost in front of something that cannot do OIDC. Headers become the trust boundary. I start with a low-risk dashboard, confirm logout, and write down which headers the upstream sees.
Where it broke
On a fresh Ubuntu 24.04 box this is the failure Authentik's first boot is famous for.
1. Initial setup URL returns 404
https://auth.example.com/if/flow/initial-setup/ 404'd. Official troubleshooting: migrations still running. First boot can take several minutes.
cd /opt/authentik
docker compose logs --since=5m server worker
docker compose ps
I wait until server/worker are healthy, then hit the setup URL again. If Nginx 502s instead, the server container is not up or proxy_pass is not http://127.0.0.1:9000.
2. CSRF errors on login
Login posted and Authentik complained about CSRF. Nginx must pass Host, X-Forwarded-Proto, and X-Forwarded-For. If the proxy is not on localhost, I set AUTHENTIK_LISTEN__TRUSTED_PROXY_CIDRS to that proxy network.
OIDC "redirect mismatch" is scheme + host + path + trailing slash, character-for-character with the app. Users who can log in but cannot open an app: assignments, groups, provider bindings, events in the admin UI — not a Compose bug. Missing admin group: Authentik's own troubleshooting docs, not hand-edits to Postgres.
Troubleshooting
- Email not delivered: host, port, TLS vs SSL, user, password, From. Some VPS providers block outbound 25; I use a relay on an allowed port.
- Outpost deploy fails: I removed the Docker socket — deploy outposts by hand or add a socket proxy with the permissions Authentik lists.
Scaling, Securing, and Next Steps
Single-host Compose is how I started. As more apps depend on it I watch container health, Postgres disk, certs, failed logins, SMTP. Upgrades: release notes, new Compose file if they say so, backup, pull, then test login and one OIDC app before I call it done.
MFA on admins, no shared admin users, groups for access, tight trusted-proxy CIDRs, Docker socket only if I mean it. I need a written path for "Authentik is down" that does not require logging into Authentik.
Conclusion
Authentik is running on my Ubuntu 24.04 VPS under /opt/authentik: official Compose, Nginx/Certbot on auth.example.com, ports on localhost, admin with MFA, Postgres dump in backups/. I can hang a first OIDC app off it.
Next I would integrate one low-risk app, invite a test user, restore the dump on a spare host, then move more services. The 404 was migrations; CSRF was proxy headers.
Did you hit the same wall?
I got stuck on /if/flow/initial-setup/ returning 404 while Authentik migrations were still running. Did you hit the same thing, or a different one — Nginx 502, CSRF after login, OIDC redirect URI mismatch? Tell me in the comments. I read them.
Need this done on your server?
I deploy and harden Laravel/CodeCanyon apps on cPanel or VPS, and offer monthly Server Watch retainers. Hire for deploy · Care plan