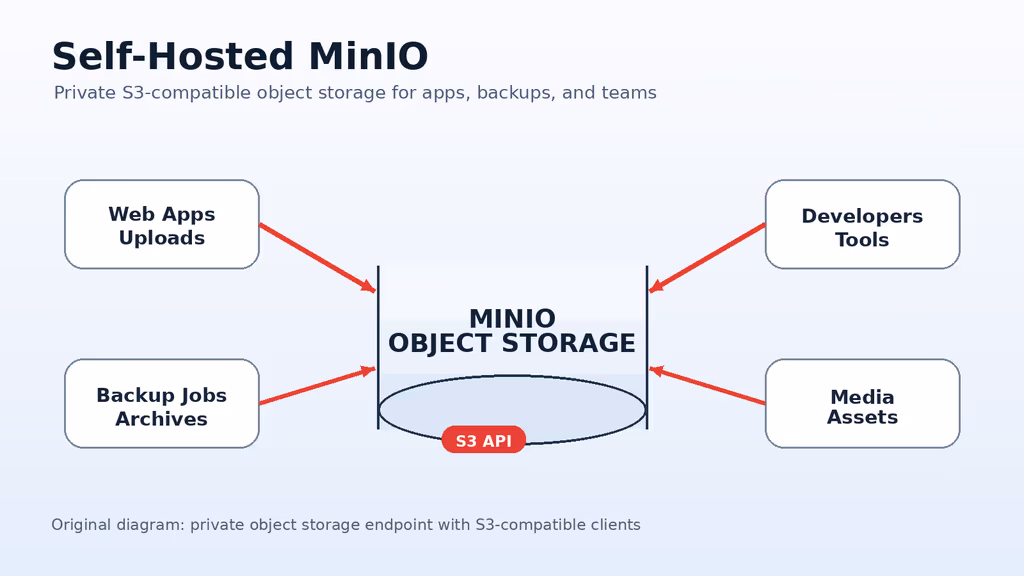
Caption: Vaultwarden provides a lightweight self-hosted backend for Bitwarden-compatible browser, desktop, and mobile clients.
Introduction
Vaultwarden is an unofficial, community-maintained server implementation for the Bitwarden client ecosystem. It gives individuals, families, agencies, and small teams a compact way to run password vault sync on infrastructure they control while continuing to use familiar Bitwarden browser extensions, mobile apps, desktop apps, and command-line tools. The project is written in Rust, stores data locally, and is popular because it needs far fewer resources than the official Bitwarden self-hosted stack.
Self-hosting a password manager is a serious operational choice. You gain control over where vault metadata, organizations, attachments, and emergency access records live, but you also accept responsibility for server patching, TLS, backups, SMTP delivery, monitoring, and restore testing. A password vault should be treated as critical infrastructure even when the service only has two or three users.
This guide installs Vaultwarden on Ubuntu 24.04 LTS using Docker Compose. The stack keeps the container bound to localhost, places Nginx in front for HTTPS, disables public signups, enables invite-based onboarding, and documents a backup process for the full /data directory. By the end, you will have a private Vaultwarden service at https://vaultwarden.example.com, a working admin page protected by a long token, and a maintenance checklist for upgrades and restores.
Why Choose Vaultwarden?
- Very small footprint: A modest VPS can run Vaultwarden comfortably because the application is lightweight and defaults to SQLite.
- Bitwarden-compatible clients: Users can point official Bitwarden apps and browser extensions at your custom server URL.
- Docker-friendly deployment: One container, one persistent data directory, and a reverse proxy are enough for many personal and small-team installations.
- Private infrastructure: Vault metadata and attachments remain on a server you control, subject to your own backup and access policies.
- Organization support: Families and small teams can share collections while still keeping individual vaults separate.
- SMTP integration: Invite emails, verification messages, and account notices can be delivered through your existing mail provider.
- Open-source community: The project has active documentation, GitHub releases, and a broad self-hosting user base.
Vaultwarden is a good fit when you want a lean password-management service and are comfortable operating a Linux server. If you need enterprise support, official vendor guarantees, or managed compliance controls, evaluate the official Bitwarden offerings before deciding.
Prerequisites
Hardware Recommendations:
- 1 CPU core and 1 GB RAM for a small personal or family instance
- 2 CPU cores and 2 GB RAM if you expect many users, frequent attachments, or other containers on the same VPS
- 10 GB free disk space to start, plus room for attachments and backups
- SSD storage, because the SQLite database and attachment metadata should not live on slow or unreliable disks
Software and Accounts:
- Ubuntu 24.04 LTS server with sudo access
- A domain such as
vaultwarden.example.com - DNS
AorAAAArecord pointing to the server - Docker Engine and the Docker Compose plugin
- Nginx and Certbot for HTTPS
- SMTP credentials for invitations and account emails
- A separate machine where you can test restoring backups
Security Notes:
- Use SSH keys, disable password-based SSH login, and keep sudo access limited.
- Expose only ports 80 and 443 to the public internet. Do not publish Vaultwarden's container port directly.
- Disable public signups after the first setup and invite users deliberately.
- Require every user to enable two-step login from their account settings.
- Back up the full
/datadirectory and test restores before storing important secrets.
Start with an updated host and a small firewall policy:
sudo apt update
sudo apt upgrade -y
sudo apt install -y ca-certificates curl gnupg git ufw nginx certbot python3-certbot-nginx

sudo ufw allow OpenSSH
sudo ufw allow 80/tcp
sudo ufw allow 443/tcp
sudo ufw enable
sudo ufw status
Installation Guide
This deployment uses Docker Compose with the official Vaultwarden container image and a local data directory. The container listens only on 127.0.0.1:8080; Nginx terminates TLS and proxies traffic to it.
1. Install Docker Engine
Install Docker from the convenience script or use Docker's official apt repository if your organization standardizes package sources:
curl -fsSL https://get.docker.com | sudo sh
sudo usermod -aG docker "$USER"
newgrp docker

docker --version
docker compose version
If newgrp docker does not refresh your shell membership, log out and back in before continuing.
2. Create the Project Directory
Use /opt/vaultwarden for the Compose file, environment file, and persistent data directory:
sudo mkdir -p /opt/vaultwarden/data
sudo chown -R "$USER":"$USER" /opt/vaultwarden
cd /opt/vaultwarden
chmod 700 data
The data directory is the important part of the service. It stores the SQLite database, attachments, icon cache, sends, and cryptographic files. Include it in every backup.
3. Generate an Admin Token and Environment File
The admin page controls server-wide settings. Protect it with a long random token, store that token in a password manager, and avoid sending it through chat or tickets.
cd /opt/vaultwarden
ADMIN_TOKEN_VALUE="$(openssl rand -base64 48 | tr -d '\n')"
read -rsp "SMTP password: " SMTP_PASSWORD_VALUE
echo

cat > .env <<EOF
DOMAIN=https://vaultwarden.example.com
ADMIN_TOKEN=${ADMIN_TOKEN_VALUE}
SIGNUPS_ALLOWED=false
INVITATIONS_ALLOWED=true
SMTP_HOST=smtp.example.com
SMTP_FROM=vaultwarden@example.com
SMTP_PORT=587
SMTP_SECURITY=starttls
SMTP_USERNAME=vaultwarden@example.com
SMTP_PASSWORD=${SMTP_PASSWORD_VALUE}
LOG_LEVEL=warn
EOF

chmod 600 .env
For a hardened production setup, generate an Argon2id hash for the admin token as described in the Vaultwarden admin-page documentation, then store the hash in ADMIN_TOKEN. The random token above is useful for a clear first boot, but a hashed token is safer if the environment file is accidentally exposed.
4. Create the Docker Compose File
Create compose.yaml:
services:
  vaultwarden:
    image: vaultwarden/server:latest
    container_name: vaultwarden
    restart: unless-stopped
    env_file:
      - .env
    volumes:
      - ./data:/data
    ports:
      - "127.0.0.1:8080:80"
Pull and start the service:
cd /opt/vaultwarden
docker compose pull
docker compose up -d
docker compose ps
docker compose logs --since=2m vaultwarden
Vaultwarden should now answer locally on port 8080. Do not open this port in the firewall; the public endpoint should be HTTPS through Nginx.
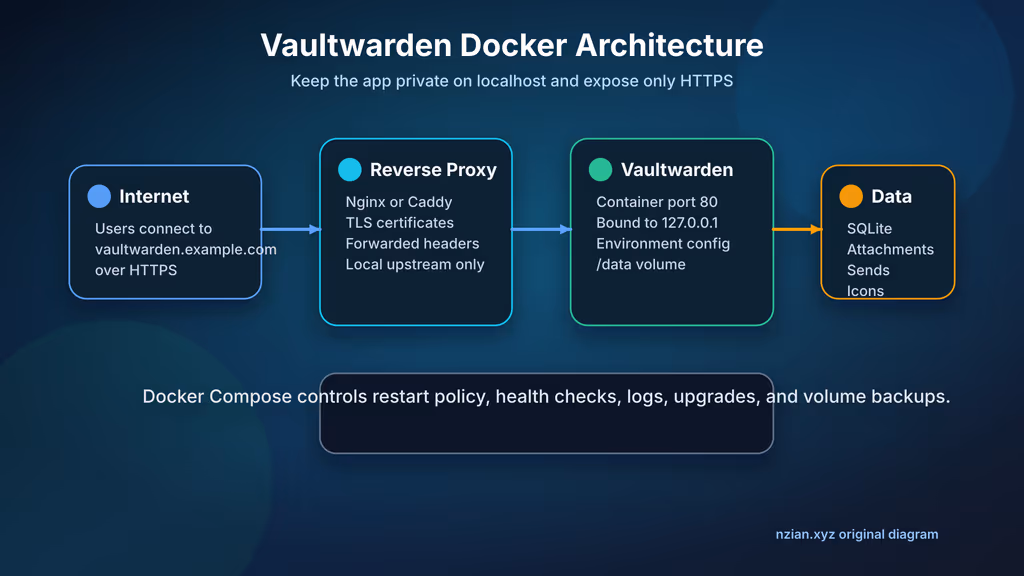
Caption: Nginx exposes HTTPS publicly while the Vaultwarden container remains bound to localhost with persistent data in /opt/vaultwarden/data.
5. Configure Nginx and HTTPS
Create /etc/nginx/sites-available/vaultwarden.example.com:
server {
    listen 80;
    listen [::]:80;
    server_name vaultwarden.example.com;

    client_max_body_size 128M;

    location / {
        proxy_http_version 1.1;
        proxy_set_header Host $host;
        proxy_set_header X-Real-IP $remote_addr;
        proxy_set_header X-Forwarded-For $proxy_add_x_forwarded_for;
        proxy_set_header X-Forwarded-Proto $scheme;
        proxy_set_header Upgrade $http_upgrade;
        proxy_set_header Connection "upgrade";
        proxy_pass http://127.0.0.1:8080;
    }
}
Enable the site and request a certificate:
sudo ln -s /etc/nginx/sites-available/vaultwarden.example.com /etc/nginx/sites-enabled/
sudo nginx -t
sudo systemctl reload nginx
sudo certbot --nginx -d vaultwarden.example.com
After Certbot updates the configuration, open https://vaultwarden.example.com. If the page loads, create the first account, then keep public signups disabled and invite additional users from the admin page.
Configuration
Domain and Proxy Awareness
The DOMAIN value in .env should be the final HTTPS URL users will enter in Bitwarden clients. If you change it later, update .env and restart the container:
cd /opt/vaultwarden
nano .env
docker compose up -d
docker compose logs --since=1m vaultwarden
The reverse proxy must forward Host, X-Real-IP, X-Forwarded-For, and X-Forwarded-Proto. Without those headers, login flows, admin links, and generated URLs may behave as if the service is still running on localhost.
SMTP for Invites and Account Emails
Vaultwarden can run without SMTP, but invite-based onboarding is much smoother with email configured. Use an SMTP provider that supports authenticated submission and app-specific credentials. After editing .env, restart and send a test invite:
cd /opt/vaultwarden
docker compose up -d
docker compose logs --since=5m vaultwarden
If messages do not arrive, check the SMTP host, port, TLS mode, username, password, sender address, and the sending domain's SPF, DKIM, and DMARC records. Many mail providers reject messages when the SMTP_FROM domain is not verified.
Admin Page
Visit:
https://vaultwarden.example.com/admin
Log in with the admin token from your password manager. Review these settings before inviting users:
- Confirm public registrations are disabled.
- Confirm invitations are enabled only if you plan to onboard users by email.
- Set sensible attachment limits for your storage budget.
- Review organization settings and whether users can create new organizations.
- Save a copy of any configuration changes in your operations notes.
The admin page is powerful. If possible, restrict it further with network controls, a VPN, or a reverse-proxy access rule so it is not casually reachable from every public IP.
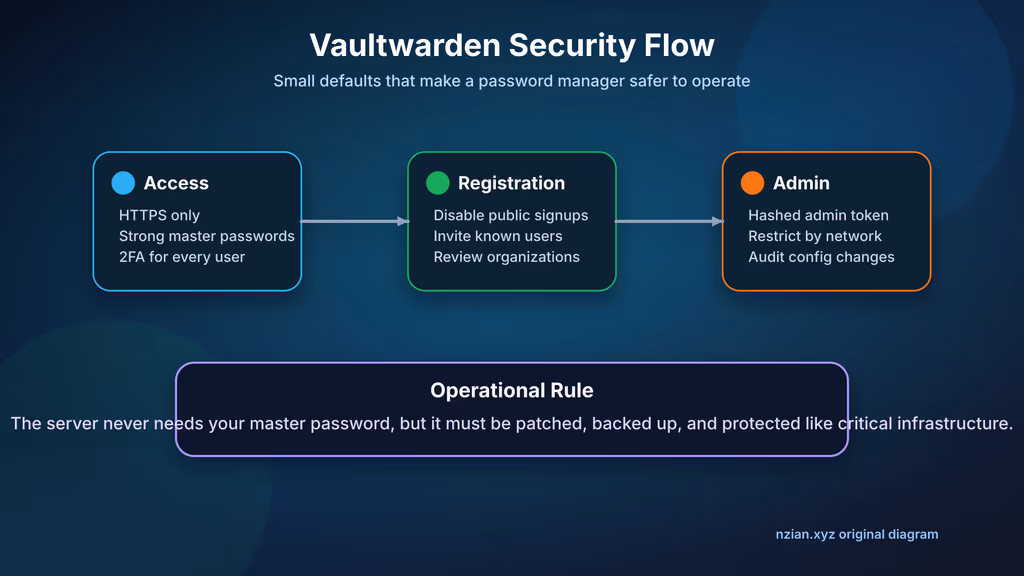
Caption: A secure Vaultwarden deployment combines HTTPS, deliberate registration controls, strong user authentication, and careful admin access.
Usage
After the server is reachable over HTTPS, users can connect Bitwarden-compatible clients to the self-hosted endpoint.
- Open the Bitwarden browser extension, desktop app, or mobile app.
- Before logging in, choose the self-hosted server option.
- Enter
https://vaultwarden.example.comas the server URL. - Create or accept the invited account.
- Enable two-step login from account settings.
- Import passwords from a browser or another password manager only after reviewing the import file locally.
- Create shared collections for family or team credentials instead of sharing individual account passwords through messages.
Run a basic acceptance checklist before trusting the instance:
- Create one test login item and confirm it syncs to a second client.
- Upload a small attachment and verify it appears in the
data/attachmentstree. - Invite a second user and confirm the SMTP message arrives.
- Create an organization collection and share one test item.
- Log out and log back in from a private browser window.
- Restart the container and confirm clients can sync afterward.
Once the workflow is verified, migrate real passwords in batches. Keep the old password manager available until every important account has been tested from the new clients.
Screenshots and Visuals
The images in this article are original diagrams created for the deployment workflow. For your internal runbook, capture your own screenshots after installation:
- Admin settings page with secrets blurred
- SMTP test invite result
- Bitwarden client server URL setting
- Organization collection layout
- Backup job output and restore notes
Avoid publishing screenshots that reveal account names, domains, collection names, SMTP addresses, or vault metadata. Even harmless-looking password manager screenshots can disclose operational structure.
Troubleshooting
- 502 Bad Gateway from Nginx: Run
docker compose psin/opt/vaultwarden, check that the container is healthy, and verify Nginx proxies tohttp://127.0.0.1:8080. - Browser shows an insecure origin warning: Confirm Certbot completed successfully and the public
DOMAINvalue starts withhttps://. - Bitwarden client cannot find the server: Set the custom server URL before login and include the full HTTPS URL without a trailing path.
- Invitations are not delivered: Recheck SMTP settings, provider security rules, verified sender domains, and spam folders.
- Uploads fail: Increase
client_max_body_sizein Nginx and confirm disk space is available under/opt/vaultwarden/data. - Admin token stops working: Inspect
.envfor accidental spaces or shell quoting problems, then restart withdocker compose up -d. - High disk usage: Review attachments and sends, rotate old backups, and monitor the data directory before the VPS fills completely.
- Upgrade looks risky: Read release notes, take a fresh backup, test the backup on another host, then pull the new image.
Scaling, Securing, and Next Steps
Backups
Back up the whole data directory, not only db.sqlite3. Attachments, sends, icon data, and key files are part of the working service.
cd /opt/vaultwarden
docker compose stop
sudo tar -czf /root/vaultwarden-backup-$(date +%F).tar.gz compose.yaml .env data
docker compose start
sudo sha256sum /root/vaultwarden-backup-$(date +%F).tar.gz
A password vault backup is sensitive. Store it encrypted, keep at least one off-site copy, and limit who can retrieve it. If your backup platform supports client-side encryption, enable it before uploading archives.
To test a restore on a separate host:
sudo mkdir -p /opt/vaultwarden
sudo tar -xzf /root/vaultwarden-backup-2026-07-01.tar.gz -C /opt/vaultwarden
sudo chown -R "$USER":"$USER" /opt/vaultwarden
cd /opt/vaultwarden
docker compose up -d
docker compose logs --since=2m vaultwarden
Log in with a test account, confirm attachments load, and verify clients can sync. A backup plan is not complete until restore testing is routine.
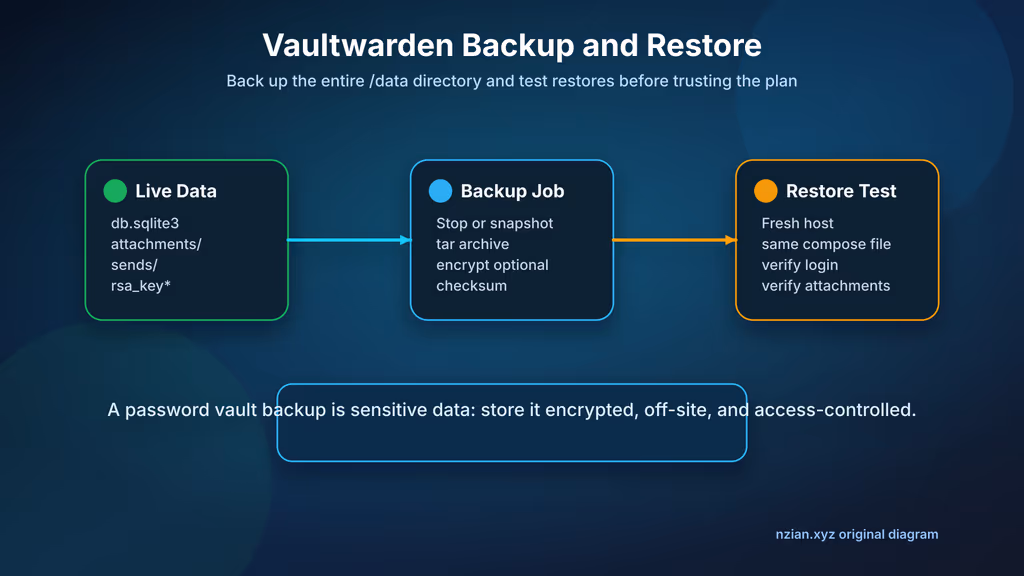
Caption: Reliable Vaultwarden operations depend on complete /data backups, protected archives, and regular restore tests.
Upgrades
Docker upgrades are straightforward, but still treat them carefully because this service protects high-value data:
cd /opt/vaultwarden
docker compose pull
docker compose up -d
docker compose logs --since=10m vaultwarden
Before major upgrades, read the release notes, verify your backup, and keep the previous image tag in your notes so you can roll back if needed. Pinning a known-good image tag can be useful for conservative environments, while latest is convenient for a small personal instance that you update deliberately.
Hardening Checklist
- Require two-step login for all accounts.
- Disable public signups and review pending invitations regularly.
- Protect
/adminwith a hashed admin token and network-level restrictions when possible. - Monitor HTTPS availability and container restarts.
- Keep Ubuntu, Docker, Nginx, and Vaultwarden patched.
- Store the admin token, SMTP password, and backup encryption key in separate secure records.
- Document restore steps where another trusted administrator can find them during an incident.
Following this guide, you end up with a private Vaultwarden installation that serves Bitwarden-compatible clients over HTTPS, keeps application data in a persistent Docker volume path, sends invite emails through SMTP, and has a repeatable backup and restore process. Next, onboard users slowly, enforce two-step login, schedule encrypted off-site backups, and practice a restore before the vault becomes the only copy of critical credentials.