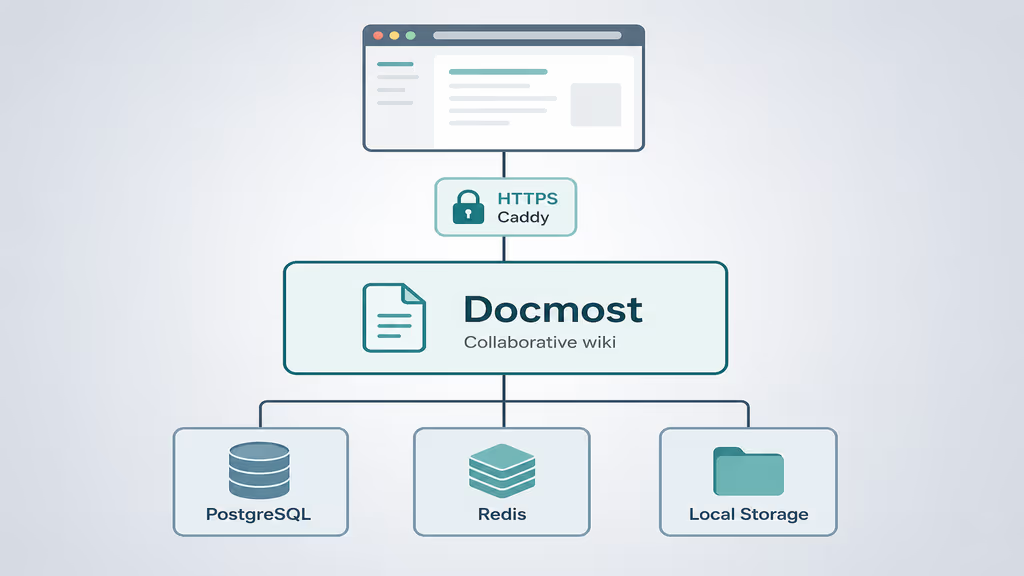
Caption: Docmost with PostgreSQL, Redis, and local files behind HTTPS on my VPS.
Why I wanted this on my server
Runbooks were scattered across Markdown files and a hosted wiki I did not want holding client notes. Docmost is a collaborative wiki: spaces, pages, permissions, real-time editing, attachments. It fits the same Compose + reverse-proxy model as the rest of this homelab — Authentik, MinIO, Gitea, scheduled backups. Writers who are not comfortable living in a Git repo still get nested pages and a live editor.
APP_SECRET is effectively an encryption key. I treat it like one. A leaked secret or a weak database password is enough to expose the workspace. I planned disk for Postgres growth and attachments before the wiki became the team source of truth.
What I actually installed
Ubuntu 24.04 LTS, official docker-compose.yml from Docmost, docmost/docmost, Postgres 18, Redis 8, Caddy for TLS and WebSockets. Project /opt/docmost. URL https://docmost.example.com. App bound to 127.0.0.1:3000 for local checks; Caddy reaches docmost:3000 on the Docker network.
Hardware: 1 CPU / 2 GB / 20 GB SSD minimum for a personal or small-team deploy; 2 CPU / 4 GB / 40 GB+ if people actually edit together and attach files. Extra headroom for AI features or remote S3. Off-server dumps for Postgres and the storage volume.
Security I would not skip: replace every placeholder before the first up, APP_SECRET at least 32 characters via openssl rand -hex 32, publish only 80/443 through Caddy, keep Compose mode 600 if it holds secrets, and enable WebSockets or the editor falls back to read-only. I do not expose Postgres or Redis publicly.
Where it broke
On a fresh Ubuntu 24.04 box this install is famous for the container exiting because APP_SECRET is still REPLACE_WITH_LONG_SECRET.
Docs want at least 32 characters. I used openssl rand -hex 32, recreated the app, and it stayed up.
openssl rand -hex 32
docker compose logs --tail=80 docmost
Second: password authentication failed for user docmost. POSTGRES_PASSWORD and the password inside DATABASE_URL must match. If you change only one after the volume already initialized, Postgres still has the old role password. Align both, or in a lab docker compose down -v after a backup you accept losing.
Third: editor read-only. Real-time needs WebSockets. Caddy reverse_proxy docmost:3000 does that without extra headers. Nginx/Traefik need Upgrade and Connection. Two browsers on the same page is the test.
URL-encode @, #, / in the database password inside DATABASE_URL.
Other documented issues: setup page never loads — docker compose logs docmost, DNS, UFW 80/443, curl to /api/health. Invites never arrive — SMTP variables, TLS for the provider, MAIL_FROM_ADDRESS allowed by the mail host. Wrong public links — APP_URL exactly https://docmost.example.com with no trailing-slash mismatch. Disk filling — attachments on the docmost volume and page history in Postgres. Certificate errors on first boot — DNS must already point here; wait for Caddy logs to show issuance. Do not change POSTGRES_PASSWORD on a live volume without updating the database role. Rotate APP_SECRET only with a backup and a plan.
Optional mail variables are in the Compose example so invitations work on day one. If I skip SMTP for a lab, I create the owner during setup and accept that invites wait.
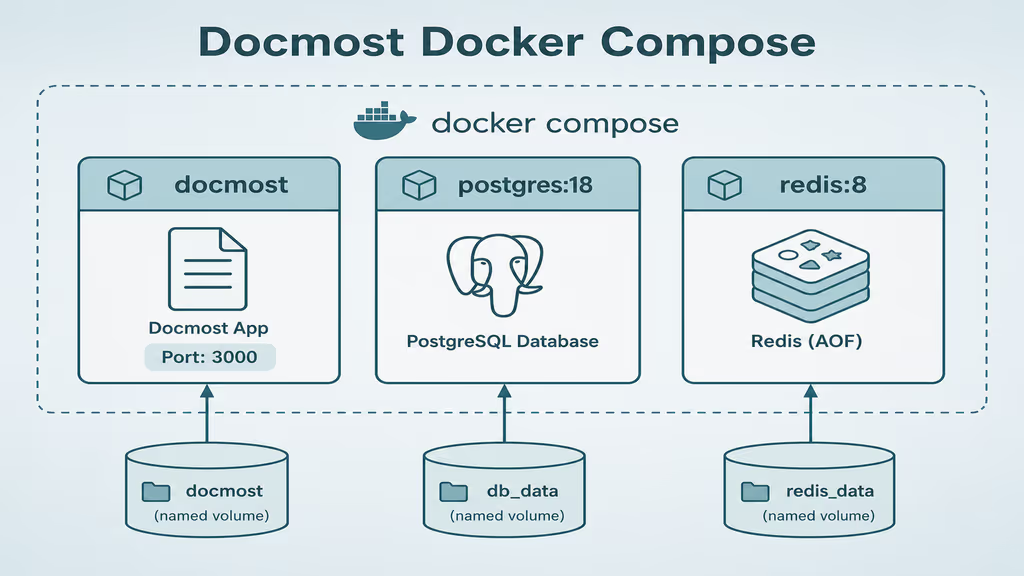
Caption: App, Postgres 18, Redis 8, named volumes.
The working install
sudo apt update
sudo apt upgrade -y
sudo apt install -y ca-certificates curl gnupg openssl ufw

sudo ufw allow OpenSSH
sudo ufw allow 80/tcp
sudo ufw allow 443/tcp
sudo ufw enable
sudo ufw status
1. Install Docker Engine
Docmost’s prerequisites match Docker’s official Ubuntu packages:
sudo apt-get update -qqy
sudo apt-get install ca-certificates curl -qqy
sudo install -m 0755 -d /etc/apt/keyrings
sudo curl -fsSL https://download.docker.com/linux/ubuntu/gpg -o /etc/apt/keyrings/docker.asc
sudo chmod a+r /etc/apt/keyrings/docker.asc

echo \
  "deb [arch=$(dpkg --print-architecture) signed-by=/etc/apt/keyrings/docker.asc] https://download.docker.com/linux/ubuntu \
  $(. /etc/os-release && echo "$VERSION_CODENAME") stable" | \
  sudo tee /etc/apt/sources.list.d/docker.list > /dev/null

sudo apt-get update -qqy
sudo apt-get install docker-ce docker-ce-cli containerd.io docker-compose-plugin -qqy

sudo usermod -aG docker "$USER"
newgrp docker

docker --version
docker compose version
2. Download the official Compose file
sudo mkdir -p /opt
sudo chown "$USER":"$USER" /opt
cd /opt

mkdir docmost
cd docmost
curl -O https://raw.githubusercontent.com/docmost/docmost/main/docker-compose.yml
chmod 600 docker-compose.yml
3. Generate secrets and edit Compose
openssl rand -hex 32
openssl rand -base64 24
For HTTPS behind Caddy, APP_URL is HTTPS and the Postgres password matches in both places:
services:
  docmost:
    image: docmost/docmost:latest
    depends_on:
      - db
      - redis
    environment:
      APP_URL: "https://docmost.example.com"
      APP_SECRET: "PASTE_OPENSSL_HEX_SECRET_HERE"
      DATABASE_URL: "postgresql://docmost:YOUR_STRONG_DB_PASSWORD@db:5432/docmost"
      REDIS_URL: "redis://redis:6379"
      MAIL_DRIVER: "smtp"
      SMTP_HOST: "smtp.example.com"
      SMTP_PORT: "587"
      SMTP_USERNAME: "docs@example.com"
      SMTP_PASSWORD: "YOUR_SMTP_PASSWORD"
      SMTP_SECURE: "false"
      MAIL_FROM_ADDRESS: "docs@example.com"
      MAIL_FROM_NAME: "Docmost"
      DISABLE_TELEMETRY: "true"
    # Bound only for local checks; Caddy will reach docmost:3000 on the Docker network
    ports:
      - "127.0.0.1:3000:3000"
    restart: unless-stopped
    volumes:
      - docmost:/app/data/storage
  db:
    image: postgres:18
    environment:
      POSTGRES_DB: docmost
      POSTGRES_USER: docmost
      POSTGRES_PASSWORD: YOUR_STRONG_DB_PASSWORD
    restart: unless-stopped
    volumes:
      - db_data:/var/lib/postgresql
  redis:
    image: redis:8
    command: ["redis-server", "--appendonly", "yes", "--maxmemory-policy", "noeviction"]
    restart: unless-stopped
    volumes:
      - redis_data:/data

volumes:
  docmost:
  db_data:
  redis_data:
Skip SMTP in a lab if you must; invite flows will not work until mail is configured.
4. Add Caddy for HTTPS and WebSockets
cat > /opt/docmost/Caddyfile <<'EOF'
docmost.example.com {
    reverse_proxy docmost:3000
}
EOF
Add under services: and volumes::
  caddy:
    image: caddy:2
    ports:
      - "80:80"
      - "443:443"
    volumes:
      - ./Caddyfile:/etc/caddy/Caddyfile:ro
      - caddy_data:/data
      - caddy_config:/config
    depends_on:
      - docmost
    restart: unless-stopped
  caddy_data:
  caddy_config:
DNS must already point here before first start so Caddy can issue a cert.
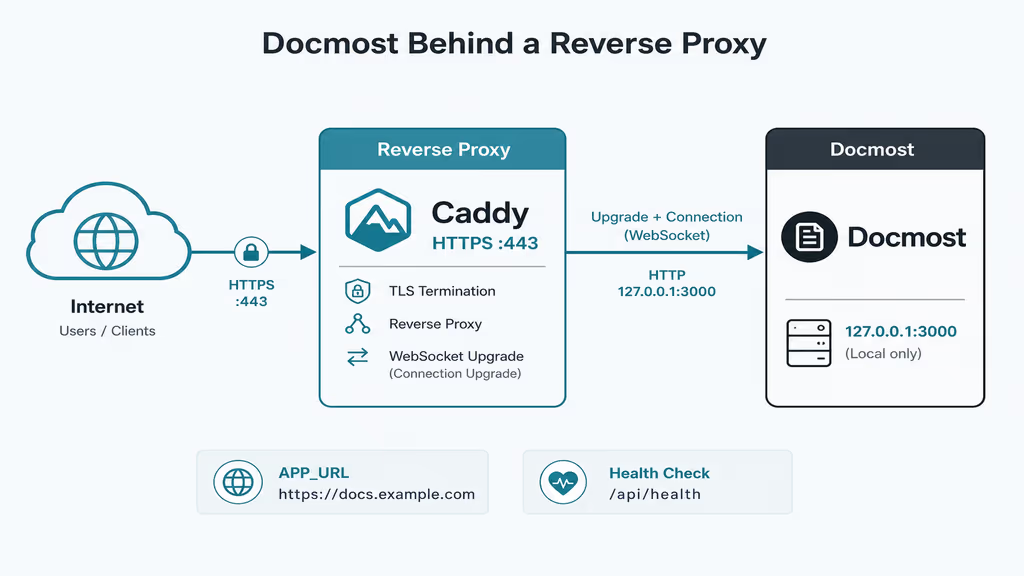
Caption: Caddy on 443 to Docmost on the Docker network so live editing works.
5. Start the stack
cd /opt/docmost
docker compose pull
docker compose up -d
docker compose ps
docker compose logs --tail=80 docmost
curl -sS http://127.0.0.1:3000/api/health
Open https://docmost.example.com, create the first workspace and owner.
Configuration
APP_URL must match the browser URL (scheme and host). Wrong APP_URL breaks cookies, invites, and shared links.
Do not change POSTGRES_PASSWORD on a live volume without updating the database role.
Storage defaults to the docmost volume. S3: STORAGE_DRIVER=s3 plus AWS_S3_*. Azure: STORAGE_DRIVER=azure. Health: https://docmost.example.com/api/health.
cd /opt/docmost
docker compose up -d
docker compose logs --tail=100 docmost
Important Infortmation
Redis is not optional for the collaborative editor. Postgres holds pages; Redis is what live editing rides on. A “healthy” app with a dead Redis looks like a read-only wiki. I would not have guessed that from the setup page.
/api/health is the monitor target. I pointed Uptime Kuma at it after the first cert succeeded.
Usage
- Owner setup, a Space, nested pages.
- Invite by email once SMTP works.
- Two browsers on one page — if read-only, fix WebSockets.
- Upload a file; recreate the app container; confirm the file remains.
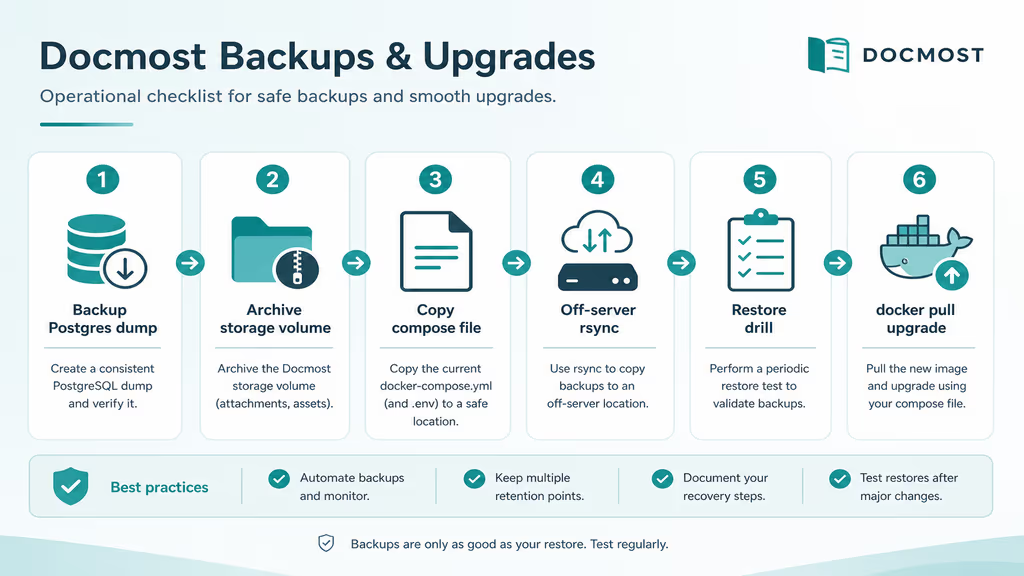
Caption: Postgres dump, storage volume, Compose secrets, restore drill.
Backup, expose, next step
sudo tee /opt/docmost/backup.sh >/dev/null <<'EOF'
#!/usr/bin/env bash
set -euo pipefail

cd /opt/docmost
stamp="$(date -u +%Y%m%dT%H%M%SZ)"
mkdir -p backups

docker compose exec -T db pg_dump -U docmost docmost | gzip > "backups/docmost-db-${stamp}.sql.gz"
docker run --rm \
  -v docmost_docmost:/data:ro \
  -v /opt/docmost/backups:/backups \
  alpine:3.20 \
  tar -czf "/backups/docmost-storage-${stamp}.tar.gz" -C /data .
mkdir -p "backups/docmost-config-${stamp}"
cp -a docker-compose.yml Caddyfile "backups/docmost-config-${stamp}/"

find backups -type f -mtime +14 -delete
EOF

sudo chmod 700 /opt/docmost/backup.sh
/opt/docmost/backup.sh
rsync -avz /opt/docmost/backups/ backup-user@backup.example.net:/srv/backups/docmost/
Dump without storage = broken uploads. Storage without Postgres = empty wiki.
cd /opt/docmost
/opt/docmost/backup.sh
docker pull docmost/docmost:latest
docker compose up --force-recreate --build docmost -d
docker compose logs --tail=120 docmost
curl -sS http://127.0.0.1:3000/api/health
I would pin a digest instead of latest for a shared workspace.
What I have running now: Docmost behind Caddy, Postgres 18, Redis 8, a 32-character APP_SECRET, live editing in two browsers. Health checks hit /api/health. Next: SMTP invites, spaces per team, restore steps written inside the wiki itself, watch disk, pin a digest instead of latest for a shared workspace. I have not moved attachments to S3 yet. When a disk fills, I would rather have a dump plus storage tarball than a Compose file and a prayer.
Did you hit the same wall?
I got stuck on the app exiting because APP_SECRET was still the placeholder (needs 32+ characters), then a read-only editor until WebSockets worked. Did you hit the same thing, or a different one — DATABASE_URL vs POSTGRES_PASSWORD, Caddy certs, invite mail? Tell me in the comments. I read them.
Need this done on your server?
I deploy and harden Laravel/CodeCanyon apps on cPanel or VPS, and offer monthly Server Watch retainers. Hire for deploy · Care plan