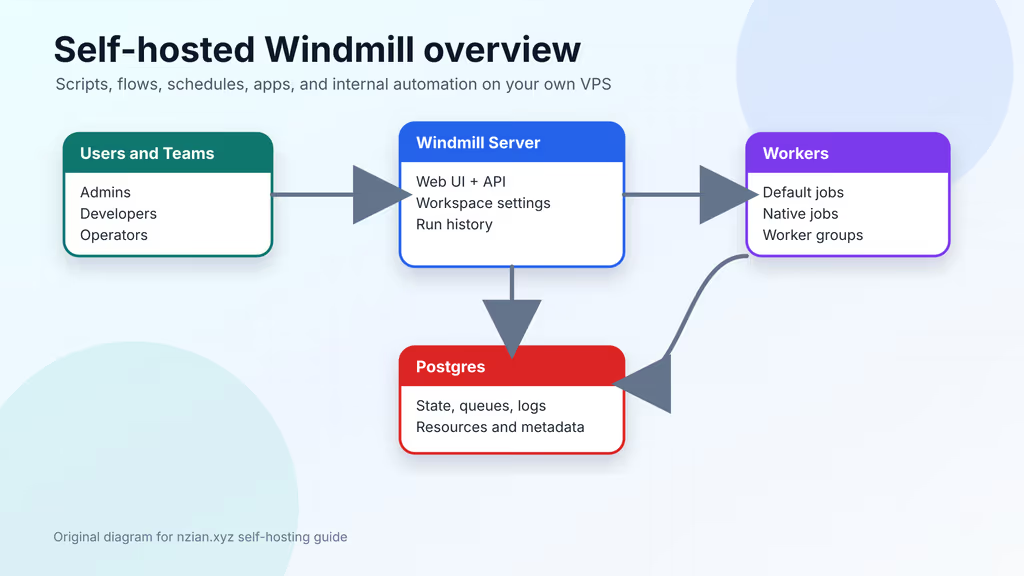
Caption: Windmill on my VPS: web UI, API server, workers, Postgres queues, and Caddy in front.
Why I wanted this on my server
I had cron jobs in three home directories and a couple of “temporary” Bash files I was afraid to delete. I wanted one UI where I could see the last run, the log, and whether the job actually finished. Windmill is a script-first automation platform: Python, TypeScript, Bash, SQL, plus schedules, forms, secrets as resources, and a worker pool. That matched how I already work better than a giant Zapier clone. A team can expose scripts as flows or apps, pass typed inputs, and see failures in one browser.
I also did not want those jobs talking to private databases from a hosted SaaS. The scripts rotate credentials, hit internal health URLs, and occasionally poke Postgres. That stays on my box. Windmill can execute code, so I treat it like a CI runner or an internal admin panel: worker privileges, network access, secrets, and backups matter more than the first login screen.
What I actually installed
Ubuntu 24.04 LTS, Docker Engine with Compose v2, and the official Windmill Community Edition Compose stack under /opt/windmill. Hostname: windmill.example.com. The bundled stack is Postgres 16, windmill_server, default workers, a native worker, extra editor services, and Caddy as the public reverse proxy. I used the bundled Postgres for a single VPS; I would move to managed Postgres later if this became a team box.
Hardware I planned for: 2 vCPU / 4 GB RAM for a personal instance; 4 vCPU / 8 GB if a small team will schedule jobs. SSD for Postgres, worker logs, and dependency caches. Off-server backups on another VPS, a NAS, or an encrypted bucket. If scripts scrape or generate reports, I would add CPU before adding more worker replicas.
Security I would not skip: HTTPS before any real credential, a named admin instead of the bootstrap user, no Docker socket in workers unless every Windmill user is trusted to administer the host, .env mode 600, and a Postgres dump before upgrades. Email-on-port-25 stays closed unless I actually want mail triggers. Outbound firewall rules matter if jobs should only reach approved internal URLs.
I keep curl, jq, OpenSSL, UFW, and the PostgreSQL client on the host so I can dump the database without inventing a one-off container.
Where it broke
On a fresh Ubuntu 24.04 box this install is famous for two leftovers from the example files.
1. Caddy never issued a certificate. I downloaded the official docker-compose.yml and forgot that HTTPS is commented out. The compose file ships with # - 443:443 # Uncomment to enable HTTPS handling by Caddy. I started the stack, pointed DNS at the VPS, and curl -I https://windmill.example.com hung or failed. docker compose logs caddy showed ACME never getting a fair shot because port 443 was not published. The fix is in the official file: uncomment the 443 mapping, set BASE_URL to the real hostname, confirm UFW allows 80/443, then recreate Caddy.
cd /opt/windmill
docker compose logs --since=10m caddy
curl -I https://windmill.example.com
If DNS is wrong, fix DNS first. Caddy cannot mint a cert for a hostname that does not hit this box.
2. I almost left changeme everywhere. The example .env uses postgres:changeme@db. The first browser login is documented as:
admin@windmill.dev
changeme
That is bootstrap only. I generated a real database password, patched both .env and POSTGRES_PASSWORD in Compose, created a named admin after login, and stored recovery details in the password manager. If you skip that, you have a public automation runner with the example password.
If you later swap Caddy for Nginx, the extra service websocket routes (/ws/*) are easy to drop. The official Caddyfile already forwards them. Missing those routes looks like “HTTPS works but the editor is dead.”
Other failures I kept in the runbook, from official troubleshooting and GitHub issues rather than a unique screenshot: docker compose config failing after a sloppy YAML indent — I run that before every restart. Managed Postgres that cannot create Windmill’s roles — initialize windmill_admin / windmill_user with a privileged user first. Workers eating RAM — cut replicas, split heavy jobs into a group, inspect run logs. Jobs that cannot reach an internal URL — Docker DNS, host firewall, VPN, egress. Default login still working after setup — create and verify the named admin, then finish instance setup so admin@windmill.dev is not the operational account. Backups that restore but jobs fail — .env, resource names, worker groups, and external credentials have to come back with the dump.
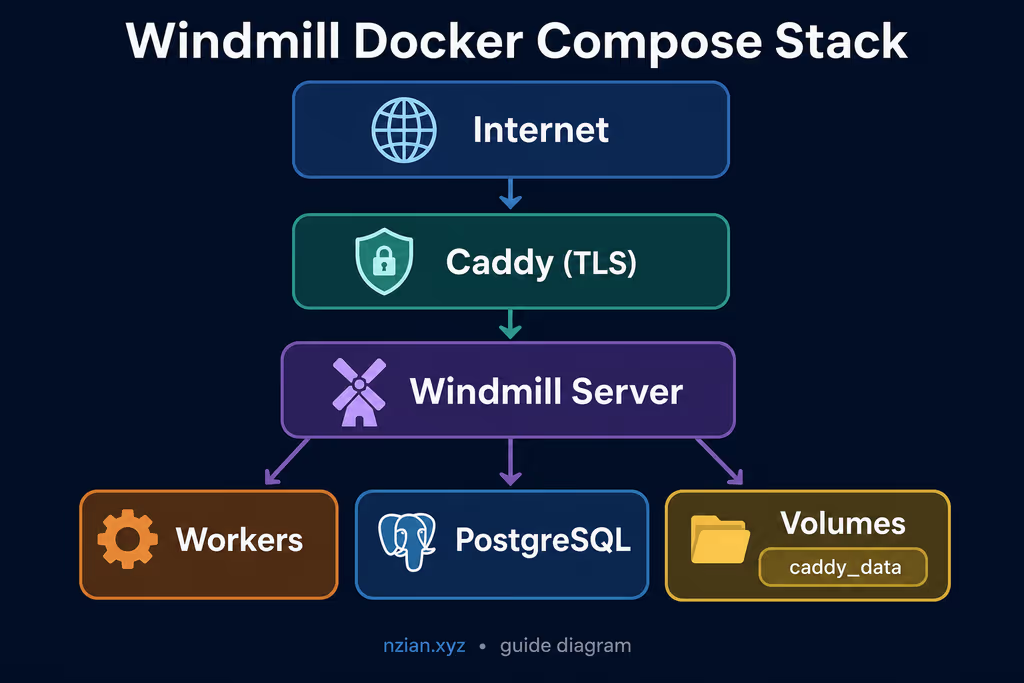
Caption: Official stack: Postgres, server, workers, extra editor services, Caddy, volumes.
The working install
Patch the host and open only SSH plus web ports:
sudo apt update
sudo apt upgrade -y
sudo apt install -y ca-certificates curl gnupg openssl ufw jq postgresql-client

sudo ufw allow OpenSSH
sudo ufw allow 80/tcp
sudo ufw allow 443/tcp
sudo ufw enable
sudo ufw status
1. Install Docker Engine
curl -fsSL https://get.docker.com | sudo sh
sudo usermod -aG docker "$USER"
newgrp docker

docker --version
docker compose version
If docker compose version fails, fix Docker before continuing. These examples use the v2 plugin, not the old docker-compose Python command.
2. Download the official Compose files
sudo mkdir -p /opt/windmill
sudo chown "$USER":"$USER" /opt/windmill
chmod 700 /opt/windmill
cd /opt/windmill

curl -fsSL https://raw.githubusercontent.com/windmill-labs/windmill/main/docker-compose.yml -o docker-compose.yml
curl -fsSL https://raw.githubusercontent.com/windmill-labs/windmill/main/Caddyfile -o Caddyfile
curl -fsSL https://raw.githubusercontent.com/windmill-labs/windmill/main/.env -o .env

chmod 600 .env
docker compose config --services
The service list should include db, windmill_server, windmill_worker, windmill_worker_native, windmill_extra, and caddy. Read the files before you start them.
3. Set a database password and public URL
cd /opt/windmill
umask 077
WINDMILL_DB_PASSWORD="$(openssl rand -base64 48 | tr -dc 'A-Za-z0-9' | head -c 32)"

python3 - <<'PY'
from pathlib import Path
import os

password = os.environ["WINDMILL_DB_PASSWORD"]
env_path = Path(".env")
compose_path = Path("docker-compose.yml")

env_text = env_path.read_text()
env_text = env_text.replace("postgres:changeme@db", f"postgres:{password}@db")
env_path.write_text(env_text)

compose_text = compose_path.read_text()
compose_text = compose_text.replace("POSTGRES_PASSWORD: changeme", f"POSTGRES_PASSWORD: {password}")
compose_text = compose_text.replace('- BASE_URL=":80"', "- BASE_URL=windmill.example.com")
compose_text = compose_text.replace("# - 443:443 # Uncomment to enable HTTPS handling by Caddy", "- 443:443 # Enable HTTPS handling by Caddy")
compose_path.write_text(compose_text)
PY

docker compose config > /tmp/windmill-rendered.yml
Store the generated password in your password manager. If you terminate TLS at Cloudflare, a load balancer, Nginx, or Traefik, keep Caddy on an internal HTTP port and set the Windmill base URL in instance settings after login.
4. Start Windmill
cd /opt/windmill
docker compose pull
docker compose up -d
docker compose ps
Watch startup until Postgres is healthy and the server has finished migrations:
docker compose logs --since=10m db windmill_server
docker compose logs --since=10m windmill_worker windmill_worker_native windmill_extra caddy
Health from the host:
curl -fsS http://127.0.0.1/api/health/status | jq
If you configured Caddy with a public domain:
curl -I https://windmill.example.com
5. Complete first login
Open https://windmill.example.com. Use the documented bootstrap account once, then create a named administrator, set the base URL to the final HTTPS URL, sign out, and confirm the named account can log in.
Review instance URL, email settings, workspace roles, resource/secret policies, schedules and concurrency, worker groups, and log retention.
6. Size workers for the host
Official docs suggest roughly one worker per vCPU and 1–2 GB RAM per worker. On a small VPS I cut replicas before scheduling heavy jobs:
services:
  windmill_worker:
    deploy:
      replicas: 2
      resources:
        limits:
          memory: 1024M

  windmill_worker_native:
    deploy:
      replicas: 1
cd /opt/windmill
docker compose up -d
docker compose ps
Workers pull jobs from Postgres. They do not need inbound traffic from the server. If a script needs broader access than the default pool, I put it in a separate worker group on purpose.
Configuration
Three layers: Compose files, environment variables, and instance settings in the UI. I keep a copy of the edited Compose files in encrypted backup storage.
- Public URL: final HTTPS hostname.
- Database: bundled Postgres is fine for one server; managed Postgres for larger boxes. Some managed providers do not grant superuser. Run Windmill’s official role initialization script with a privileged user first, then grant
windmill_adminandwindmill_userto the app user, and setDATABASE_URLwithdbreplicas at0. - Email triggers: bundled Caddy can forward TCP 25. I leave that closed unless I actually want mail.
- Worker isolation: default sandbox for untrusted scripts. I do not mount the host Docker socket unless every Windmill user is trusted to administer the host.
- Secrets: resources, not hard-coded script values.
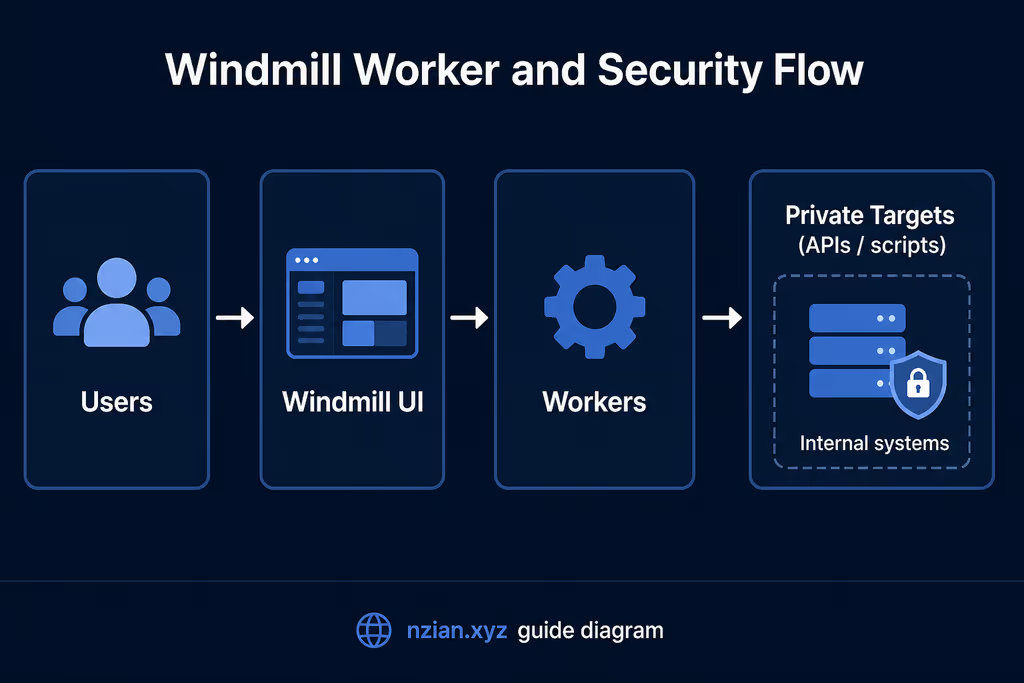
Caption: HTTPS in front, secrets in resources, jobs on workers, no extra host privileges.
Amazing feature
Worker groups. The happy-path docs get you a default pool. The thing I actually needed was splitting “harmless HTTP checks” from “jobs that hold cloud credentials.” Same UI, different workers, different network reach. I would not have guessed that from the first-run screens.
Usage
I created a workspace, a script that hits a harmless health URL, ran it by hand, then added a schedule. After that I added a test resource and a second user with limited permissions. I would not connect production CRM or cloud admin APIs until that loop works: manual run, logs, schedule, secret as a resource, and a non-admin who cannot edit instance settings.
Database maintenance jobs, browser automation, and cloud administration should not share the default worker pool. I would rather have an extra group than one compromised script with the same network as backups.
cd /opt/windmill

docker compose ps
docker compose logs --since=30m windmill_server
docker compose logs --since=30m windmill_worker
curl -fsS http://127.0.0.1/api/health/status | jq
Keep scripts small. Named resources over copied secrets. Explicit errors for expected failures.
Backup, expose, next step
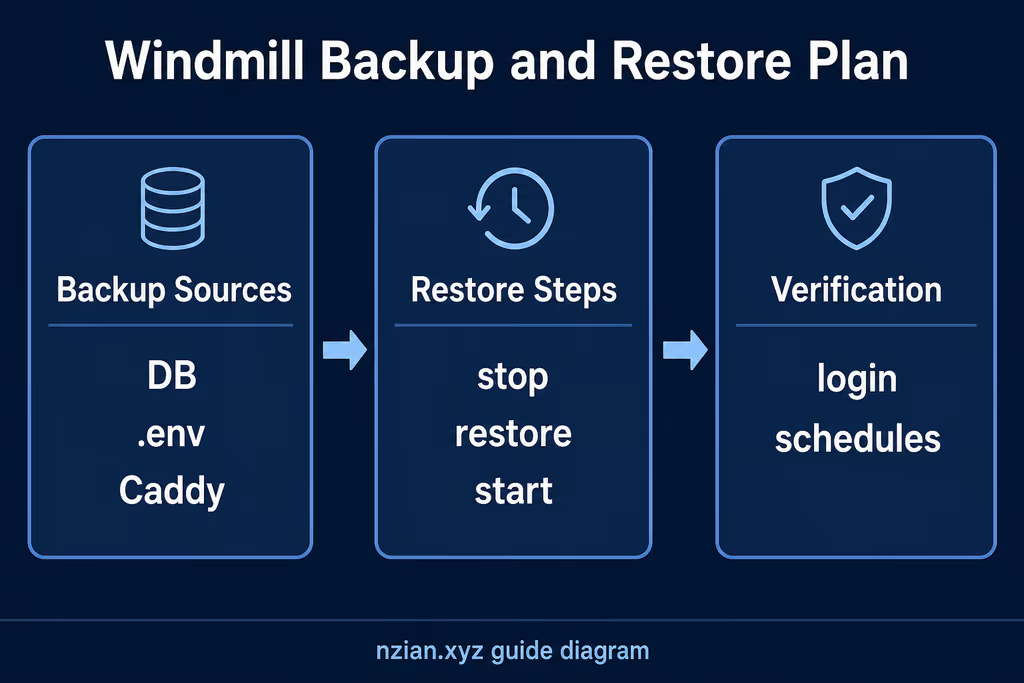
Caption: Postgres dump, Compose files, .env, Caddy state, then a restore I actually tried.
sudo mkdir -p /var/backups/windmill
sudo chmod 700 /var/backups/windmill

cd /opt/windmill
docker compose exec -T db pg_dump -U postgres windmill \
  | gzip > "/var/backups/windmill/windmill-$(date +%F).sql.gz"

find /var/backups/windmill -type f -name 'windmill-*.sql.gz' -mtime +14 -delete
Copy those archives off the server. The dump does not include how Compose was wired; back up docker-compose.yml, Caddyfile, and .env too.
cd /opt/windmill
docker compose pull
docker compose up -d
docker compose ps
curl -fsS http://127.0.0.1/api/health/status | jq
What I have running now: Windmill CE behind Caddy on Ubuntu 24.04, named admin (not the bootstrap user), two workers sized for a small VPS, and a daily Postgres dump. The health endpoint answers. Next I want SSO, monitoring on /api/health/status, and a restore rehearsal on a spare host that proves I can rebuild the queue. I still would not mount the Docker socket into workers on a shared box, and I still would not schedule a job that holds cloud credentials in the same pool as a public HTTP check.
Did you hit the same wall?
I got stuck on Caddy never publishing 443 (the commented # - 443:443 line) while the first login was still admin@windmill.dev / changeme. Did you hit the same thing, or a different one — ACME, worker memory, /ws/* behind Nginx? Tell me in the comments. I read them.
Need this done on your server?
I deploy and harden Laravel/CodeCanyon apps on cPanel or VPS, and offer monthly Server Watch retainers. Hire for deploy · Care plan