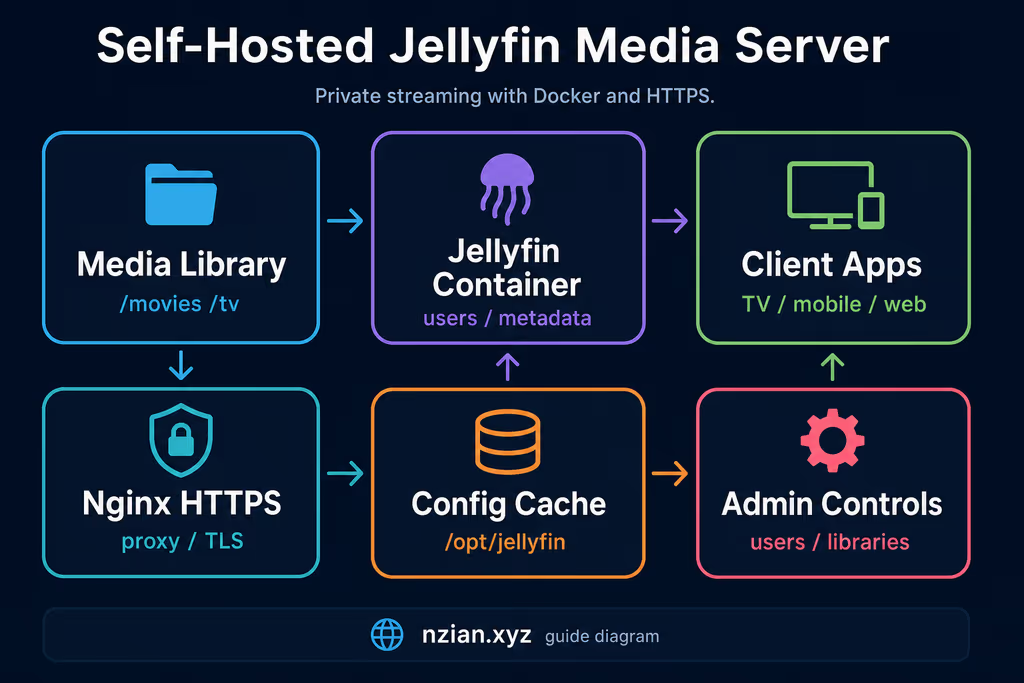
Caption: My files, Docker, Nginx, clients. UDP discovery stays on the LAN. Config under /opt/jellyfin is what I back up.
Why I wanted this on my server
I already had movies, shows, and home video on disk. I wanted a browser and TV client without a proprietary media account. Jellyfin is the open-source server: libraries, users, watched state, optional transcode.
It does not invent storage. Permissions, bandwidth, and backups of irreplaceable files are still my problem.
What I actually installed
jellyfin/jellyfin:10 under /opt/jellyfin-compose, config/cache at /opt/jellyfin, media bind-mounted read-only from /srv/media. HTTP only on 127.0.0.1:8096. Nginx HTTPS on jellyfin.example.com. Direct-play is happy on 2 vCPU / 2 GB; transcode wants more CPU or a GPU.
UDP 7359 is local discovery. I do not publish it on a public VPS.
Where it broke
On a fresh Ubuntu 24.04 box this install is famous for libraries that scan and stay empty.
The container was healthy. curl -I http://127.0.0.1:8096 worked. I added Movies pointed at /media/movies. Scan finished. Zero items.
The Compose file runs as the jellyfin system user. I had created /srv/media and chown’d it to my login. Mode u=rwX,g=rX,o= meant jellyfin could not read the files.
Logs mentioned permission errors once I looked. Fix: give the jellyfin user read on the media tree (group jellyfin, or ACLs), keep the mount read-only, rescan.
sudo chgrp -R jellyfin /srv/media
sudo chmod -R g+rX /srv/media
sudo find /srv/media -type d -exec chmod g+s {} \;
Paths inside the container still have to match: host /srv/media/movies → /media/movies in the library wizard.
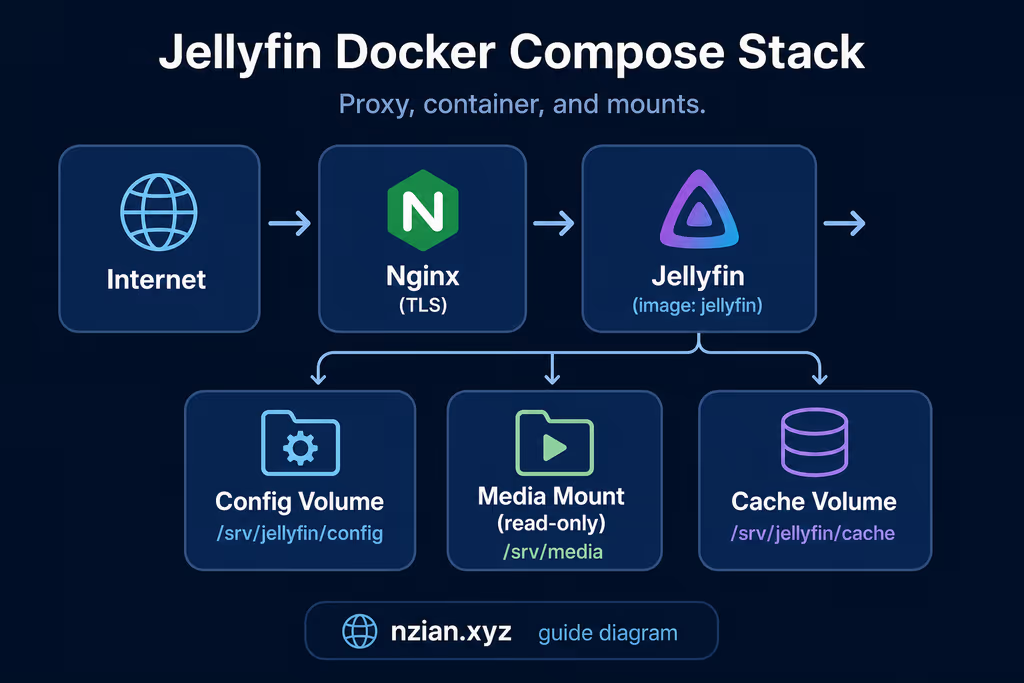
Caption: Config and cache writable. Media read-only. Localhost HTTP. Nginx on 443.
Prerequisites
Domain if this leaves the LAN. Prefer VPN if only family needs it. SSD for config/cache. Do not expose discovery ports to the internet.
sudo apt update
sudo apt upgrade -y
sudo apt install -y ca-certificates curl gnupg openssl ufw nginx certbot python3-certbot-nginx jq rsync

sudo ufw allow OpenSSH
sudo ufw allow 80/tcp
sudo ufw allow 443/tcp
sudo ufw enable
sudo ufw status
The working install
1. Install Docker Engine
curl -fsSL https://get.docker.com | sudo sh
sudo usermod -aG docker "$USER"
newgrp docker

docker --version
docker compose version
2. Create the Jellyfin user and directories
sudo useradd --system --home /opt/jellyfin --shell /usr/sbin/nologin jellyfin || true

sudo mkdir -p /opt/jellyfin/config /opt/jellyfin/cache /opt/jellyfin/fonts
sudo mkdir -p /srv/media/movies /srv/media/tv /srv/media/music /srv/media/home-videos

sudo chown -R jellyfin:jellyfin /opt/jellyfin
sudo chown -R "$USER":"$USER" /srv/media
sudo chmod 750 /opt/jellyfin
sudo chmod -R u=rwX,g=rX,o= /srv/media
After copy-in, apply the jellyfin group read from “Where it broke” if the library stays empty. Mount the real disk before Docker starts if /srv/media is a separate volume.
3. Create the Compose project
sudo mkdir -p /opt/jellyfin-compose
sudo chown "$USER":"$USER" /opt/jellyfin-compose
chmod 700 /opt/jellyfin-compose
cd /opt/jellyfin-compose

cat > .env <<EOF
JELLYFIN_UID=$(id -u jellyfin)
JELLYFIN_GID=$(id -g jellyfin)
TZ=Etc/UTC
JELLYFIN_URL=https://jellyfin.example.com
EOF

chmod 600 .env
services:
  jellyfin:
    image: jellyfin/jellyfin:10
    container_name: jellyfin
    user: "${JELLYFIN_UID}:${JELLYFIN_GID}"
    ports:
      - "127.0.0.1:8096:8096/tcp"
    volumes:
      - /opt/jellyfin/config:/config
      - /opt/jellyfin/cache:/cache
      - type: bind
        source: /srv/media
        target: /media
        read_only: true
      - type: bind
        source: /opt/jellyfin/fonts
        target: /usr/local/share/fonts/custom
        read_only: true
    environment:
      - TZ=${TZ}
      - JELLYFIN_PublishedServerUrl=${JELLYFIN_URL}
    restart: unless-stopped
Tag 10 follows the current major. After a stable week I pin a patch version.
4. Start Jellyfin
cd /opt/jellyfin-compose

docker compose config
docker compose pull
docker compose up -d
docker compose ps
curl -I http://127.0.0.1:8096
docker logs --since=10m jellyfin
If the container exits, logs first. Nginx 502 is usually “container is down,” not Certbot.
5. Configure Nginx and HTTPS
Create /etc/nginx/sites-available/jellyfin.example.com:
server {
    listen 80;
    listen [::]:80;
    server_name jellyfin.example.com;

    location / {
        return 301 https://$host$request_uri;
    }
}

server {
    listen 443 ssl;
    listen [::]:443 ssl;
    http2 on;
    server_name jellyfin.example.com;

    client_max_body_size 20M;
    ssl_protocols TLSv1.3 TLSv1.2;

    ssl_certificate /etc/letsencrypt/live/jellyfin.example.com/fullchain.pem;
    ssl_certificate_key /etc/letsencrypt/live/jellyfin.example.com/privkey.pem;
    include /etc/letsencrypt/options-ssl-nginx.conf;
    ssl_dhparam /etc/letsencrypt/ssl-dhparams.pem;

    add_header X-Content-Type-Options "nosniff";

    location / {
        proxy_pass http://127.0.0.1:8096;
        proxy_set_header Host $host;
        proxy_set_header X-Real-IP $remote_addr;
        proxy_set_header X-Forwarded-For $proxy_add_x_forwarded_for;
        proxy_set_header X-Forwarded-Proto $scheme;
        proxy_set_header X-Forwarded-Protocol $scheme;
        proxy_set_header X-Forwarded-Host $http_host;
        proxy_buffering off;
    }

    location /socket {
        proxy_pass http://127.0.0.1:8096;
        proxy_http_version 1.1;
        proxy_set_header Upgrade $http_upgrade;
        proxy_set_header Connection "upgrade";
        proxy_set_header Host $host;
        proxy_set_header X-Real-IP $remote_addr;
        proxy_set_header X-Forwarded-For $proxy_add_x_forwarded_for;
        proxy_set_header X-Forwarded-Proto $scheme;
        proxy_set_header X-Forwarded-Protocol $scheme;
        proxy_set_header X-Forwarded-Host $http_host;
    }
}
sudo certbot certonly --nginx -d jellyfin.example.com
sudo ln -s /etc/nginx/sites-available/jellyfin.example.com /etc/nginx/sites-enabled/jellyfin.example.com
sudo nginx -t
sudo systemctl reload nginx
sudo certbot renew --dry-run
VPN-only access: skip public Nginx and use the private address.
6. Complete first-run setup
Language, unique admin password, libraries at /media/movies, /media/tv, /media/music, /media/home-videos. A few test files before a 4 TB scan. Metadata language. Remote access on or off on purpose. Daily watching as a non-admin user.
Dashboard > Networking: known proxies and LAN ranges if remote rules depend on them. A base URL works; a dedicated subdomain fights fewer clients.
Very important to know
CPU at 100% during play is usually transcode, not “the VPS is too small in general.” Check whether the client direct-plays. Subtitle burn-in forces transcode. Hardware acceleration needs /dev/dri (or NVIDIA) in Compose and the matching option in Dashboard > Playback. The official image already ships jellyfin-ffmpeg.
lspci -nn | grep -Ei "3d|display|vga" || true
ls -l /dev/dri || true
    devices:
      - /dev/dri:/dev/dri
First playback I actually ran
cd /opt/jellyfin-compose

docker compose ps
docker logs --since=30m jellyfin
curl -I https://jellyfin.example.com
du -sh /opt/jellyfin/config /opt/jellyfin/cache /srv/media
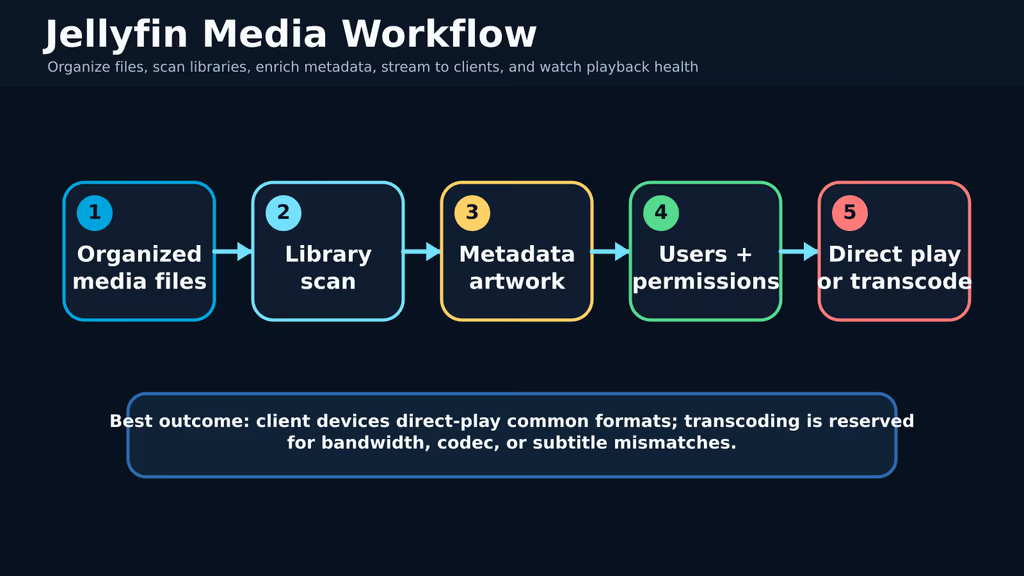
Caption: Files on disk → scan → metadata → user → direct-play or transcode. Empty library is almost always path or unix perms.
Scan, play in browser, play on a TV or phone, subtitles, remote policy, a locked-down user, active devices while something is playing.
Backup, expose, next step
/opt/jellyfin/config is users, metadata, watched state, plugins. Cache can rebuild. Media that cannot be ripped again gets its own backup tool.
sudo mkdir -p /var/backups/jellyfin
sudo chmod 700 /var/backups/jellyfin
sudo tar -C /opt -czf "/var/backups/jellyfin/jellyfin-config-$(date +%F).tar.gz" jellyfin
sudo tar -C /opt -czf "/var/backups/jellyfin/jellyfin-compose-$(date +%F).tar.gz" jellyfin-compose
sudo rsync -a --delete /var/backups/jellyfin/ backup-user@backup.example.com:/srv/backups/jellyfin/
Restore test: other machine, same config path, same media mount path, confirm users and watched state.
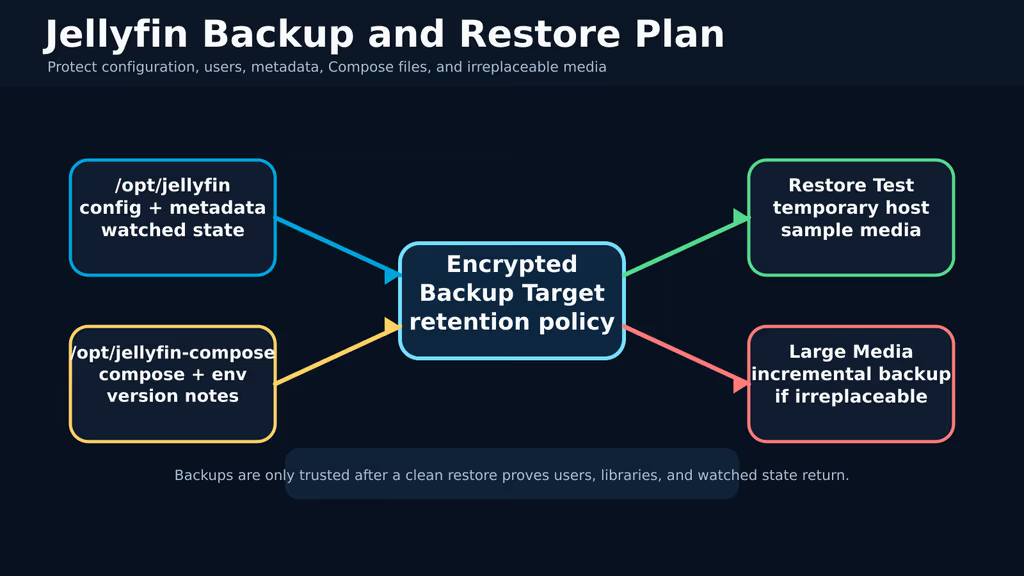
Caption: Config tarball, Compose, irreplaceable media, restore on a second host. Cache is optional.
What I have running now is Jellyfin on HTTPS, media read-only, jellyfin group able to read /srv/media, a handful of test files playing. Next I add real libraries, decide VPN vs public remote, and copy config off-box before I care about watched status.
Did you hit the same wall?
I got stuck on libraries scanning empty because the jellyfin container user could not read /srv/media after I chowned it to my login. Did you hit the same thing, or a different one? Tell me in the comments. I read them.
Need this done on your server?
I deploy and harden Laravel/CodeCanyon apps on cPanel or VPS, and offer monthly Server Watch retainers. Hire for deploy · Care plan