Caption: Ghost gives independent publishers a fast, open-source stack for articles, newsletters, memberships, and subscriptions.
Introduction
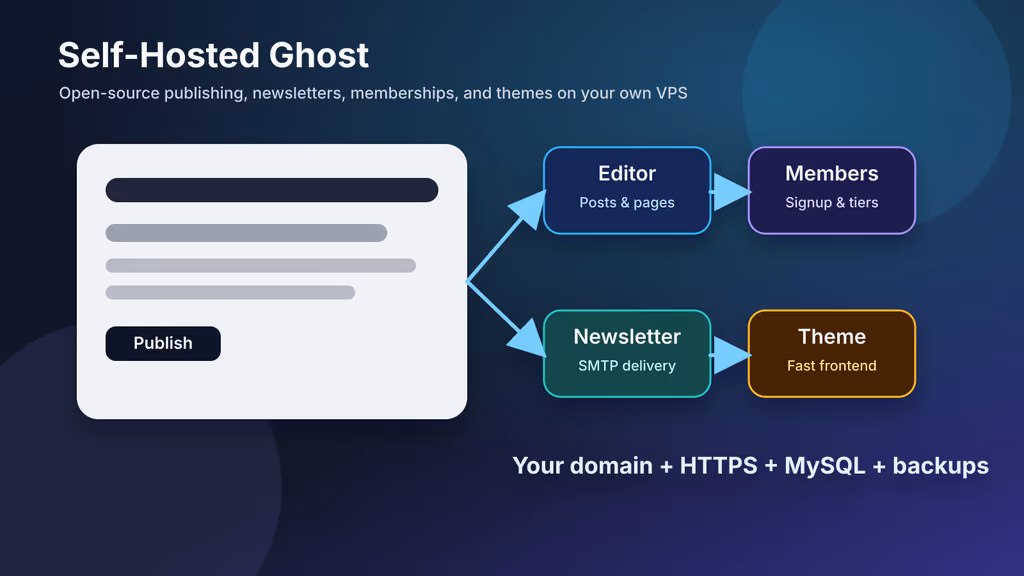
Ghost is an open-source publishing platform built for modern blogs, newsletters, membership sites, and independent media businesses. It is lighter than a general-purpose CMS, more focused than a page builder, and designed around the daily workflow of writing, editing, sending, and monetizing content. Ghost runs on Node.js, stores production data in MySQL, and provides a clean admin area at /ghost for posts, tags, members, newsletters, themes, integrations, and site settings.
Self-hosting Ghost is attractive when you want full control over infrastructure, data location, themes, email settings, and operating cost. It is also a good fit for agencies and developers who already manage VPS infrastructure for client projects. The trade-off is operational responsibility: you must secure the server, run backups, monitor uptime, patch Ghost, maintain MySQL, and keep email delivery healthy.
This guide covers two production-oriented paths on Ubuntu 24.04 LTS. The Docker Compose path uses the official Ghost image with MySQL 8 and a reverse proxy. The manual path uses the official Ghost-CLI stack with Nginx, MySQL 8, Node.js 22 LTS, and systemd. Choose Docker if you prefer containerized services and portable backups. Choose Ghost-CLI if you want the officially recommended bare-server workflow where the installer configures Nginx, SSL, and systemd for you.
Why Choose Ghost?
- Publishing-first interface: Ghost focuses on posts, pages, newsletters, members, tags, and themes instead of trying to be every kind of web application.
- Open-source core: You can inspect the code, self-host the platform, and keep your content on infrastructure you control.
- Fast Node.js runtime: Ghost is known for quick page delivery and a polished editor experience.
- Membership and newsletter support: Native members, tiers, and email newsletters reduce the number of plugins needed for a publication.
- Theme ecosystem: Handlebars themes make it practical to customize the public site while leaving the admin workflow intact.
- Docker and Ghost-CLI options: Teams can choose either a container deployment or the official Ubuntu production stack.
- Good fit for VPS hosting: A modest server can run a personal publication, company blog, or niche media site when properly maintained.
Ghost works especially well for founders, developers, writers, agencies, documentation teams, and small media projects that need a professional publishing workflow without hosting everything on a third-party SaaS.
Prerequisites
Hardware Recommendations:
- 1 CPU core and 1 GB RAM minimum for a small publication
- 2 CPU cores and 2-4 GB RAM recommended for production use, newsletters, and image-heavy sites
- 20 GB free disk space to start, with room for images, themes, database growth, and backups
- SSD storage for faster MySQL and image handling
Software and Accounts:
- Ubuntu 24.04 LTS VPS with sudo access
- A domain such as
ghost.example.com - DNS
AorAAAArecord pointing to the server - SMTP credentials for transactional email and newsletters
- Docker Engine and Docker Compose plugin for the Docker method
- Nginx, MySQL 8, Node.js 22 LTS, and Ghost-CLI for the manual method
Security Notes:
- Use SSH keys and disable password-based SSH login on production hosts.
- Keep ports 80 and 443 open for HTTPS, but do not expose MySQL to the public internet.
- Configure Ghost's
urlto the final HTTPS URL before inviting users. - Back up both the Ghost content directory and MySQL database before every major upgrade.
- Use a real SMTP provider; localhost-only mail delivery is unreliable for membership sites.
Start with an updated server and a basic firewall:
sudo apt update
sudo apt upgrade -y
sudo apt install -y ca-certificates curl gnupg git ufw

sudo ufw allow OpenSSH
sudo ufw allow 80/tcp
sudo ufw allow 443/tcp
sudo ufw enable
sudo ufw status
Installation Guide
The two methods below install the same application but organize operations differently. Use only one method on a given server unless you intentionally run separate Ghost instances on different domains and ports.
1. Docker Compose Method: Create the Project Directory
Install Docker if it is not already present:
curl -fsSL https://get.docker.com | sudo sh
sudo usermod -aG docker "$USER"
newgrp docker
docker --version
docker compose version
Create a dedicated directory:
sudo mkdir -p /opt/ghost
sudo chown "$USER":"$USER" /opt/ghost
cd /opt/ghost
2. Docker Compose Method: Define Ghost and MySQL
Create a Compose file using the official Ghost image and MySQL 8. The Ghost Docker image supports nested configuration through environment variables with double underscores.
cat > compose.yaml <<'EOF'
services:
  ghost:
    image: ghost:6-alpine
    restart: unless-stopped
    depends_on:
      - db
    ports:
      - "127.0.0.1:2368:2368"
    environment:
      url: https://ghost.example.com
      database__client: mysql
      database__connection__host: db
      database__connection__user: ghost
      database__connection__password: change-this-ghost-db-password
      database__connection__database: ghost
      mail__transport: SMTP
      mail__options__host: smtp.example.com
      mail__options__port: 587
      mail__options__secure: "false"
      mail__options__auth__user: ghost@example.com
      mail__options__auth__pass: change-this-smtp-password
    volumes:
      - ghost-content:/var/lib/ghost/content

  db:
    image: mysql:8.0
    restart: unless-stopped
    environment:
      MYSQL_ROOT_PASSWORD: change-this-root-password
      MYSQL_DATABASE: ghost
      MYSQL_USER: ghost
      MYSQL_PASSWORD: change-this-ghost-db-password
    volumes:
      - ghost-db:/var/lib/mysql

volumes:
  ghost-content:
  ghost-db:
EOF
Replace the example domain and passwords before starting. Keep the MySQL password in the Ghost service and the database service identical.
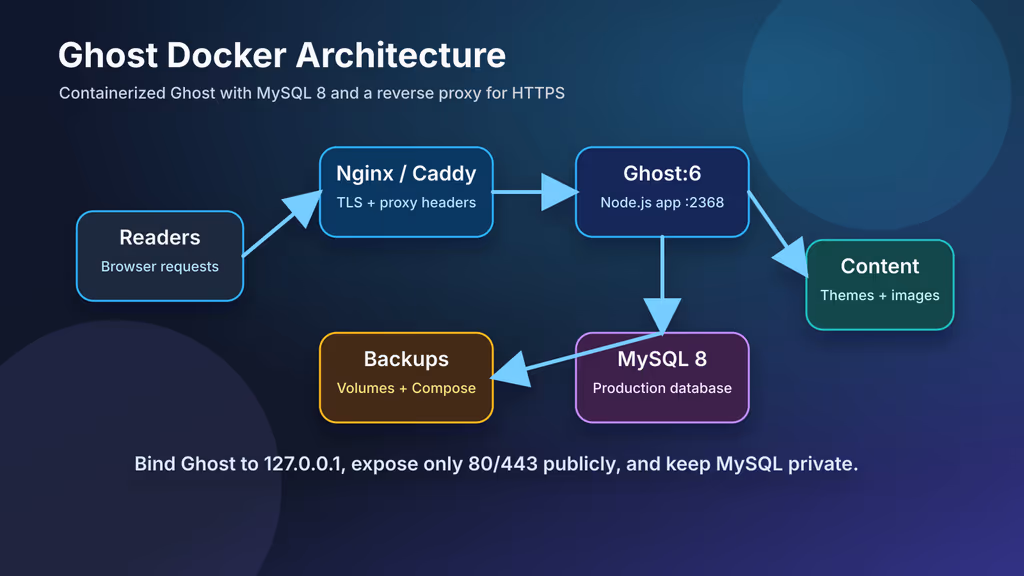
Caption: A Docker deployment runs Ghost and MySQL as separate services, with Nginx or Caddy handling HTTPS in front.
3. Docker Compose Method: Start Ghost
Pull images and launch the stack:
cd /opt/ghost
docker compose pull
docker compose up -d
docker compose ps
Check the logs during first boot:
docker compose logs -f ghost
Ghost listens on the host at 127.0.0.1:2368. Keep it bound to localhost and place a reverse proxy in front for HTTPS.
4. Docker Compose Method: Add HTTPS with Nginx
Install Nginx and Certbot:
sudo apt install -y nginx certbot python3-certbot-nginx
Create /etc/nginx/sites-available/ghost.example.com:
server {
    listen 80;
    listen [::]:80;
    server_name ghost.example.com;

    location / {
        proxy_set_header Host $host;
        proxy_set_header X-Real-IP $remote_addr;
        proxy_set_header X-Forwarded-For $proxy_add_x_forwarded_for;
        proxy_set_header X-Forwarded-Proto $scheme;
        proxy_pass http://127.0.0.1:2368;
    }
}
Enable the site and request a certificate:
sudo ln -s /etc/nginx/sites-available/ghost.example.com /etc/nginx/sites-enabled/
sudo nginx -t
sudo systemctl reload nginx
sudo certbot --nginx -d ghost.example.com
After Certbot completes, open https://ghost.example.com/ghost and create the first owner account.
5. Manual Method: Install the Official Stack
The official Ubuntu production path uses Nginx, MySQL 8, Node.js 22 LTS, Ghost-CLI, and systemd. Install Nginx and MySQL first:
sudo apt install -y nginx mysql-server
sudo mysql_secure_installation
Install Node.js 22 from NodeSource:
curl -fsSL https://deb.nodesource.com/setup_22.x | sudo -E bash -
sudo apt install -y nodejs
node --version
npm --version
Install Ghost-CLI globally:
sudo npm install ghost-cli@latest -g
ghost --version
Create a database and user:
sudo mysql
CREATE DATABASE ghost_prod CHARACTER SET utf8mb4 COLLATE utf8mb4_unicode_ci;
CREATE USER 'ghost_prod'@'localhost' IDENTIFIED BY 'change-this-strong-password';
GRANT ALL PRIVILEGES ON ghost_prod.* TO 'ghost_prod'@'localhost';
FLUSH PRIVILEGES;
EXIT;
6. Manual Method: Run Ghost-CLI
Create the installation directory. Do not install Ghost under /root; Ghost-CLI expects a normal non-root user with sudo privileges.
sudo mkdir -p /var/www/ghost
sudo chown "$USER":"$USER" /var/www/ghost
sudo chmod 775 /var/www/ghost
cd /var/www/ghost
Run the installer:
ghost install
Answer the prompts with your production values:
- Blog URL:
https://ghost.example.com - MySQL hostname:
localhost - MySQL username:
ghost_prod - MySQL password: the database password you created
- Ghost database name:
ghost_prod - Set up Nginx:
Y - Set up SSL:
Y - Enter a real email address for certificate notices
- Set up systemd:
Y - Start Ghost:
Y
When the installer finishes, verify the service:
ghost ls
ghost doctor
systemctl status ghost_ghost-example-com
The exact systemd unit name depends on your domain. Use ghost ls if you need to confirm it.
Configuration
Public URL and Admin URL
Ghost must know the canonical public URL. In Docker, set the url environment variable and restart:
cd /opt/ghost
docker compose up -d
In a Ghost-CLI install, update the URL with:
cd /var/www/ghost
ghost config url https://ghost.example.com
ghost restart
Some publications use a separate admin domain for extra isolation. Ghost supports an admin.url configuration value, but set it only after DNS and HTTPS are ready for both domains.
Email Delivery
Ghost uses email for staff invites, password resets, member signups, and newsletters. Configure SMTP before inviting users. For Docker, use the mail__options__* environment variables shown earlier. For Ghost-CLI, update config values:
cd /var/www/ghost
ghost config mail.transport SMTP
ghost config mail.options.host smtp.example.com
ghost config mail.options.port 587
ghost config mail.options.secure false
ghost config mail.options.auth.user ghost@example.com
ghost config mail.options.auth.pass change-this-smtp-password
ghost restart
Send a test invite or password reset after configuration. If mail lands in spam, fix SPF, DKIM, and DMARC records for the sending domain.
Themes and Content
Upload themes from Settings -> Design & branding in Ghost Admin, or place custom themes under the content/themes directory and restart Ghost. For Docker, that content lives in the ghost-content volume. For Ghost-CLI, it lives under /var/www/ghost/content.
Avoid editing files inside the application runtime unless your deployment process tracks those changes. Themes should live in source control, and production uploads should be repeatable.
Usage
After installation, visit:
https://ghost.example.com/ghost
Create the owner account and complete the site profile. Then work through this launch checklist:
- Set the site title, description, logo, accent color, and publication language.
- Create staff accounts with the minimum role each person needs.
- Configure tags for your main editorial categories.
- Upload or customize a theme.
- Connect SMTP and send a test email.
- Create a draft post, preview it, and publish only after reviewing the public page.
- If you use memberships, configure member tiers, portal settings, and payment options.
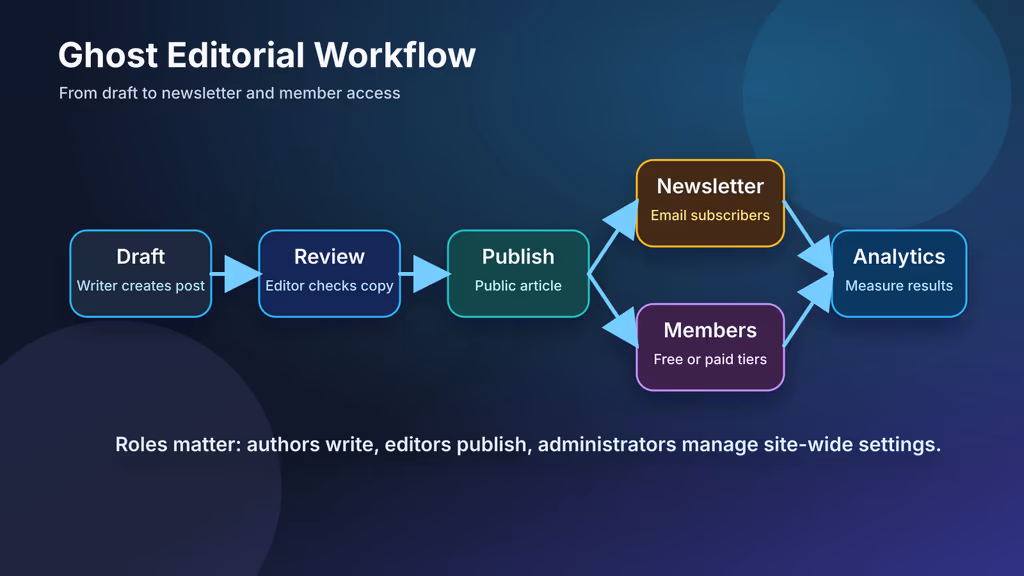
Caption: A self-hosted Ghost workflow moves from drafting and editorial review to newsletter delivery, member access, and public publishing.
For a team blog, use roles deliberately. Authors can write posts, editors can review and publish, and administrators can change site-wide settings. Keep the owner account protected with a strong password and a password manager.
Screenshots and Visuals
The images in this guide are original diagrams created for the deployment workflow. After your own installation, capture private screenshots for your internal runbook:
- Ghost Admin dashboard after first login
- Members settings with private domains and emails blurred
- Newsletter settings showing the configured sender
- Theme settings and navigation menus
- Backup job output and restore notes
Do not use random Ghost dashboard screenshots from search results. If you publish screenshots, use your own instance and remove private member, payment, and analytics data first.
Troubleshooting
- 502 Bad Gateway from Nginx: Confirm Ghost is running with
docker compose psorghost ls, then verify Nginx proxies to the correct local port. - Admin loads over HTTP or redirects strangely: Check the Ghost
urlvalue. It should be the finalhttps://domain used by readers. - Docker Ghost cannot connect to MySQL: Make sure the database service is healthy, the username/password match, and Ghost points to
dbas the host inside Compose. - Ghost-CLI installer fails permissions checks: Install from a non-root user, ensure the install directory is owned by that user, and avoid directories such as
/rootor/home/user. - Email is not delivered: Recheck SMTP host, port, TLS mode, username, password, sender address, and DNS records. Many providers require app-specific passwords or verified sender domains.
- Images fail to upload: Check free disk space and permissions on the Ghost content directory or Docker volume.
- Updates fail: Back up first, review release notes, update to the latest minor version before crossing major versions, then retry with
ghost updateor a container image upgrade.
Scaling, Securing, and Next Steps
Backups
For Docker, back up the Compose file and both volumes:
cd /opt/ghost
docker compose stop
sudo tar -czf /root/ghost-docker-backup-$(date +%F).tar.gz compose.yaml /var/lib/docker/volumes
docker compose start
For Ghost-CLI, export the database and archive content:
cd /var/www/ghost
ghost stop
mysqldump -u ghost_prod -p ghost_prod > /root/ghost-prod-$(date +%F).sql
sudo tar -czf /root/ghost-content-$(date +%F).tar.gz /var/www/ghost/content
ghost start
Test restores on a separate server before trusting any backup plan. A backup you have never restored is only a hopeful file.
Upgrades
For Docker:
cd /opt/ghost
docker compose pull
docker compose up -d
docker compose logs --since=10m ghost
For Ghost-CLI:
cd /var/www/ghost
ghost backup
ghost update
ghost doctor
Read Ghost release notes before major upgrades. The official Docker documentation recommends being on the latest minor release before upgrading across major versions.
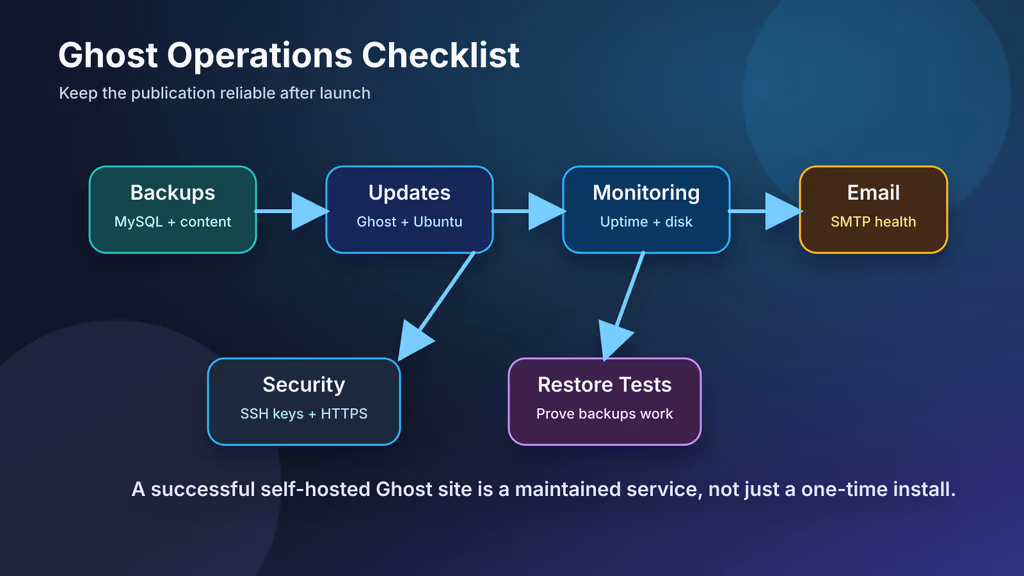
Caption: A reliable Ghost publication depends on backups, upgrades, monitoring, HTTPS, and email health checks.
Monitoring and Hardening
- Monitor
https://ghost.example.comandhttps://ghost.example.com/ghost. - Alert on disk usage, MySQL restarts, container restarts, and failed backup jobs.
- Keep Ubuntu security updates current.
- Restrict SSH to key-based access and trusted users.
- Store SMTP, database, and Stripe credentials outside shared notes.
- Review staff users and integrations regularly.
- Keep an off-site copy of database and content backups.
Following this guide, you end up with a production-ready Ghost installation that you control: HTTPS in front, MySQL for durable storage, a working admin area, email configured for publication workflows, and a maintenance path for backups and upgrades. Next, customize your theme, write your first editorial calendar, connect analytics, and document your restore process before the site becomes business-critical.