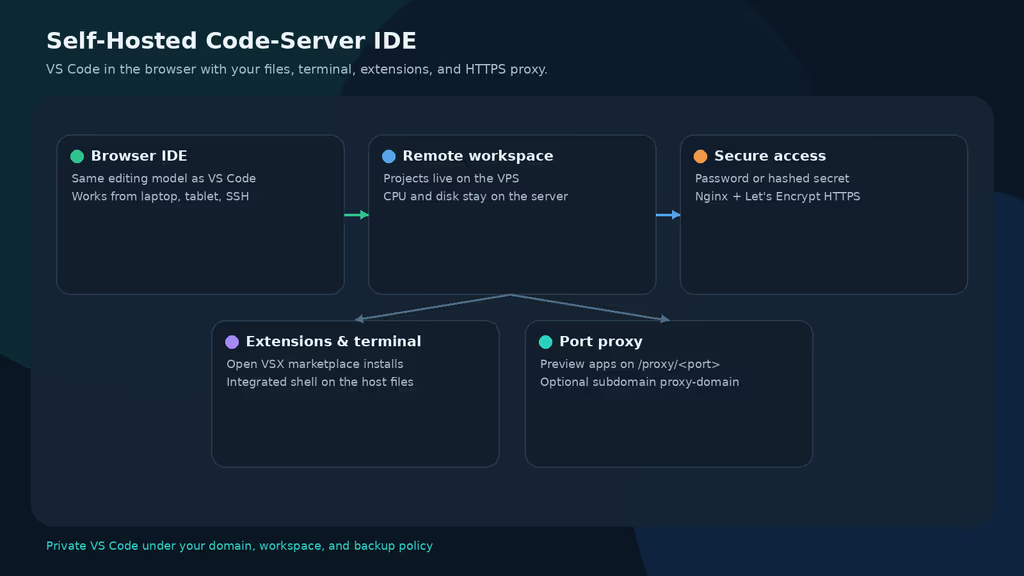
Caption: VS Code in the browser; files, terminal, and extensions live on the VPS.
Why I wanted this on my server
I did not want another copy of client repos on every laptop. code-server (Coder) runs a VS Code workbench in the browser. The tree, terminal, and language servers stay on Ubuntu. A Chromebook only renders the UI. This is not GitHub Codespaces and not Microsoft code serve-web. It is the smaller editor: password auth, a port proxy, disk-backed settings. Agencies can keep client trees on a hardened VPS. I can edit Compose next to the services those files deploy.
Anyone who logs in gets a shell on that workspace. A leaked password is a leaked terminal. I treat it like SSH with a nicer UI. I do not mount /, /root, or backup credential paths into the container.
What I actually installed
Ubuntu 24.04 LTS, Docker Compose, codercom/code-server:4.132.0 (VS Code 1.132.0), hashed Argon2 password, Nginx + Let’s Encrypt. Files under /opt/code-server. UI at https://code.example.com. Container 8080 bound only to 127.0.0.1:8080.
Hardware: 2 vCPU / 2 GB for light PHP/Node; 2–4 vCPU / 4–8 GB if language servers, builds, and test suites run in the workspace. SSD for the project tree, extension cache, and VS Code user data. Off-server backups. Optional wildcard DNS (*.code.example.com) if I later want subdomain port proxying.
Security I would not skip: never publish 8080 on 0.0.0.0, HTTPS before treating this as a daily editor (service workers need a secure context), hashed-password instead of plaintext, mount only the project directories I intend to edit, and back up config, user data, and the workspace before image upgrades.
Where it broke
On a fresh Ubuntu 24.04 box this install is famous for webviews failing with ServiceWorker SecurityError when you open the editor on a raw IP over HTTP.
I hit /healthz and saw "status": "alive". The workbench loaded, then extensions and webviews died. Official FAQ: VS Code needs a secure context. Fix: real hostname + Let’s Encrypt, not http://SERVER_IP:8080.
The second trap: login loop. Nginx without Upgrade / Connection upgrade drops WebSockets. The official snippet sets those. Safari plus TLS 1.3-only configs can still complain; the guide notes TLS 1.2 may be needed.
Third: hashed-password and Compose $. If you put the Argon2 string in a Compose env var, $ is interpolation. Double them as $$, or keep the hash only in config.yaml like I did.
Permission denied on the workspace: PUID/PGID must match ls -ln /opt/code-server. The official image runs as your host UID.
Other documented issues: /healthz failing means inspect bind-addr and container logs before blaming Nginx. Editor shows the wrong public URL — official Nginx snippet uses Host $http_host. Extensions missing after recreate — ./local must still mount at /home/coder/.local. Port preview 404s — the app must listen on 0.0.0.0 inside the environment code-server can reach. I do not open 8080 in UFW; Nginx reaches the editor over loopback.
hashed-password takes precedence over password. I keep the hash only in config.yaml so Compose never swallows $. If I later put the hash in Compose as HASHED_PASSWORD, I would double every $ as $$.
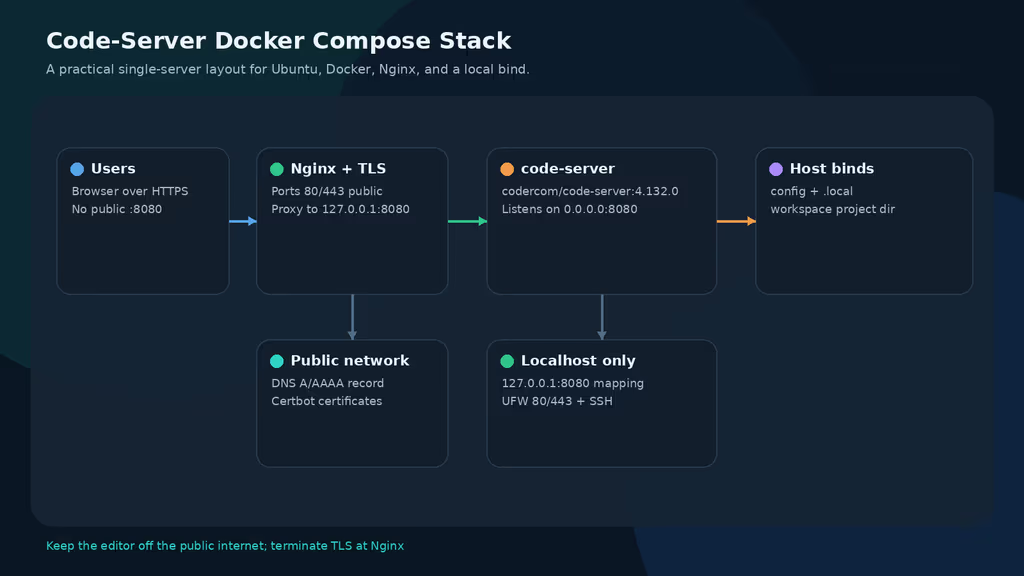
Caption: Editor on loopback 8080; Nginx terminates HTTPS.
The working install
sudo apt update
sudo apt upgrade -y
sudo apt install -y ca-certificates curl gnupg openssl ufw nginx certbot python3-certbot-nginx jq git rsync

sudo ufw allow OpenSSH
sudo ufw allow 80/tcp
sudo ufw allow 443/tcp
sudo ufw enable
sudo ufw status
Do not open 8080 in UFW.
1. Install Docker Engine
curl -fsSL https://get.docker.com | sudo sh
sudo usermod -aG docker "$USER"
newgrp docker

docker --version
docker compose version
2. Create the project directory
sudo mkdir -p /opt/code-server/{config,local,project,backups}
sudo chown -R "$USER":"$USER" /opt/code-server
chmod 700 /opt/code-server
cd /opt/code-server
3. Generate a hashed password and environment file
Official FAQ hash command:
cd /opt/code-server

CODE_SERVER_PASSWORD="$(openssl rand -base64 24 | tr -d '\n')"
CODE_SERVER_HASH="$(printf '%s' "$CODE_SERVER_PASSWORD" | npx --yes argon2-cli -e)"

cat > .env <<EOF
CODE_SERVER_IMAGE=codercom/code-server:4.132.0
CODE_SERVER_DOMAIN=code.example.com
PUID=$(id -u)
PGID=$(id -g)
DOCKER_USER=$USER
EOF

chmod 600 .env
printf 'Editor password (store in your password manager):\n%s\n' "$CODE_SERVER_PASSWORD"
printf 'Argon2 hash:\n%s\n' "$CODE_SERVER_HASH"
If npx is missing on the host, hash on a trusted workstation and paste the hash.
4. Write the code-server configuration
Inside the container listen on 0.0.0.0:8080; the host mapping stays loopback-only.
cd /opt/code-server
mkdir -p config/code-server

# Replace HASH_FROM_STEP_3 with the argon2 hash printed above.
cat > config/code-server/config.yaml <<'EOF'
bind-addr: 0.0.0.0:8080
auth: password
hashed-password: "HASH_FROM_STEP_3"
cert: false
disable-telemetry: true
EOF

chmod 600 config/code-server/config.yaml
hashed-password wins over plaintext password. Do not commit this file.
5. Write Docker Compose configuration
services:
  code-server:
    image: ${CODE_SERVER_IMAGE}
    container_name: code-server
    restart: unless-stopped
    user: "${PUID}:${PGID}"
    environment:
      DOCKER_USER: ${DOCKER_USER}
    ports:
      - "127.0.0.1:8080:8080"
    volumes:
      - ./config:/home/coder/.config
      - ./local:/home/coder/.local
      - ./project:/home/coder/project
cd /opt/code-server
docker compose config
docker compose pull
docker compose up -d

docker compose ps
docker compose logs --tail=80 code-server
curl -sS http://127.0.0.1:8080/healthz
/healthz is unauthenticated and should return "status": "alive".
6. Put Nginx and Let’s Encrypt in front
sudo tee /etc/nginx/sites-available/code-server >/dev/null <<'EOF'
server {
    listen 80;
    listen [::]:80;
    server_name code.example.com;

    location / {
        proxy_pass http://127.0.0.1:8080/;
        proxy_set_header Host $http_host;
        proxy_set_header Upgrade $http_upgrade;
        proxy_set_header Connection upgrade;
        proxy_set_header Accept-Encoding gzip;
    }
}
EOF

sudo ln -sf /etc/nginx/sites-available/code-server /etc/nginx/sites-enabled/code-server
sudo nginx -t
sudo systemctl reload nginx

sudo certbot --non-interactive --redirect --agree-tos --nginx -d code.example.com -m you@example.com
Sign in at https://code.example.com with the password from the password manager.
Configuration
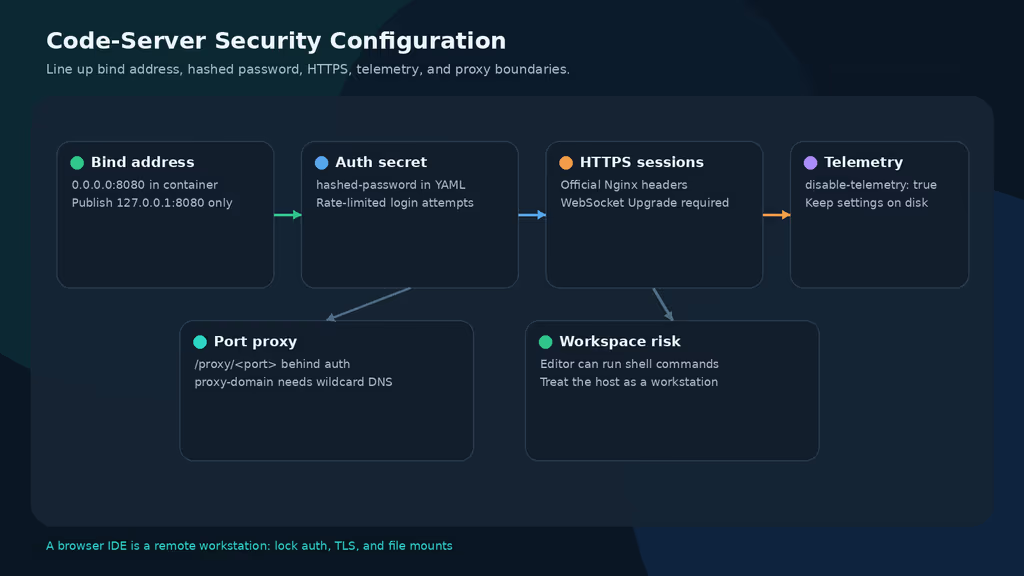
Caption: Loopback bind, hashed password, HTTPS WebSockets, telemetry off.
bind-addr: 0.0.0.0:8080
auth: password
hashed-password: "$argon2i$v=19$m=4096,t=3,p=1$replace-with-your-own-hash"
cert: false
disable-telemetry: true
cd /opt/code-server
docker compose restart code-server
docker compose logs --tail=80 code-server
Subdomain port proxy: wildcard DNS plus proxy-domain: code.example.com. Without a wildcard cert, use https://code.example.com/proxy/3000/. Do not mount /var/run/docker.sock until you accept the editor talking to the host daemon.
Proxy setup need to careful
The default extension marketplace is Open VSX, not Microsoft’s. code-server --install-extension works; some Microsoft-branded extensions simply are not there. The FAQ points at code serve-web if you need the official marketplace. I found that after wondering why a familiar extension ID 404’d.
/proxy/<port> vs /absproxy/<port>: some Vue/CRA dev servers need the full path. The app must listen on 0.0.0.0 inside the container or the preview 404s.
Usage
- Log in, File → Open Folder →
/home/coder/project. - Save a file; confirm it appears under
/opt/code-server/projecton the host. - Terminal:
pwd,id,git --version. - Install one extension. Preview via
/proxy/<port>. curl -sS https://code.example.com/healthzstillalive.
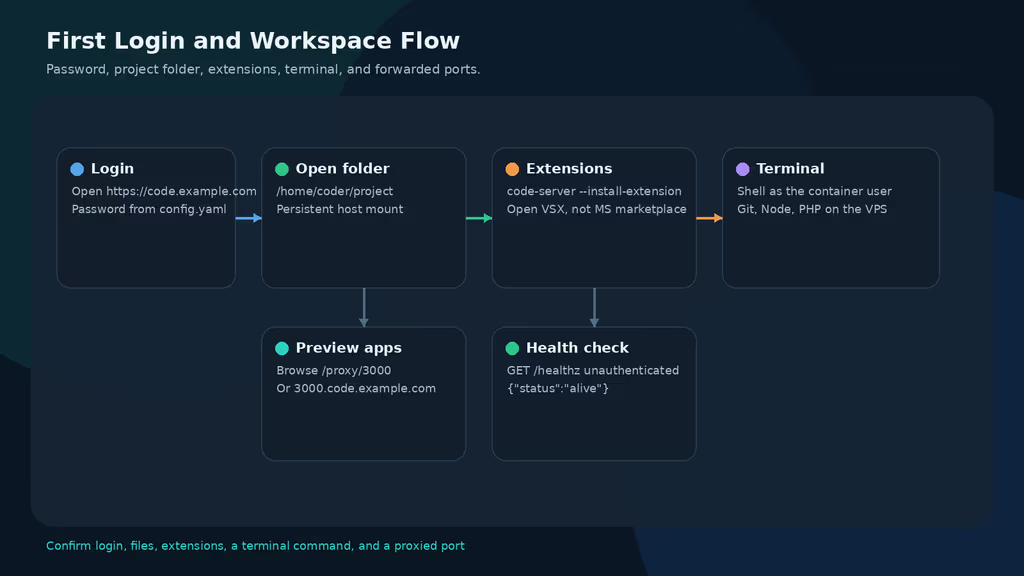
Caption: Login, project folder, extensions, terminal, proxied port, healthz.
docker compose exec code-server code-server --install-extension gitlens.gitlens
docker compose exec code-server code-server --list-extensions
cd /opt/code-server/project
git clone git@github.com:example/app.git
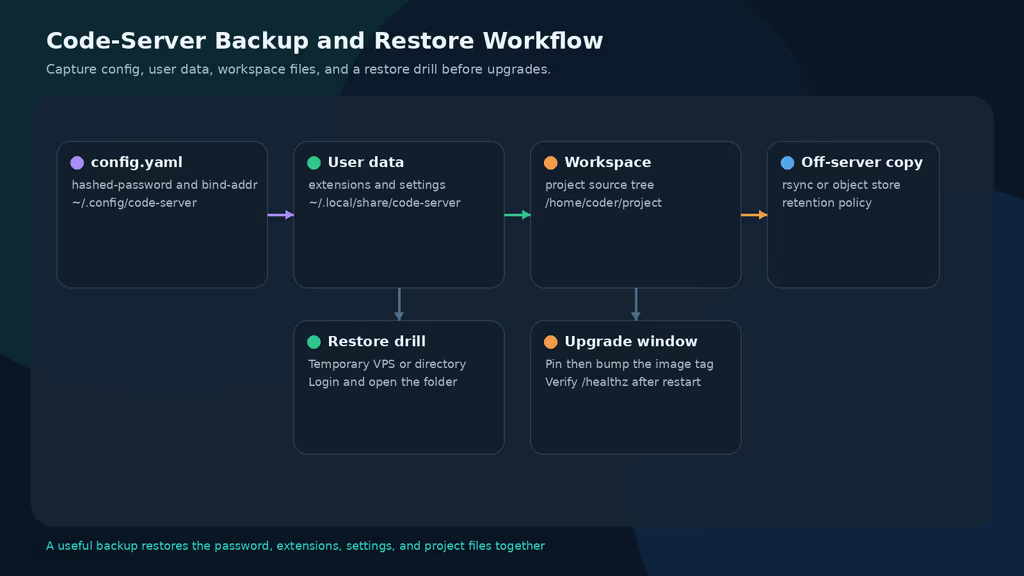
Caption: config.yaml, user data, workspace, off-server copy.
Backup, expose, next step
sudo tee /opt/code-server/backup.sh >/dev/null <<'EOF'
#!/usr/bin/env bash
set -euo pipefail

cd /opt/code-server
stamp="$(date -u +%Y%m%dT%H%M%SZ)"
mkdir -p backups

tar --one-file-system -czf "backups/code-server-config-${stamp}.tar.gz" config
tar --one-file-system -czf "backups/code-server-local-${stamp}.tar.gz" local
tar --one-file-system -czf "backups/code-server-project-${stamp}.tar.gz" project
mkdir -p "backups/code-server-compose-${stamp}"
cp -a docker-compose.yml .env "backups/code-server-compose-${stamp}/"

find backups -type f -mtime +14 -delete
EOF

sudo chmod 700 /opt/code-server/backup.sh
/opt/code-server/backup.sh
rsync -avz /opt/code-server/backups/ backup-user@backup.example.net:/srv/backups/code-server/
Missing config.yaml means a new password and a confusing login failure. Missing local drops extensions.
cd /opt/code-server
/opt/code-server/backup.sh
# Edit CODE_SERVER_IMAGE in .env, for example codercom/code-server:4.132.0
docker compose pull
docker compose up -d
docker compose logs --tail=120 code-server
curl -sS http://127.0.0.1:8080/healthz
What I have running now: code-server 4.132.0 on HTTPS, Argon2 password, workspace on /opt/code-server/project, Nginx WebSockets. Pinning the image keeps upgrades deliberate; latest is convenient for a homelab and risky for a shared editor because a surprise VS Code bump can change extensions. Next: clone one real repo into the mount, install only the extensions I use, document restore steps, and watch disk for node_modules. I am not mounting the Docker socket. If I outgrow a single-user editor, the FAQ recommends one VM per user rather than packing many processes onto one kernel.
Did you hit the same wall?
I got stuck on ServiceWorker SecurityError until the editor was on a real HTTPS hostname, plus a login loop when Nginx dropped WebSockets. Did you hit the same thing, or a different one — hashed-password $ in Compose, PUID permissions, Open VSX missing an extension? Tell me in the comments. I read them.
Need this done on your server?
I deploy and harden Laravel/CodeCanyon apps on cPanel or VPS, and offer monthly Server Watch retainers. Hire for deploy · Care plan