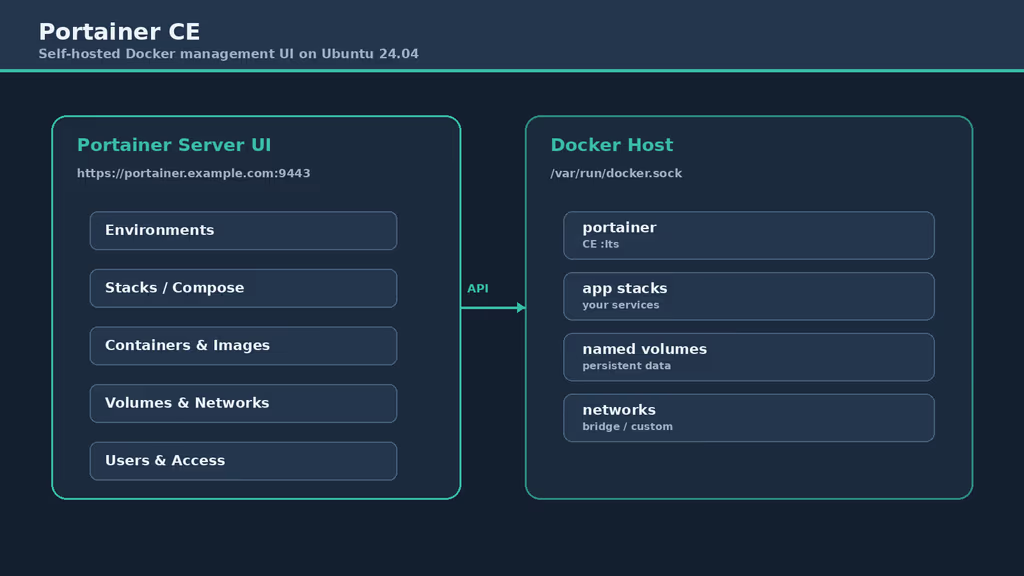
Caption: Portainer CE in front of Docker: stacks, containers, optional remote agents.
Why I wanted this on my server
I was tired of SSH-ing for every restart and log tail. Portainer CE is a web UI for Docker: containers, images, volumes, Compose stacks, extra hosts via agents. Solo operators keep inventory across one or two servers; agencies give trusted operators a path that is still not raw root SSH for every log tail. The server mounts the Docker socket (or talks to agents). That is root-shaped power. HTTPS, a strong admin password, and few admin seats.
Not a SaaS console. The socket stays on my VPS. An admin can start containers with host mounts, read volume secrets, and alter networks. I planned firewall rules before exposing 9443 publicly.
What I actually installed
Ubuntu 24.04 LTS, portainer/portainer-ce:lts, Compose at /opt/portainer/portainer-compose.yaml, named volume portainer_data. UI on 9443 (self-signed until a reverse proxy). Optional Edge tunnel 8000 — I would drop it if unused. Hostname portainer.example.com.
Hardware: 1–2 vCPU / 1–2 GB for Portainer itself on a host that already runs a few stacks; 2–4 vCPU / 4 GB on the Portainer server if many environments. 10 GB+ SSD for images and portainer_data. Off-server backups of the volume plus Compose. Optional second Docker host to practice remote Agent enrollment.
Security I would not skip: :lts instead of floating :latest, no raw Docker TCP without mutual TLS, Compose and backup archives private, public firewall only SSH/80/443 when a reverse proxy fronts Portainer (otherwise restrict 9443 to VPN or trusted IPs), limited admin seats.
Docker Engine from Docker’s apt repo — not snap Docker. Portainer warns about snap socket/path issues.
Where it broke
On a fresh Ubuntu 24.04 box this install is famous for the initial admin creation window expiring.
I opened :9443, got distracted, came back, and could not create the first user. Official behavior: finish setup promptly after first boot. Fix:
cd /opt/portainer
docker compose -f portainer-compose.yaml restart
Then complete admin creation on the next visit. Do not delete portainer_data to “reset password” as a shortcut — back up the volume first and follow current CE docs for a reset.
Second: browser certificate warning on 9443. Expected. Default cert is self-signed. I put Caddy in front with tls_insecure_skip_verify to the upstream, or you upload a cert in Settings.
Third: snap Docker. Portainer warns about socket/path issues. I install Engine from Docker’s apt repository. hello-world before Portainer.
Local environment empty: /var/run/docker.sock not mounted or Docker not running (systemctl status docker).
Other documented issues: container exits immediately — port 9443 already bound (ss -tlnp | grep 9443) or a bad volume mount. Remote agent will not connect — 9001 reachable from the Portainer server only, agent running, Environment URL host:9001 without a scheme, matching AGENT_SECRET if customized. SELinux denials on RHEL-family hosts need extra labels; this path is Ubuntu. I keep production Compose in Git even when I deploy from the UI. Day-to-day: restart a failed container, stream logs, prune unused images before disk fills, switch environments when I operate more than one host.
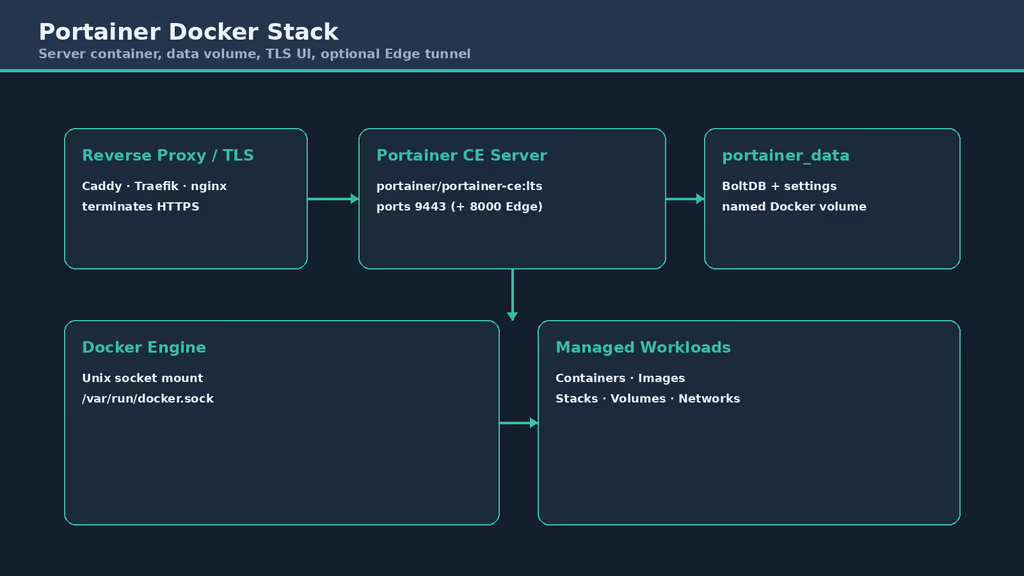
Caption: One server container, data volume, socket, 9443, optional 8000.
The working install
sudo apt update
sudo apt upgrade -y
sudo apt install -y ca-certificates curl gnupg openssl ufw

sudo ufw allow OpenSSH
sudo ufw allow 80/tcp
sudo ufw allow 443/tcp
# Only if you will hit Portainer TLS directly without a reverse proxy:
# sudo ufw allow 9443/tcp
sudo ufw enable
sudo ufw status
1. Install Docker Engine
sudo apt-get update -qqy
sudo apt-get install ca-certificates curl -qqy
sudo install -m 0755 -d /etc/apt/keyrings
sudo curl -fsSL https://download.docker.com/linux/ubuntu/gpg -o /etc/apt/keyrings/docker.asc
sudo chmod a+r /etc/apt/keyrings/docker.asc

echo \
  "deb [arch=$(dpkg --print-architecture) signed-by=/etc/apt/keyrings/docker.asc] https://download.docker.com/linux/ubuntu \
  $(. /etc/os-release && echo "$VERSION_CODENAME") stable" | \
  sudo tee /etc/apt/sources.list.d/docker.list > /dev/null

sudo apt-get update -qqy
sudo apt-get install docker-ce docker-ce-cli containerd.io docker-compose-plugin -qqy

sudo usermod -aG docker "$USER"
newgrp docker

docker --version
docker compose version
docker run --rm hello-world
2. Create the Portainer directory and Compose file
sudo mkdir -p /opt/portainer
sudo chown "$USER":"$USER" /opt/portainer
cd /opt/portainer
services:
  portainer:
    container_name: portainer
    image: portainer/portainer-ce:lts
    restart: always
    volumes:
      - /var/run/docker.sock:/var/run/docker.sock
      - portainer_data:/data
    ports:
      - 9443:9443
      - 8000:8000  # Remove if you do not intend to use Edge Agents

volumes:
  portainer_data:
    name: portainer_data

networks:
  default:
    name: portainer_network
For a reverse proxy on the same host, publish "127.0.0.1:9443:9443" and leave 8000 unpublished unless Edge Agents need it.
3. Start Portainer CE
cd /opt/portainer
docker compose -f portainer-compose.yaml up -d
docker compose -f portainer-compose.yaml ps
docker ps --filter name=portainer
docker compose -f portainer-compose.yaml logs --tail=100
Port 9443 already bound: ss -tlnp | grep 9443.
4. Complete initial admin setup
Open https://YOUR_SERVER_IP:9443 or https://portainer.example.com:9443. Create the admin immediately. Connect the local Docker environment when prompted.
5. Put HTTPS in front with a reverse proxy
portainer.example.com {
  reverse_proxy https://127.0.0.1:9443 {
    transport http {
      tls_insecure_skip_verify
    }
  }
}
curl -I https://portainer.example.com
Configuration
Socket mount can create privileged containers. Restrict who logs in.
Drop Edge if unused:
cd /opt/portainer
# edit portainer-compose.yaml, remove the 8000 mapping
docker compose -f portainer-compose.yaml up -d
Non-admin users for day-to-day. Unique accounts.
Remote agent on a second Linux Docker host:
docker run -d \
  -p 9001:9001 \
  --name portainer_agent \
  --restart=always \
  -v /var/run/docker.sock:/var/run/docker.sock \
  -v /var/lib/docker/volumes:/var/lib/docker/volumes \
  portainer/agent:lts
Allow TCP 9001 only from the Portainer server. In the UI: Environments → Add → Docker Standalone → Agent. Environment URL like remote-docker.example.com:9001 — host:port, no https://. Custom AGENT_SECRET must match on server and agent.
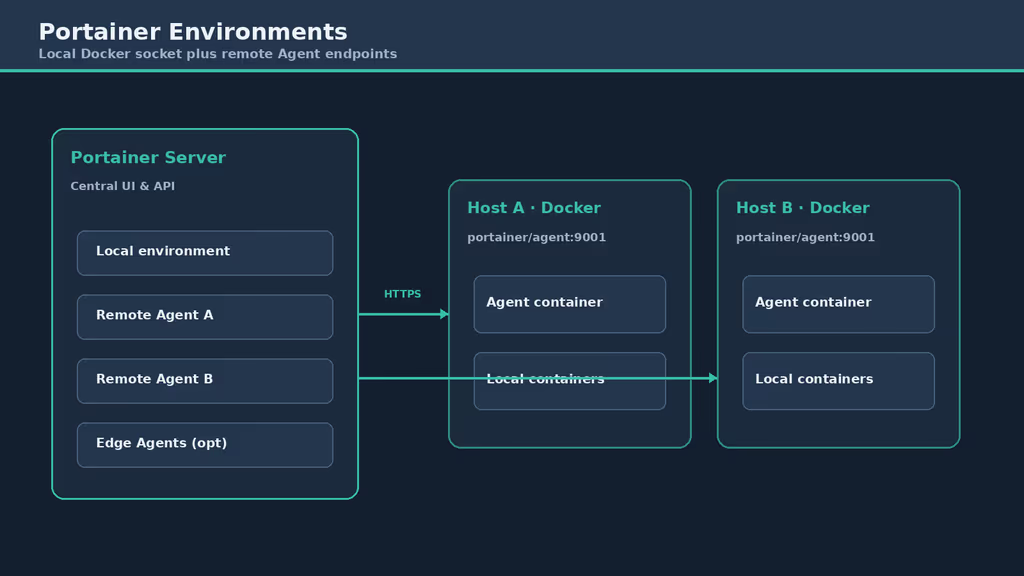
Caption: One server, local socket, extra hosts on agent port 9001.
Important tips
The Environment URL for an agent is host:9001 with no scheme. I pasted https://… and it would not connect. Also: 502 from Caddy is often TLS mismatch to the self-signed upstream — the tls_insecure_skip_verify block is the documented workaround, not a hack I invented.
Usage
- Admin login, local environment lists the containers you expect.
- Non-admin user cannot change admin settings.
- Stacks → Add stack: tiny
whoami, deploy, remove. - Keep production Compose in Git even when you click Deploy.
- After reboot,
docker compose -f /opt/portainer/portainer-compose.yaml psstill shows Portainer up. - If a remote agent is in play, it stays Connected and 9001 is not open to the world.
I use Portainer for incident restarts and log tails. Image pulls and recreates wait for a maintenance window. Prune unused images before the disk fills. Switch environments when I operate more than one Docker host. I still would not share one admin password across contractors.
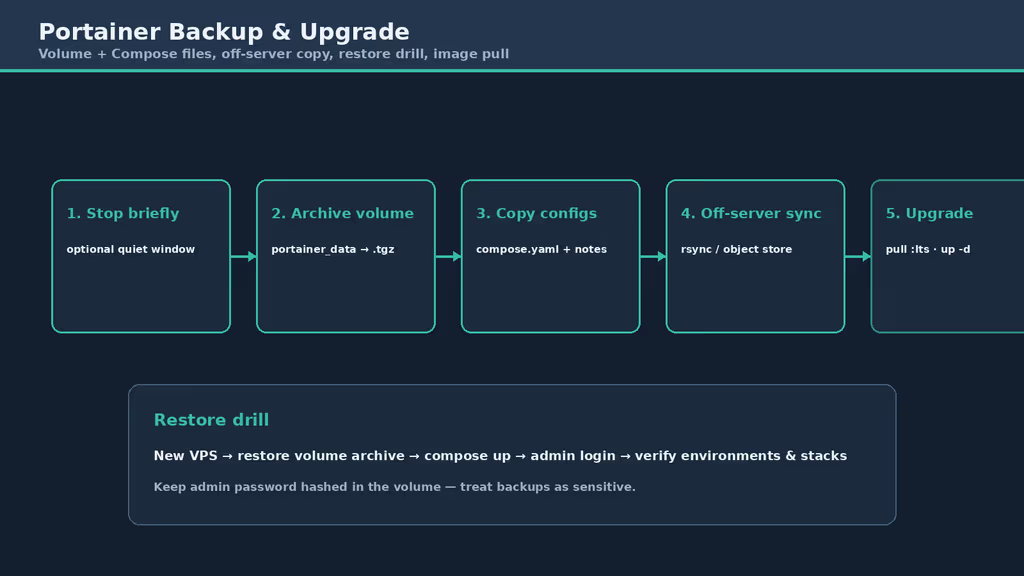
Caption: portainer_data volume, Compose file, off-server copy, LTS pull.
Backup, expose, next step
cd /opt/portainer
docker compose -f portainer-compose.yaml stop

sudo mkdir -p /var/backups/portainer
docker run --rm \
  -v portainer_data:/data:ro \
  -v /var/backups/portainer:/backup \
  alpine:3.20 \
  sh -c 'cd /data && tar czf /backup/portainer-data.tgz .'

cp portainer-compose.yaml /var/backups/portainer/
rsync -a /var/backups/portainer/ backup-user@backup.example.net:/srv/backups/portainer/

docker compose -f portainer-compose.yaml start
Backup tarballs hold auth material.
cd /opt/portainer
docker compose -f portainer-compose.yaml pull
docker compose -f portainer-compose.yaml up -d
docker compose -f portainer-compose.yaml ps
docker compose -f portainer-compose.yaml logs -f --tail=100
What I have running now: Portainer CE :lts on Ubuntu, admin created after a restart, Caddy on 443, local Docker via the socket, 8000 unpublished. Backup tarballs hold auth material — I treat them as secrets. Next: a volume restore drill, fewer admin seats, maybe one remote agent with 9001 locked to the server IP, SSO or VPN if this becomes a team console. I track the :lts image so the control plane stays rebuildable.
Did you hit the same wall?
I got stuck on the expired initial admin setup window and had to restart the container to create the first user. Did you hit the same thing, or a different one — snap Docker, agent URL with https://, 9443 already bound? Tell me in the comments. I read them.
Need this done on your server?
I deploy and harden Laravel/CodeCanyon apps on cPanel or VPS, and offer monthly Server Watch retainers. Hire for deploy · Care plan