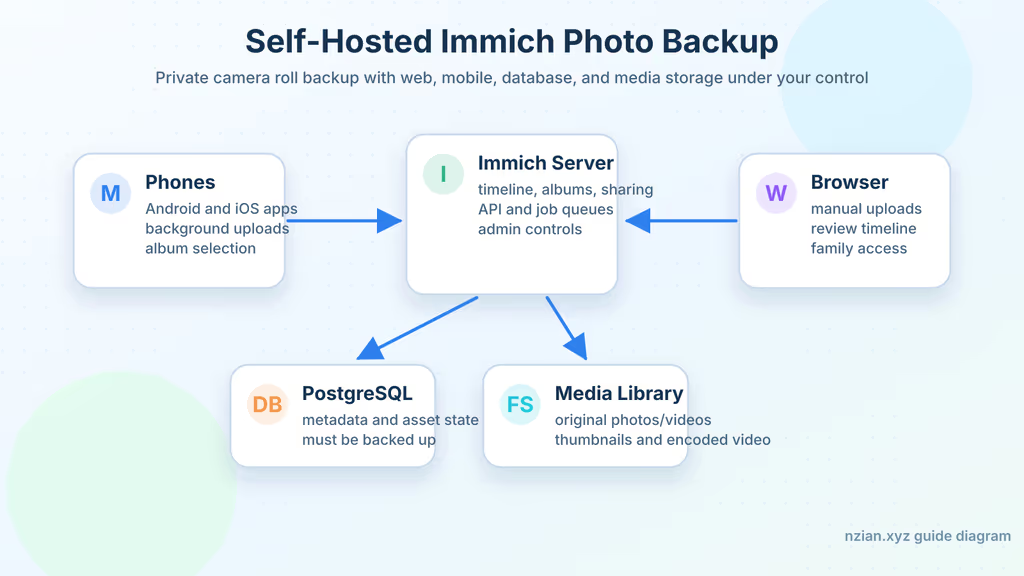
Caption: Phones and browser upload to my VPS. Postgres holds the library state. Scanning a folder of JPEGs is not a restore.
Why I wanted this on my server
I wanted camera-roll backup off Google Photos. Family pictures, travel, the occasional scan — not another monthly library I do not control.
Immich is the open-source photo stack: mobile auto backup, timeline, albums, thumbnails, optional ML. It is an application with Postgres and workers, not a file browser pointed at a disk. If the database dies and I only have a folder of originals, I do not have Immich back.
What I actually installed
Ubuntu 24.04, official Immich Compose from GitHub releases, files under /opt/immich. Nginx to 127.0.0.1:2283. Media at /opt/immich/library, Postgres on local SSD at /opt/immich/postgres — not NFS. Immich wants about 6–8 GB RAM. Thumbnails and transcodes add roughly 10–20% on top of originals.
Where it broke
On a fresh Ubuntu 24.04 box this install is famous for a Docker Engine version check.
I downloaded docker-compose.yml and example.env, filled paths and a password, ran docker compose up -d. Docker answered:
can't set healthcheck.start_interval as feature require Docker Engine v25 or later
The official Immich Compose uses start_interval on the database healthcheck. Engine 24 (and anything I got from a stale convenience install) cannot parse it.
I had two documented exits: upgrade Docker Engine to 25+, or comment that start_interval line as Immich’s install docs say. I upgraded Engine. After that, docker compose up -d started Postgres and the server.
docker compose (plugin) is required. The old docker-compose Python command is not supported.
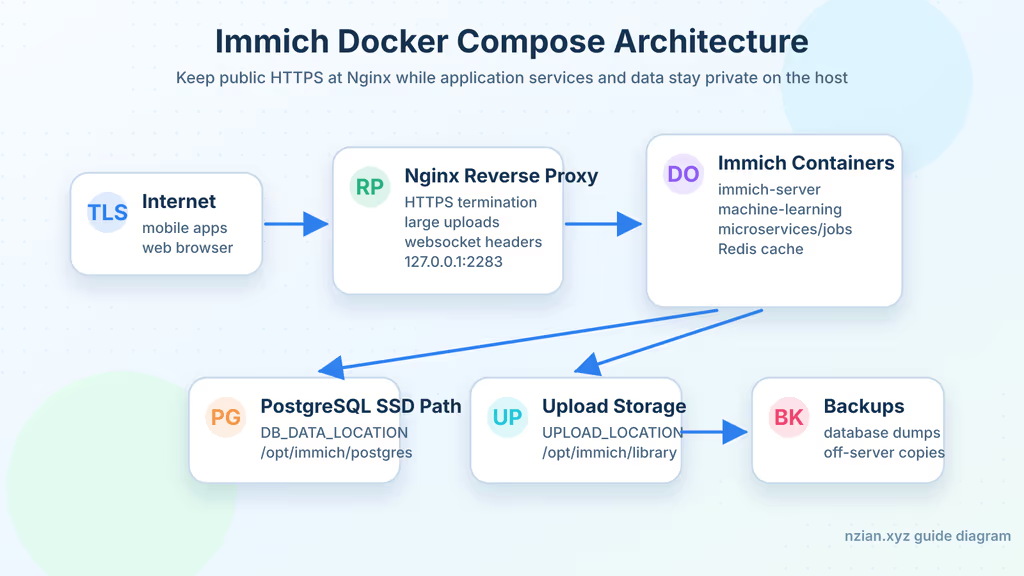
Caption: HTTPS at Nginx. Immich, Redis, Postgres, ML, library folder on the private side.
Prerequisites
Domain at the root of a host (immich.example.com). Sub-path /immich is unsupported. HTTPS for mobile backup. .env private. Pin IMMICH_VERSION after a known-good boot.
sudo apt update
sudo apt upgrade -y
sudo apt install -y ca-certificates curl wget gnupg openssl ufw nginx certbot python3-certbot-nginx gzip rsync jq

sudo ufw allow OpenSSH
sudo ufw allow 80/tcp
sudo ufw allow 443/tcp
sudo ufw enable
sudo ufw status
The working install
1. Install Docker Engine
curl -fsSL https://get.docker.com | sudo sh
sudo usermod -aG docker "$USER"
newgrp docker

docker --version
docker compose version
Confirm Engine is 25 or newer before you fight the healthcheck. If docker compose version fails, stop here.
2. Create the deployment directory
sudo mkdir -p /opt/immich
sudo chown -R "$USER":"$USER" /opt/immich
chmod 700 /opt/immich
cd /opt/immich

mkdir -p library postgres backups
DB_DATA_LOCATION stays on local Unix storage. Immich is explicit: network shares and Postgres are a bad mix.
3. Download the official Compose files
cd /opt/immich

wget -O docker-compose.yml https://github.com/immich-app/immich/releases/latest/download/docker-compose.yml
wget -O .env https://github.com/immich-app/immich/releases/latest/download/example.env

chmod 600 .env
Do not commit .env to a public repo.
4. Configure .env
cd /opt/immich

export IMMICH_DB_PASSWORD="$(openssl rand -base64 36 | tr -dc 'A-Za-z0-9' | head -c 32)"

cp .env ".env.$(date +%F-%H%M).bak"

python3 - <<'PY'
from pathlib import Path
import os

env_path = Path(".env")
text = env_path.read_text()
replacements = {
    "UPLOAD_LOCATION=./library": "UPLOAD_LOCATION=/opt/immich/library",
    "DB_DATA_LOCATION=./postgres": "DB_DATA_LOCATION=/opt/immich/postgres",
    "# TZ=Etc/UTC": "TZ=Etc/UTC",
    "DB_PASSWORD=postgres": f"DB_PASSWORD={os.environ['IMMICH_DB_PASSWORD']}",
}
for old, new in replacements.items():
    text = text.replace(old, new)
env_path.write_text(text)
PY

grep -E '^(UPLOAD_LOCATION|DB_DATA_LOCATION|TZ|IMMICH_VERSION|DB_USERNAME|DB_DATABASE_NAME)=' .env
The example used IMMICH_VERSION=v3 when I wrote this. Fine for a first boot. Production: pin a release tag so pull is not a surprise.
5. Start Immich
cd /opt/immich

docker compose config
docker compose pull
docker compose up -d
docker compose ps
docker compose logs --since=10m immich-server database redis
curl -i http://127.0.0.1:2283
If you still see can't set healthcheck.start_interval as feature require Docker Engine v25 or later, upgrade Engine or comment start_interval on the database healthcheck.
Unsafe characters in DB_PASSWORD also take the database down. I stick to the alphanumeric generation above.
6. Configure Nginx and HTTPS
Create /etc/nginx/sites-available/immich.example.com:
server {
    listen 80;
    listen [::]:80;
    server_name immich.example.com;

    client_max_body_size 50000M;
    proxy_request_buffering off;
    client_body_buffer_size 1024k;

    proxy_read_timeout 600s;
    proxy_send_timeout 600s;
    send_timeout 600s;

    location / {
        proxy_pass http://127.0.0.1:2283;
        proxy_http_version 1.1;
        proxy_redirect off;

        proxy_set_header Host $host;
        proxy_set_header X-Real-IP $remote_addr;
        proxy_set_header X-Forwarded-For $proxy_add_x_forwarded_for;
        proxy_set_header X-Forwarded-Proto $scheme;
        proxy_set_header Upgrade $http_upgrade;
        proxy_set_header Connection "upgrade";
    }

    location = /.well-known/immich {
        proxy_pass http://127.0.0.1:2283;
    }
}
Uploads dying at Nginx: body size, proxy_request_buffering off, websocket headers. Mobile app cannot find the server: public URL, cert, DNS, /.well-known/immich.
sudo ln -s /etc/nginx/sites-available/immich.example.com /etc/nginx/sites-enabled/immich.example.com
sudo nginx -t
sudo systemctl reload nginx

sudo certbot --nginx -d immich.example.com
sudo certbot renew --dry-run
Keep in mind always
Do not rename files inside UPLOAD_LOCATION by hand. The database tracks assets. A dump without the matching library folder (or the reverse) is a half restore.
First-import slowness is thumbnails, metadata, transcode, ML — not “Immich is broken.” On 6 GB RAM I watch the ML container; if it OOMs, I turn ML down or move to a bigger VM.
cd /opt/immich

docker compose ps
docker compose logs --since=30m immich-server
docker compose logs --since=30m immich-machine-learning
docker compose exec database psql --username="${DB_USERNAME:-postgres}" --dbname="${DB_DATABASE_NAME:-immich}" -c 'select now();'
du -sh /opt/immich/library /opt/immich/postgres
Create the first admin in the browser, then normal users for phones. Enable automatic DB dumps in Administration and confirm files appear under UPLOAD_LOCATION/backups. Those dumps still do not contain photos.
First library I actually used
Ten photos and one small video in the browser. Timeline updates, thumbnails exist, files under /opt/immich/library. Then the mobile app on one album, HTTPS only, then the full roll.
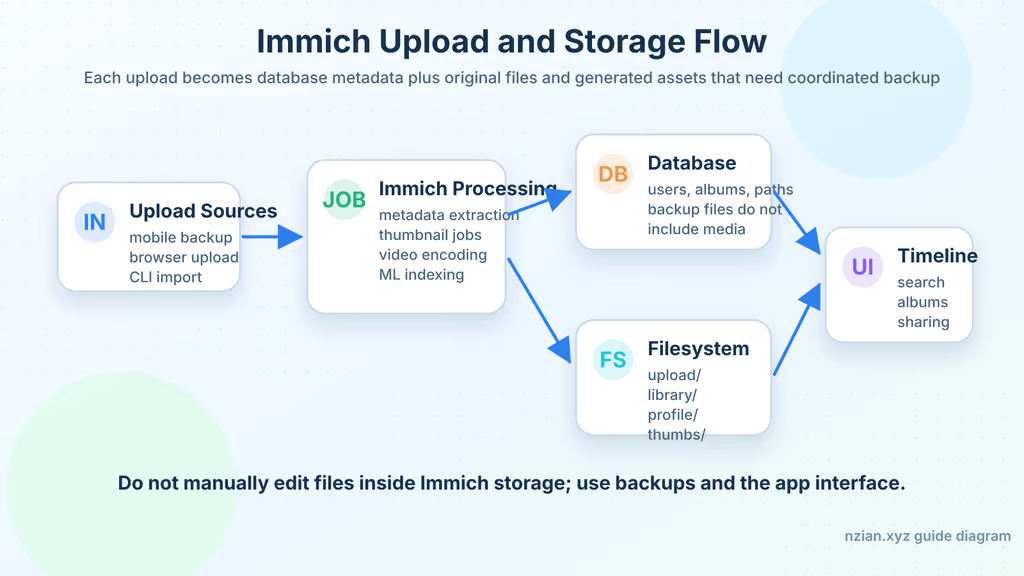
Caption: Originals, Postgres rows, thumbs, encoded video. Backup all of it from the same moment.
sudo find /opt/immich/library -maxdepth 3 -type f | wc -l
du -sh /opt/immich/library
docker compose logs --since=15m immich-server immich-machine-learning
Backup, expose, next step
cd /opt/immich
mkdir -p backups

BACKUP_DATE="$(date +%F-%H%M)"

docker exec -t immich_postgres \
  pg_dump --clean --if-exists --dbname="${DB_DATABASE_NAME:-immich}" --username="${DB_USERNAME:-postgres}" \
  | gzip > "backups/immich-db-${BACKUP_DATE}.sql.gz"

rsync -aH --delete /opt/immich/library/ "backups/library-${BACKUP_DATE}/"
ls -lh backups
du -sh backups/library-${BACKUP_DATE}
Docs: dump the database first, filesystem second — or stop immich-server while you copy. Then off-box:
rsync -aH --info=progress2 /opt/immich/backups/ backup-user@backup.example.com:/srv/backups/immich/
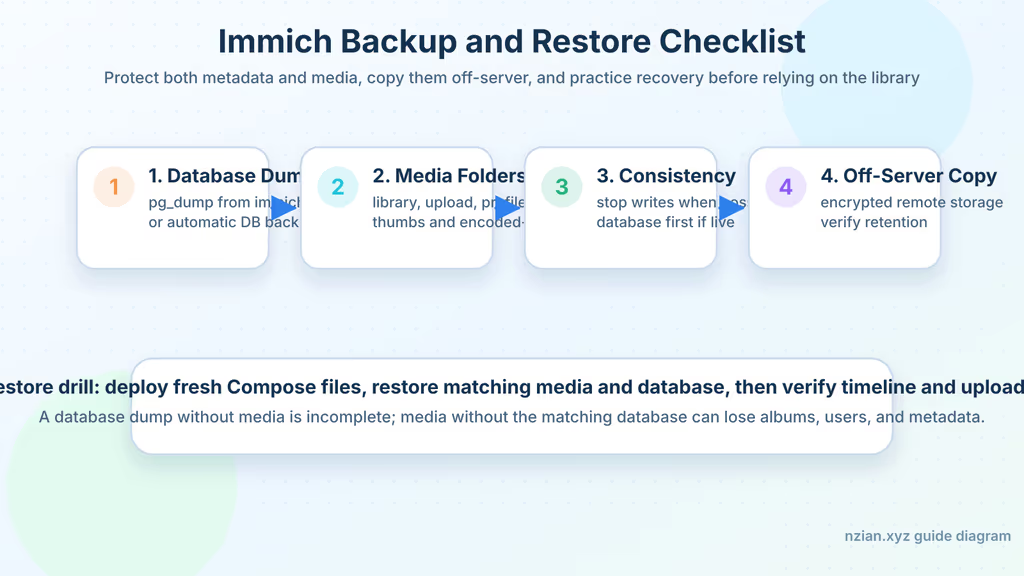
Caption: Postgres dump, library folder, off-server copy, restore drill. Missing photos after restore means the two copies were not from the same time.
cd /opt/immich
docker compose pull
docker compose up -d
docker compose logs --since=10m immich-server
What I have running now is Immich on HTTPS, Engine 25, library and Postgres on local disk, one test album. Next I finish a phone backup, copy a matched dump+library off the server, and restore onto a spare VM before this is the only copy of anything I cannot re-shoot.
Did you hit the same wall?
I got stuck on can't set healthcheck.start_interval as feature require Docker Engine v25 or later. Did you hit the same thing, or a different one? Tell me in the comments. I read them.
Need this done on your server?
I deploy and harden Laravel/CodeCanyon apps on cPanel or VPS, and offer monthly Server Watch retainers. Hire for deploy · Care plan