Self-Hosting Hoppscotch: A Complete Guide to Running an Open-Source API Client

Hoppscotch is an open-source API client for REST, GraphQL, realtime connections, environments, and team collections. This guide walks through self-hosting Hoppscotch Community Edition on Ubuntu 24.04 LTS with Docker Compose, PostgreSQL, Nginx, HTTPS, OAuth, SMTP notes, backups, and operational checks.

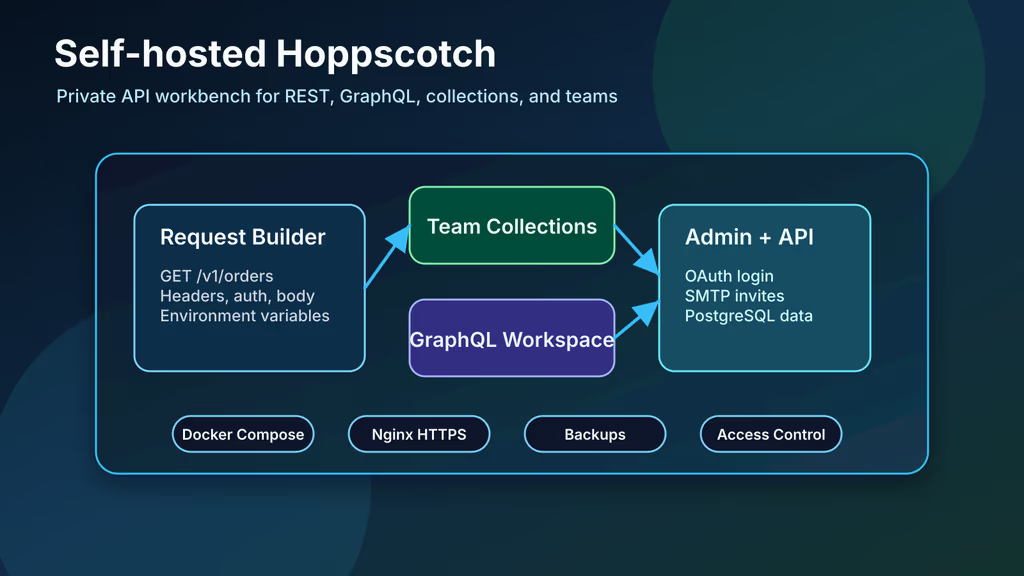
 Hoppscotch self-hosted API workspace

Caption: Hoppscotch gives developers a private browser-based API workspace for REST, GraphQL, collections, environments, and team collaboration.

Introduction

Hoppscotch is an open-source API client for building, testing, saving, and sharing API requests from the browser. If your team currently uses a hosted API client for REST requests, GraphQL queries, environment variables, auth headers, and shared collections, Hoppscotch is a strong self-hosted alternative. It is especially useful for small engineering teams, agencies, homelabs, and internal platform groups that want a private API workbench close to their own infrastructure.

Self-hosting Hoppscotch is not just about replacing a desktop tool. It gives you control over where collections, environment values, users, and team configuration live. You can place it behind your own domain, use HTTPS, decide which OAuth provider can sign users in, back up PostgreSQL, and document recovery steps beside the rest of your internal services. That matters when API examples include internal hostnames, staging credentials, customer-like test payloads, or workflows that should not drift into unmanaged accounts.

This guide installs Hoppscotch Community Edition on Ubuntu 24.04 LTS using Docker Compose. The deployment uses the official all-in-one Hoppscotch container, PostgreSQL for persistent data, a one-shot migration container, and Nginx as the public HTTPS reverse proxy. The guide uses Hoppscotch's subpath mode so the app, admin dashboard, and backend can live under one domain: https://hoppscotch.example.com, https://hoppscotch.example.com/admin, and https://hoppscotch.example.com/backend.

Why Choose Hoppscotch?

  • Open-source API client: Hoppscotch supports REST, GraphQL, realtime APIs, collections, environments, authorization helpers, and sharing workflows without requiring a proprietary hosted workspace.
  • Browser-based access: Developers can open the same tool from a trusted browser instead of installing a local client on every workstation.
  • Team collections: Shared request collections help keep API examples, auth flows, and test payloads visible to the whole team.
  • Private deployment: Self-hosting keeps workspace data, internal URLs, and environment configuration under your infrastructure and backup policy.
  • Docker-friendly setup: The Community Edition can run with the official AIO container and PostgreSQL, which is approachable for a small VPS.
  • OAuth support: Community deployments can use OAuth providers such as GitHub, Google, or Microsoft for login.
  • Good developer experience: Hoppscotch is useful for API exploration, support debugging, QA checks, onboarding, and lightweight internal API documentation.

Hoppscotch does not remove the need for secrets discipline. Treat it as a developer application that may contain sensitive request examples and environment variables. Start with a small user group, keep backups encrypted off-host, and review who has admin access.

Prerequisites

Hardware Recommendations:

  • 1 CPU core and 1 GB RAM for a small personal or homelab deployment
  • 2 CPU cores and 2 GB RAM for a small team using shared collections regularly
  • 20 GB free disk space to start, plus room for PostgreSQL growth, logs, and backup archives
  • SSD-backed storage for PostgreSQL
  • A second server, NAS, or object storage bucket for off-server backups

Software and Accounts:

  • Ubuntu 24.04 LTS server with sudo access
  • A domain such as hoppscotch.example.com
  • DNS A or AAAA record pointing the hostname to your server
  • Docker Engine and the Docker Compose v2 plugin
  • Nginx and Certbot for HTTPS
  • An OAuth provider account if you want team login through GitHub, Google, or Microsoft
  • SMTP credentials if you want email-related workflows
  • A password manager for PostgreSQL credentials, OAuth secrets, SMTP passwords, and DATA_ENCRYPTION_KEY

Security Notes:

  • Do not expose the Hoppscotch container directly to the internet. Bind it to 127.0.0.1 and publish only Nginx over ports 80 and 443.
  • Generate DATA_ENCRYPTION_KEY as a 32-character value and preserve it with backups. Losing encryption keys can make stored sensitive data unusable.
  • Hoppscotch's official environment examples require values without quotes and without spaces around =.
  • Register OAuth callback URLs exactly. For subpath access, the GitHub callback is https://hoppscotch.example.com/backend/v1/auth/github/callback.
  • Test a database restore before storing important API collections in the workspace.

Start with an updated host and a basic firewall:

sudo apt update
sudo apt upgrade -y
sudo apt install -y ca-certificates curl gnupg git ufw nginx certbot python3-certbot-nginx openssl

sudo ufw allow OpenSSH
sudo ufw allow 80/tcp
sudo ufw allow 443/tcp
sudo ufw enable
sudo ufw status

Installation Guide

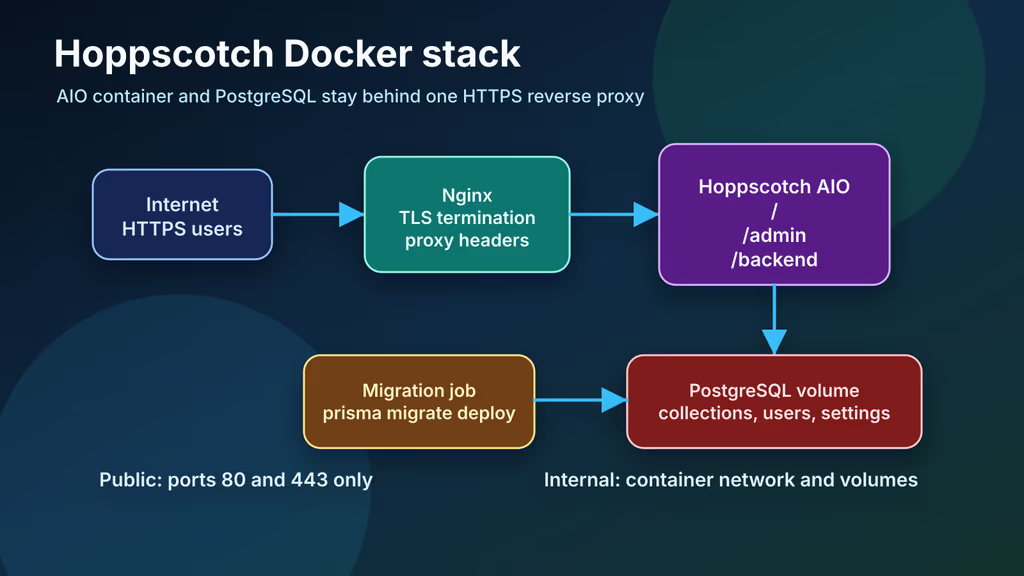
This deployment keeps Hoppscotch under /opt/hoppscotch. Docker Compose manages the Hoppscotch AIO container, PostgreSQL, and a migration job. Nginx terminates HTTPS and forwards traffic to the AIO container on localhost.

1. Install Docker Engine

Install Docker and confirm that Compose v2 is available:

curl -fsSL https://get.docker.com | sudo sh
sudo usermod -aG docker "$USER"
newgrp docker

docker --version
docker compose version

If your current shell does not pick up the Docker group, log out and back in before continuing.

2. Create the Hoppscotch Project Directory

Create a directory for the Compose file, environment file, and backup staging area:

sudo mkdir -p /opt/hoppscotch/backups
sudo chown -R "$USER":"$USER" /opt/hoppscotch
chmod 700 /opt/hoppscotch/backups
cd /opt/hoppscotch

Keep this directory readable only by the deployment user because .env contains database, OAuth, SMTP, and encryption settings.

3. Generate Secrets and Create .env

Generate a PostgreSQL password and a 32-character data encryption key, then write the first environment file:

cd /opt/hoppscotch

POSTGRES_PASSWORD_VALUE="$(openssl rand -base64 36 | tr -d '\n')"
DATA_ENCRYPTION_KEY_VALUE="$(openssl rand -hex 16)"

cat > .env <<EOF
POSTGRES_USER=hoppscotch
POSTGRES_PASSWORD=${POSTGRES_PASSWORD_VALUE}
POSTGRES_DB=hoppscotch
DATABASE_URL=postgresql://hoppscotch:${POSTGRES_PASSWORD_VALUE}@hoppscotch-db:5432/hoppscotch?connect_timeout=300

HOPP_AIO_ALTERNATE_PORT=80
DATA_ENCRYPTION_KEY=${DATA_ENCRYPTION_KEY_VALUE}
WHITELISTED_ORIGINS=https://hoppscotch.example.com,app://localhost_3200,app://hoppscotch

VITE_BASE_URL=https://hoppscotch.example.com
VITE_SHORTCODE_BASE_URL=https://hoppscotch.example.com
VITE_ADMIN_URL=https://hoppscotch.example.com/admin
VITE_BACKEND_GQL_URL=https://hoppscotch.example.com/backend/graphql
VITE_BACKEND_WS_URL=wss://hoppscotch.example.com/backend/graphql
VITE_BACKEND_API_URL=https://hoppscotch.example.com/backend/v1
VITE_APP_TOS_LINK=https://hoppscotch.example.com/terms
VITE_APP_PRIVACY_POLICY_LINK=https://hoppscotch.example.com/privacy

ENABLE_SUBPATH_BASED_ACCESS=true
EOF

chmod 600 .env
nano .env

The example uses a single domain with subpath access. If you use separate hostnames for the app, admin dashboard, and backend, update the VITE_* URLs and WHITELISTED_ORIGINS values to match the exact public URLs.

4. Create the Docker Compose File

Create compose.yaml:

services:
  hoppscotch:
    image: hoppscotch/hoppscotch:latest
    restart: unless-stopped
    env_file: ./.env
    depends_on:
      hoppscotch-db:
        condition: service_healthy
      hoppscotch-migrate:
        condition: service_completed_successfully
    ports:
      - "127.0.0.1:3080:80"
    healthcheck:
      test: ["CMD-SHELL", "wget -q --tries=1 --spider http://localhost || exit 1"]
      interval: 30s
      timeout: 5s
      retries: 5
      start_period: 45s

  hoppscotch-migrate:
    image: hoppscotch/hoppscotch:latest
    env_file: ./.env
    depends_on:
      hoppscotch-db:
        condition: service_healthy
    entrypoint: ["/bin/sh", "-c"]
    command: "pnpm exec prisma migrate deploy"
    restart: "no"

  hoppscotch-db:
    image: postgres:17
    restart: unless-stopped
    user: postgres
    env_file: ./.env
    volumes:
      - postgres_data:/var/lib/postgresql/data
    healthcheck:
      test: ["CMD-SHELL", "pg_isready -U $${POSTGRES_USER} -d $${POSTGRES_DB}"]
      interval: 10s
      timeout: 5s
      retries: 5

volumes:
  postgres_data:

The official Hoppscotch Docker documentation describes two Community Edition options: individual containers for the frontend, backend, and admin dashboard, or the AIO container. This guide uses AIO to keep the first production-shaped deployment small. For controlled production upgrades, pin hoppscotch/hoppscotch and postgres to versions you have tested.

 Hoppscotch Docker stack architecture

Caption: Nginx exposes one HTTPS domain while Hoppscotch AIO, the migration job, PostgreSQL, and Docker volumes stay on the server.

5. Start Hoppscotch

Pull images and start the stack:

cd /opt/hoppscotch
docker compose pull
docker compose up -d
docker compose ps
docker compose logs --since=2m hoppscotch-migrate hoppscotch

The migration service runs pnpm exec prisma migrate deploy before the AIO service starts. If the app reports a missing migration, run the migration container again and inspect its logs:

docker compose run --rm --entrypoint sh hoppscotch -c "pnpm exec prisma migrate deploy"
docker compose logs hoppscotch-migrate
6. Configure Nginx and HTTPS

Create /etc/nginx/sites-available/hoppscotch.example.com:

server {
    listen 80;
    listen [::]:80;
    server_name hoppscotch.example.com;

    client_max_body_size 50M;

    location / {
        proxy_http_version 1.1;
        proxy_set_header Host $host;
        proxy_set_header X-Real-IP $remote_addr;
        proxy_set_header X-Forwarded-For $proxy_add_x_forwarded_for;
        proxy_set_header X-Forwarded-Proto $scheme;
        proxy_set_header Upgrade $http_upgrade;
        proxy_set_header Connection "upgrade";
        proxy_pass http://127.0.0.1:3080;
    }
}

Enable the site and request a certificate:

sudo ln -s /etc/nginx/sites-available/hoppscotch.example.com /etc/nginx/sites-enabled/
sudo nginx -t
sudo systemctl reload nginx
sudo certbot --nginx -d hoppscotch.example.com

After Certbot finishes, open https://hoppscotch.example.com. The app should load at /, the admin dashboard should be available at /admin, and backend requests should route through /backend.

Configuration

OAuth Login

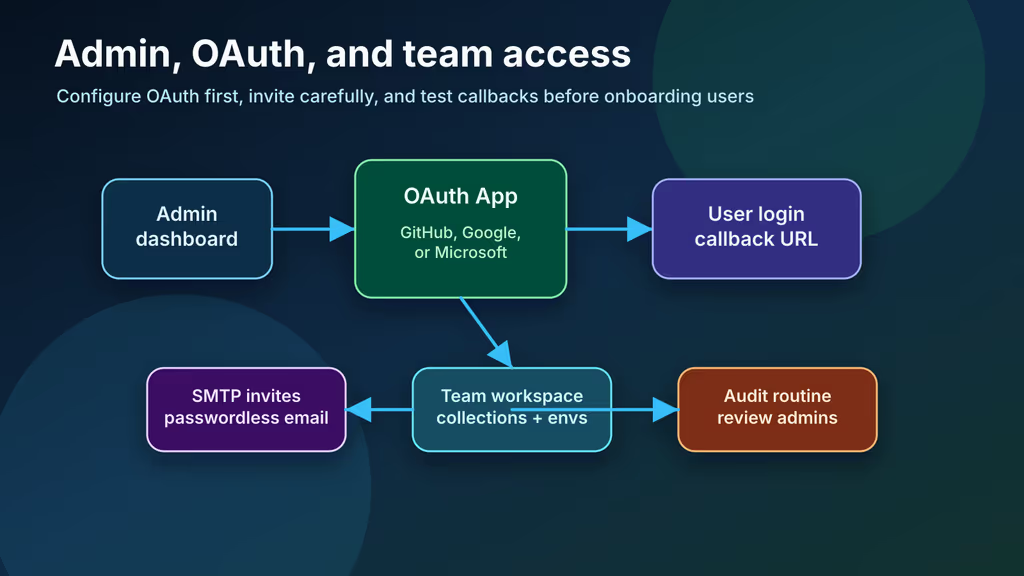
Hoppscotch Community Edition supports OAuth providers including GitHub, Google, and Microsoft. You can enter provider credentials during onboarding in the admin dashboard, or keep the values documented in your secret store. For GitHub, register an OAuth App with this callback URL:

GITHUB_CALLBACK_URL=https://hoppscotch.example.com/backend/v1/auth/github/callback
GITHUB_SCOPE=user:email

The callback URL must match exactly in both Hoppscotch and the provider settings. If you choose Google or Microsoft, follow the same pattern for the provider-specific callback URL shown by Hoppscotch's admin setup.

 Hoppscotch OAuth and admin flow

Caption: Configure OAuth, confirm callback URLs, invite a small test group, and review admin access before wider rollout.

SMTP and Email

If you want email-related workflows, configure SMTP values from the admin dashboard or your environment file according to the current Hoppscotch documentation. Use a transactional mail provider rather than a personal mailbox, then send a controlled test message before inviting real users. If your VPS provider blocks outbound SMTP, use the provider's documented relay port.

Backups

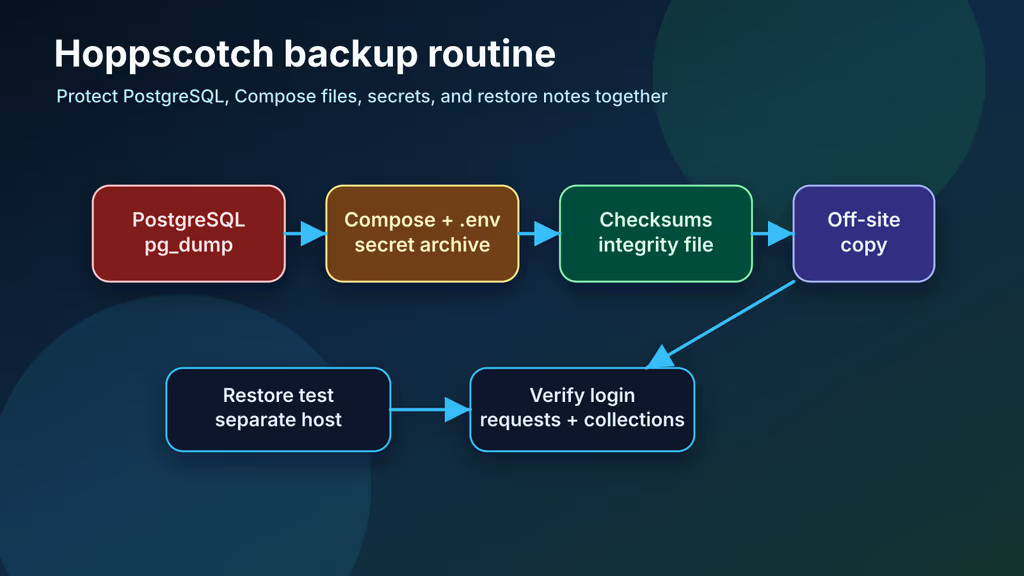
Back up PostgreSQL, the Compose file, and .env together:

cd /opt/hoppscotch
mkdir -p backups
BACKUP_DATE="$(date +%F-%H%M%S)"

docker compose exec -T hoppscotch-db pg_dump -U hoppscotch hoppscotch > "backups/hoppscotch-postgres-${BACKUP_DATE}.sql"
tar czf "backups/hoppscotch-config-${BACKUP_DATE}.tar.gz" compose.yaml .env
sha256sum backups/hoppscotch-*-"${BACKUP_DATE}".* > "backups/hoppscotch-${BACKUP_DATE}.sha256"

Copy the backup set off the server:

rsync -avh /opt/hoppscotch/backups/ backup-user@backup.example.com:/srv/backups/hoppscotch/

Practice a restore on a separate host. A useful restore test imports PostgreSQL, restores the same .env, starts Compose, confirms OAuth login, opens the admin dashboard, and verifies saved collections and environments.

 Hoppscotch backup routine

Caption: A reliable Hoppscotch backup includes PostgreSQL data, Compose configuration, secrets, checksums, an off-server copy, and a tested restore path.

Usage

First Login Checklist

After HTTPS and OAuth are configured:

  • Open https://hoppscotch.example.com and confirm the app loads over HTTPS.
  • Visit https://hoppscotch.example.com/admin and complete the initial admin setup.
  • Configure one OAuth provider and verify the callback URL.
  • Create a test user from a trusted account and confirm login works.
  • Create a collection with one REST request and one GraphQL query.
  • Add development and staging environments with non-sensitive example values first.
  • Restart the stack and confirm collections remain available.
  • Save the backup and restore instructions somewhere outside Hoppscotch.

Build the First Team Workspace

Start with a low-risk API collection before moving sensitive internal workflows into the tool:

  1. Health checks: Store unauthenticated /health, /version, or /status requests for internal services.
  2. Authentication examples: Document how developers request tokens, refresh sessions, and test authorization failures.
  3. GraphQL exploration: Save common queries and mutations with clear names.
  4. Environment conventions: Standardize environment names such as local, staging, and production-readonly.
  5. Support workflows: Add safe diagnostic requests that support engineers can run without production write access.

Keep secrets out of shared examples until access control and backups are proven. If a collection needs real credentials, store them in a limited environment, rotate them regularly, and document who owns them.

Screenshots and Visuals

The diagrams in this guide are original planning visuals:

  • The hero image frames Hoppscotch as a private API workspace.
  • The Docker stack diagram shows Nginx, AIO, migrations, PostgreSQL, and volumes.
  • The OAuth flow diagram shows admin setup, provider callbacks, team access, and review routines.
  • The backup routine diagram separates database dumps, configuration, checksums, off-server copies, and restore tests.

Troubleshooting

  • The app loads but API calls fail: Confirm VITE_BACKEND_GQL_URL, VITE_BACKEND_WS_URL, and VITE_BACKEND_API_URL use the public HTTPS domain and /backend path when subpath access is enabled.
  • OAuth returns invalid redirect_uri: The provider callback must exactly match https://hoppscotch.example.com/backend/v1/auth/github/callback for the GitHub example, including scheme and path.
  • Migration errors appear on first boot: Inspect docker compose logs hoppscotch-migrate; then run docker compose run --rm --entrypoint sh hoppscotch -c "pnpm exec prisma migrate deploy".
  • PostgreSQL connection fails: Confirm DATABASE_URL uses the Compose service name hoppscotch-db and that POSTGRES_PASSWORD matches the password embedded in the URL.
  • Nginx shows bad gateway: Check docker compose ps, confirm Hoppscotch is bound to 127.0.0.1:3080, and inspect docker compose logs --since=5m hoppscotch.
  • WebSocket requests fail: Verify the Nginx Upgrade and Connection headers are present and that VITE_BACKEND_WS_URL starts with wss:// on HTTPS.
  • Desktop app integration does not work: Confirm ENABLE_SUBPATH_BASED_ACCESS=true and include the app origins required by Hoppscotch in WHITELISTED_ORIGINS.
  • Backups restore without collections: Make sure the PostgreSQL dump was taken from the correct Compose project and database name.

Scaling, Securing, and Next Steps

For a small team, one VPS with Docker Compose is a practical starting point. As Hoppscotch becomes part of daily development, monitor container health, PostgreSQL disk usage, Nginx errors, certificate expiry, failed OAuth logins, backup age, and restore test results. Keep upgrades deliberate: read Hoppscotch release notes, take a backup, pull images, run migrations, restart the stack, and verify login, collections, GraphQL requests, admin access, and WebSocket behavior.

Security work should focus on access boundaries and recovery. Limit workspace admins, use OAuth providers with MFA, avoid storing high-value production secrets in shared environments, keep .env readable only by the deployment user, encrypt off-server backups, and rotate any credentials that appear in examples. If Hoppscotch exposes sensitive internal API behavior, consider restricting access with a VPN or identity-aware proxy in front of Nginx.

By following this guide, you now have a self-hosted Hoppscotch deployment with Docker Compose, PostgreSQL, migrations, HTTPS, subpath routing, OAuth planning, backup commands, and first-workspace guidance. Next, onboard a small test group, document your API collection conventions, rehearse a restore, and then decide which internal API workflows belong in a shared self-hosted client.

References

Share:

Get new posts in your inbox

No spam. One short email per new article — practical PHP, Laravel, devops, and AI-assisted workflows.

Comments

Powered by GitHub Discussions via Giscus. A free GitHub account is required.