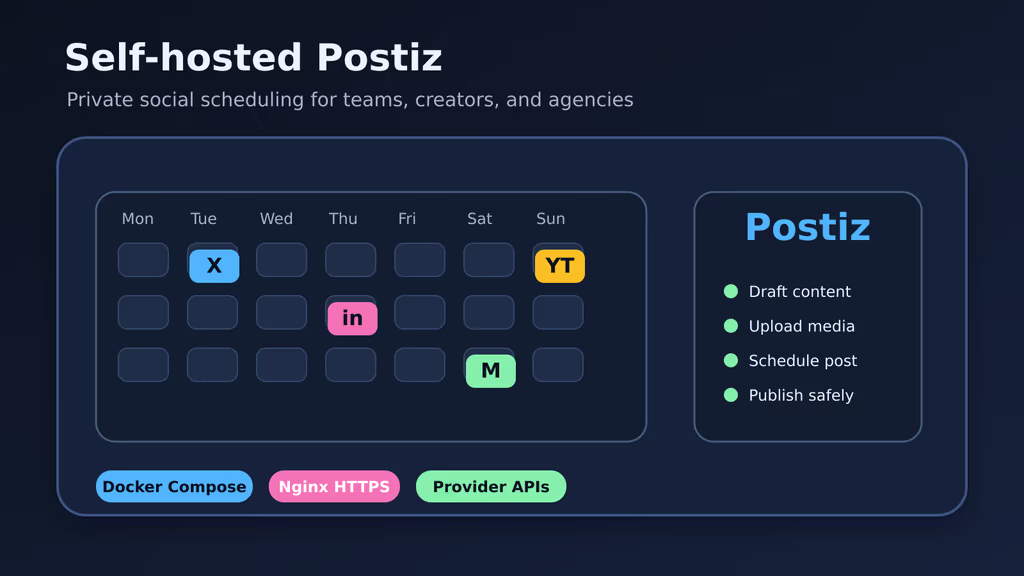
Caption: Postiz gives teams a private place to plan social content, connect publishing providers, and manage scheduled posts from their own infrastructure.
Introduction
Postiz is an open-source social media scheduling platform for creators, agencies, marketing teams, founders, and technical operators who want to plan posts without handing every workflow to a hosted SaaS account. A Postiz workspace can coordinate drafts, media uploads, publishing times, and provider connections for networks such as X, LinkedIn, Reddit, Facebook, YouTube, TikTok, Mastodon, Slack, Discord, and others supported by the project.
Self-hosting Postiz is attractive when social media operations touch private campaign calendars, unreleased product announcements, internal brand assets, or client workflows. You can run the service behind your own domain, control registration, decide who receives admin access, back up the database and uploads, and keep provider credentials inside your own deployment process. It is also useful for homelabs and small teams that want to understand every moving part before trusting a hosted scheduler.
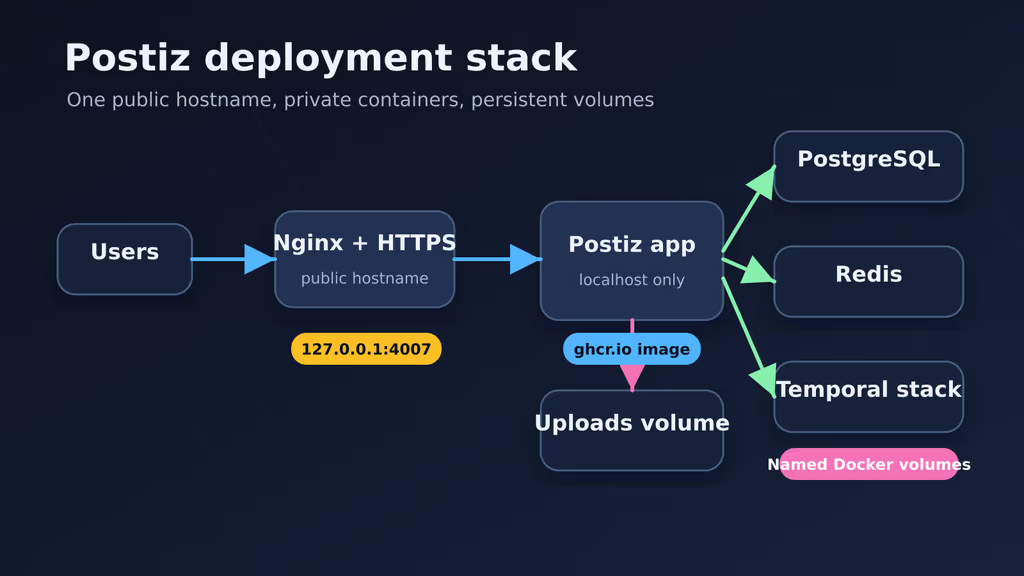
This guide installs Postiz on Ubuntu 24.04 LTS using the official Docker Compose repository maintained by the project. The current Postiz compose stack includes the application container, PostgreSQL, Redis, and a Temporal stack used for scheduled posts and background workflows. Nginx terminates HTTPS, the Postiz container stays bound to localhost, and provider API keys are added only after the base deployment is healthy.
Why Choose Postiz?
- Open-source scheduling: Postiz provides a self-hostable alternative for planning and publishing social content.
- Multi-provider workflows: The project supports many social providers and stores the related credentials in the deployment environment.
- Docker-first deployment: The official compose repository is the canonical source for the services, networks, volumes, and Temporal configuration.
- Private campaign calendar: Drafts, media, and schedules stay under your infrastructure and backup policy.
- Team-friendly operations: A small marketing or product team can share a private workspace instead of scattering credentials across personal tools.
- Storage flexibility: Local uploads are simple for a first deployment, while Cloudflare R2 can be configured when object storage is preferred.
- Good sysadmin visibility: PostgreSQL, Redis, Temporal, uploads, and app logs can be monitored and backed up like the rest of your stack.
Postiz is not a fire-and-forget appliance. Social providers change APIs, OAuth callback rules, rate limits, review requirements, and media rules. Treat the application like a production service: keep the compose repository current, review release notes before upgrades, test provider connections after changes, and keep provider secrets out of public repositories.
Prerequisites
Hardware Recommendations:
- 2 CPU cores and 4 GB RAM for a small team deployment
- 4 CPU cores and 8 GB RAM if many scheduled posts, provider connections, or media uploads are expected
- 40 GB free disk space to start, plus room for PostgreSQL, Redis persistence, uploads, Temporal data, logs, and backups
- SSD-backed storage for PostgreSQL and Temporal services
- Off-server storage such as another VPS, NAS, or object storage bucket for encrypted backups
Software and Accounts:
- Ubuntu 24.04 LTS server with sudo access
- A domain such as
postiz.example.com - DNS
AorAAAArecord pointing that hostname to the server - Docker Engine and Docker Compose v2
- Git, Nginx, Certbot, OpenSSL, and curl
- Social provider developer accounts for the networks you want Postiz to publish to
- A password manager for generated secrets, OAuth credentials, and recovery notes
Security Notes:
- Do not expose Postiz directly to the public internet. Bind the app port to
127.0.0.1and publish only Nginx over ports80and443. - Generate a unique
JWT_SECRETand PostgreSQL password before first start. - Set
DISABLE_REGISTRATIONtotrueafter creating the users you need, or keep registration protected by another access control layer. - Store provider credentials outside Git. If you must automate changes, keep secrets in a private deployment system.
- Back up database volumes, uploads, Postiz configuration, and the exact compose repository revision together.
- Test scheduled publishing with low-risk accounts before connecting client or production brand channels.
Start with an updated host and a restrictive firewall:
sudo apt update
sudo apt upgrade -y
sudo apt install -y ca-certificates curl git gnupg openssl ufw nginx certbot python3-certbot-nginx python3
sudo ufw allow OpenSSH
sudo ufw allow 80/tcp
sudo ufw allow 443/tcp
sudo ufw enable
sudo ufw status
Installation Guide
The official Postiz documentation recommends using the gitroomhq/postiz-docker-compose repository as the source of truth for Docker Compose. That matters because the service list and environment variables change over time. This guide clones the repository, applies deployment-specific values, and keeps the upstream file easy to diff during upgrades.
1. Install Docker Engine
Install Docker and confirm the Compose plugin is available:
curl -fsSL https://get.docker.com | sudo sh
sudo usermod -aG docker "$USER"
newgrp docker
docker --version
docker compose version
If the Docker group is not active in your current shell, log out and back in before continuing.
2. Clone the Official Compose Repository
Create the application directory and clone the official repository:
sudo mkdir -p /opt/postiz
sudo chown -R "$USER":"$USER" /opt/postiz
chmod 750 /opt/postiz
git clone https://github.com/gitroomhq/postiz-docker-compose /opt/postiz
cd /opt/postiz
git status --short
git log -1 --oneline
Keep this directory private. It will contain generated secrets and provider API credentials inside the compose environment.
3. Generate Deployment Secrets
Generate values for the public domain, application signing secret, and PostgreSQL password. Hex values avoid URL escaping problems inside DATABASE_URL.
cd /opt/postiz
export POSTIZ_DOMAIN="postiz.example.com"
export POSTIZ_DB_PASSWORD="$(openssl rand -hex 24)"
export POSTIZ_JWT_SECRET="$(openssl rand -hex 32)"
printf 'Postiz domain: %s\n' "$POSTIZ_DOMAIN"
printf 'Postiz database password: %s\n' "$POSTIZ_DB_PASSWORD"
printf 'Postiz JWT secret: %s\n' "$POSTIZ_JWT_SECRET"
Save both secrets in a password manager. You need the database password for manual database access and recovery, and the JWT secret should remain stable unless you intentionally invalidate existing sessions.
4. Harden docker-compose.yaml
The upstream compose file includes sample localhost URLs and placeholder credentials. Apply the minimum production edits, then review the diff:
cd /opt/postiz
cp docker-compose.yaml docker-compose.yaml.original
python3 - <<'PY'
from pathlib import Path
import os
import re
path = Path("docker-compose.yaml")
text = path.read_text()
domain = os.environ["POSTIZ_DOMAIN"]
db_password = os.environ["POSTIZ_DB_PASSWORD"]
jwt_secret = os.environ["POSTIZ_JWT_SECRET"]
replacements = {
r"MAIN_URL:\s*'[^']*'": f"MAIN_URL: 'https://{domain}'",
r"FRONTEND_URL:\s*'[^']*'": f"FRONTEND_URL: 'https://{domain}'",
r"NEXT_PUBLIC_BACKEND_URL:\s*'[^']*'": f"NEXT_PUBLIC_BACKEND_URL: 'https://{domain}/api'",
r"JWT_SECRET:\s*'[^']*'": f"JWT_SECRET: '{jwt_secret}'",
r"DATABASE_URL:\s*'[^']*'": f"DATABASE_URL: 'postgresql://postiz-user:{db_password}@postiz-postgres:5432/postiz-db-local'",
r"DISABLE_REGISTRATION:\s*'[^']*'": "DISABLE_REGISTRATION: 'true'",
r"POSTGRES_PASSWORD:\s*[^\n]+": f"POSTGRES_PASSWORD: {db_password}",
}
for pattern, value in replacements.items():
text = re.sub(pattern, value, text)
text = text.replace('- "4007:5000"', '- "127.0.0.1:4007:5000"')
path.write_text(text)
PY
git diff -- docker-compose.yaml
The important outcomes are:
MAIN_URLandFRONTEND_URLpoint tohttps://postiz.example.comNEXT_PUBLIC_BACKEND_URLpoints tohttps://postiz.example.com/apiJWT_SECRETis uniqueDATABASE_URLmatches the PostgreSQL passwordDISABLE_REGISTRATIONistrue- The public Postiz port is bound to
127.0.0.1:4007:5000
Caption: The Postiz compose stack runs the app, PostgreSQL, Redis, and Temporal services privately while Nginx publishes one HTTPS hostname.
5. Start Postiz
Validate the compose file, pull images, and start the stack:
cd /opt/postiz
docker compose config
docker compose pull
docker compose up -d
docker compose ps
Postiz may take several minutes on the first start because PostgreSQL, Redis, Temporal PostgreSQL, Elasticsearch, Temporal, and the app all need to initialize. Watch the logs until the app and dependency health checks settle:
docker compose logs --since=10m postiz postiz-postgres postiz-redis temporal temporal-postgresql temporal-elasticsearch
docker compose ps
curl -I http://127.0.0.1:4007/
If the app is not ready yet, wait and inspect the logs again. Avoid repeatedly deleting volumes during the first boot; fix configuration problems first so you do not lose useful error context.
6. Configure Nginx and HTTPS
Create /etc/nginx/sites-available/postiz.example.com:
server {
listen 80;
listen [::]:80;
server_name postiz.example.com;
client_max_body_size 100m;
location / {
proxy_http_version 1.1;
proxy_set_header Host $host;
proxy_set_header X-Real-IP $remote_addr;
proxy_set_header X-Forwarded-For $proxy_add_x_forwarded_for;
proxy_set_header X-Forwarded-Proto $scheme;
proxy_set_header Upgrade $http_upgrade;
proxy_set_header Connection "upgrade";
proxy_read_timeout 300;
proxy_pass http://127.0.0.1:4007;
}
}
Enable the site and request a certificate:
sudo ln -s /etc/nginx/sites-available/postiz.example.com /etc/nginx/sites-enabled/postiz.example.com
sudo nginx -t
sudo systemctl reload nginx
sudo certbot --nginx -d postiz.example.com
sudo systemctl reload nginx
Open https://postiz.example.com and create the first account if registration is enabled for initial setup. If you keep DISABLE_REGISTRATION=true before any user exists, temporarily allow registration from a trusted network or place the site behind a private access layer while creating the first admin user.
Configuration
Postiz is configured entirely through environment variables. The official compose file contains the main groups: required app URLs, storage settings, social provider credentials, OAuth settings, observability settings, payment settings, and optional short-link services.
For a small private deployment, start with the base stack and local upload storage:
STORAGE_PROVIDER: 'local'
UPLOAD_DIRECTORY: '/uploads'
NEXT_PUBLIC_UPLOAD_DIRECTORY: '/uploads'
Local storage is easy to back up with the Docker volume, but it lives on the same server as the application. If scheduled posts include many images or videos, plan capacity carefully. When you need object storage, use the Cloudflare R2 settings documented in the official compose file and keep the bucket private unless the Postiz docs for your version require a public delivery URL.
Provider credentials are added to the same environment block. For example, X and LinkedIn values use these keys in the compose file:
X_API_KEY=
X_API_SECRET=
LINKEDIN_CLIENT_ID=
LINKEDIN_CLIENT_SECRET=
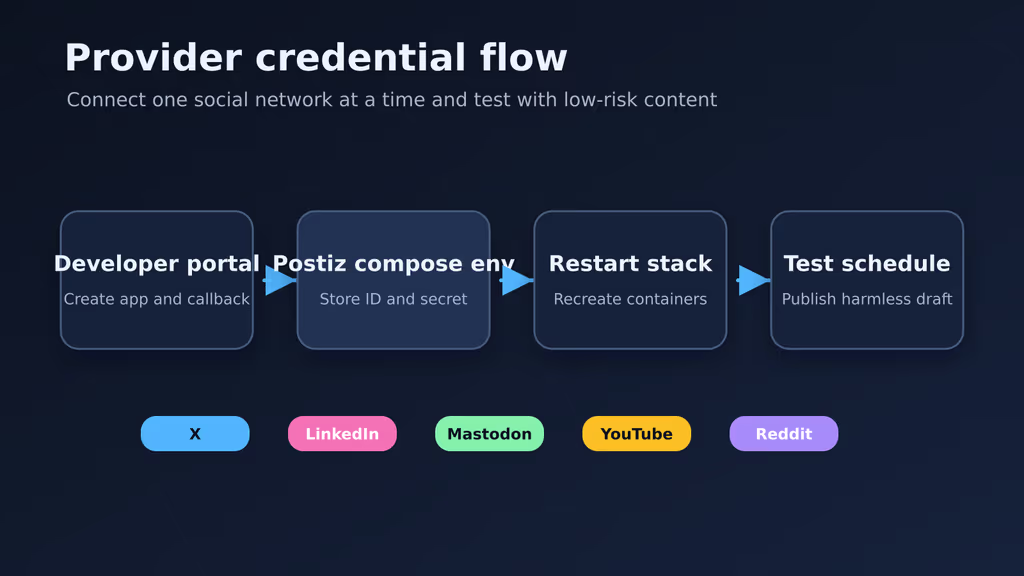
Each provider has its own developer portal, callback URL rules, scopes, and review process. Configure one provider at a time, restart the stack, and test with a harmless draft post before adding the next provider.
When environment variables change, recreate the containers:
cd /opt/postiz
docker compose down
docker compose up -d
docker compose logs --since=5m postiz
Use docker compose down without -v for normal configuration changes. The -v flag deletes named volumes and can remove PostgreSQL data, Redis data, uploads, and Temporal state.
Caption: Add social providers one at a time, verify callback URLs, store credentials securely, and test with low-risk posts before production scheduling.
Usage
After the HTTPS site loads, work through a small acceptance checklist before inviting the whole team:
- Sign in to the first administrator account.
- Confirm the public URL in the browser is
https://postiz.example.com. - Upload a small test image and verify it displays correctly.
- Connect one provider using its official developer credentials.
- Create a low-risk draft post scheduled a few minutes in the future.
- Watch
docker compose logs -f postiz temporalwhile the scheduled time passes. - Confirm the post publishes or that Postiz reports a provider-specific error clearly.
- Disable public registration if it was temporarily enabled for setup.
- Add only the team members who need scheduling access.
- Document the provider accounts, callback URLs, and recovery process.
For day-to-day operation, keep campaign planning in Postiz and secret management outside it. If a provider token is compromised, revoke it in the provider portal, update the Postiz environment, restart the stack, and verify the old token no longer works.
Screenshots and Visuals
The diagrams in this post are original deployment visuals for the self-hosted setup. Use them as a quick mental model:
- The cover image shows the private scheduling workspace.
- The stack diagram shows Nginx, Postiz, PostgreSQL, Redis, and Temporal.
- The provider flow diagram shows how credentials move from provider developer portals into Postiz.
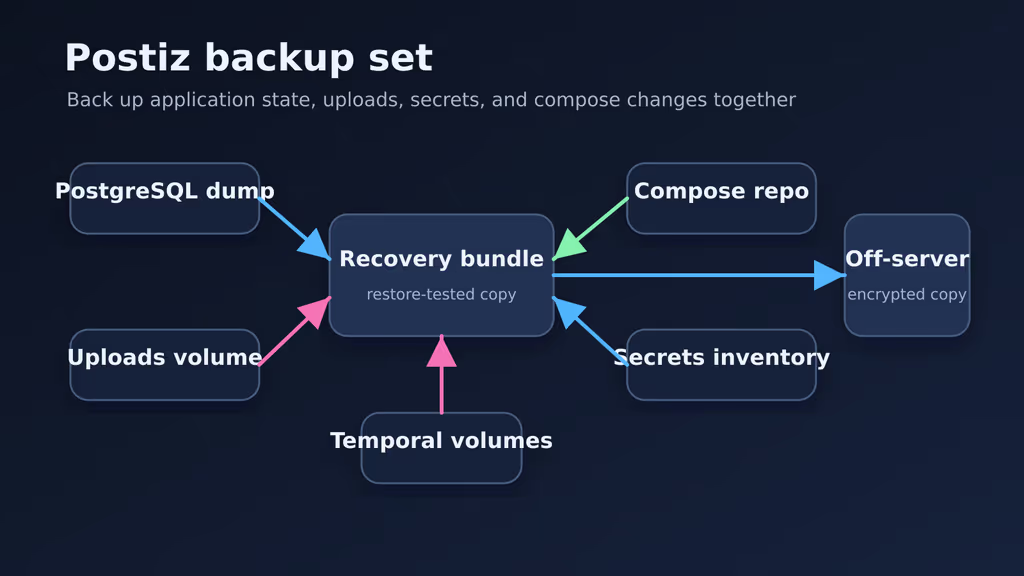
- The backup diagram below shows which state should be protected together.
Caption: Back up the compose repository, PostgreSQL volume, Redis data, uploads, Temporal data, and secret inventory as one recovery set.
Troubleshooting
- The site works on localhost but not through the domain: Check DNS, Nginx
server_name, Certbot certificate status, and firewall rules for ports80and443. - Postiz redirects to localhost: Review
MAIN_URL,FRONTEND_URL, andNEXT_PUBLIC_BACKEND_URL, then recreate containers withdocker compose downanddocker compose up -d. - The app cannot connect to PostgreSQL: Confirm
DATABASE_URLuses the same user, password, host, port, and database as thepostiz-postgresservice. - Temporal services are unhealthy: Inspect
temporal,temporal-postgresql, andtemporal-elasticsearchlogs. Low memory or disk pressure often shows up first in Elasticsearch. - Provider login fails: Verify the provider callback URL, client ID, client secret, scopes, and whether the provider application is still in development mode.
- Media uploads fail: Check the upload volume,
client_max_body_sizein Nginx, storage provider settings, and container logs. - Scheduled posts do not run: Confirm
RUN_CRONistrue, Temporal is healthy, server time is correct, and the provider token is still valid. - Registration is blocked during first setup: Temporarily set
DISABLE_REGISTRATIONtofalse, create the first admin from a trusted network, then set it back totrue.
Scaling, Securing, and Next Steps
A successful Postiz deployment gives you a private social scheduling workspace with HTTPS, persistent storage, provider credentials, and a repeatable Docker Compose base. The outcome of following this guide is a working server at https://postiz.example.com where your team can connect providers, upload media, schedule posts, and recover the service from documented backups.
Before relying on it for production campaigns, add monitoring and backups. At minimum, schedule a daily database dump, copy upload data off-server, and keep a copy of the compose repository revision and generated secrets. A simple backup routine can look like this:
cd /opt/postiz
mkdir -p backups
docker compose exec -T postiz-postgres pg_dump -U postiz-user postiz-db-local > "backups/postiz-db-$(date +%F).sql"
docker run --rm -v postiz_postiz-uploads:/uploads:ro -v "$PWD/backups:/backups" alpine \
tar -czf "/backups/postiz-uploads-$(date +%F).tar.gz" -C / uploads
tar -czf "backups/postiz-config-$(date +%F).tar.gz" docker-compose.yaml dynamicconfig
Copy the resulting files to encrypted off-server storage and test a restore on a staging machine. If your Docker Compose project name differs, check volume names with docker volume ls and adjust the upload volume name.
For upgrades, pull the official compose repository changes into a staging clone first:
cd /opt/postiz
git fetch origin main
git diff HEAD..origin/main -- docker-compose.yaml
Review any changed environment variables, service names, image versions, and Temporal settings before merging. Then back up, pull images, and restart:
docker compose pull
docker compose up -d
docker compose ps
docker compose logs --since=10m postiz temporal
The safest next steps are to configure one provider, invite one internal tester, and run a full publish cycle with non-sensitive content. After that, add monitoring for disk space, container health, certificate renewal, and backup freshness.